
Здравствуйте, Владимир! У меня целая эпопея с восстановлением хранилища оригинальных компонентов Windows 10. Нужен Ваш совет, думаю я Вас пойму, так как считаю себя опытным пользователем. Установленная на моём ноутбуке Windows 10 работает со значительными ошибками. Решил проверить целостность системных файлов с помощью средства sfc /scannow, но вышла ошибка «Программа защиты ресурсов Windows обнаружила повреждённые файлы, но не может восстановить некоторые из них». Как я понял, ошибка эта обозначает, что нарушена целостность самого хранилища системных компонентов Win 10 (папка WinSxS). Тогда решил проверить целостность этого самого хранилища командой Dism /Online /Cleanup-Image /ScanHealth, вышло сообщение «Хранилище компонентов подлежит восстановлению». Соответственно восстанавливаю хранилище командой Dism /Online /Cleanup-Image /RestoreHealth, данная команда восстанавливает хранилище компонентов с помощью Центра обновлений Windows, и у меня опять выходит ошибка «Не удалось скачать исходные файлы. Укажите расположение файлов, необходимых для восстановления компонента, с помощью параметра «Источник»».
Непонятно, почему вылезла ошибка в этот раз, ведь интернет у меня есть. Ладно думаю, буду использовать для восстановления хранилища компонентов средство PowerShell и ISO-образ Windows 10, скачал дистрибутив Windows 10 и подсоединил его к виртуальному дисководу, запустил PowerShell и ввёл команду: Repair-WindowsImage -Online -RestoreHealth -Source F:sourcesinstall.wim:1 (где буква «F» соответствует букве подключенного образа с Win 10, а цифра «1» — индексу издания в образе Win 10 PRO (именно она у меня установлена), но и в очередной раз я потерпел неудачу — «Ошибка: 0x800f081. Сбой восстановления. Не найден источник восстановления, или хранилище компонентов восстановить невозможно».
На одном известном форуме подсказали, что не нужно подсоединять ISO-образ Windows 10 к виртуальному дисководу, а нужно смонтировать ISO-образ с файлами Win 10 в папку с помощью команды: Dism /Mount-Wim /WimFile:F:sourcesinstall.wim /index:1 /MountDir:C:WIM /ReadOnly (где WIM, это пустая папка на диске C:, в которую монтируется ISO-образ, а F:sourcesinstall.wim — местонахождение файла-образа install.wim), но у меня и здесь уже при монтировании вышел промах «Ошибка: 11. Была сделана попытка загрузить программу, имеющую неверный формат».
Короче я сдался и не знаю, почему у меня ничего не получается.
Автор — Владимир
Привет, друзья. Цель данной статьи рассказать начинающим пользователям в подробностях, как производить восстановление повреждённого хранилища компонентов Windows 10 в различных критических ситуациях. Если вы хотите проверить целостность системных файлов в своей операционной системе, то поможет вам в этом встроенная утилита «sfc /scannow», но если она выдаст ошибку: «Программа защиты ресурсов Windows обнаружила повреждённые файлы, но не может восстановить некоторые из них»,

то значит в вашей OS нарушена целостность самого хранилища системных компонентов (содержимое папки WinSxS). В этом случае нужно проверить целостность хранилища компонентов командой «Dism /Online /Cleanup-Image /ScanHealth», если при данной проверке тоже будут выходить различные ошибки, например, «Хранилище компонентов подлежит восстановлению», «Ошибка: 1910 Не найден указанный источник экспорта объекта», «Ошибка: 1726 Сбой при удалённом вызове процедуры»,
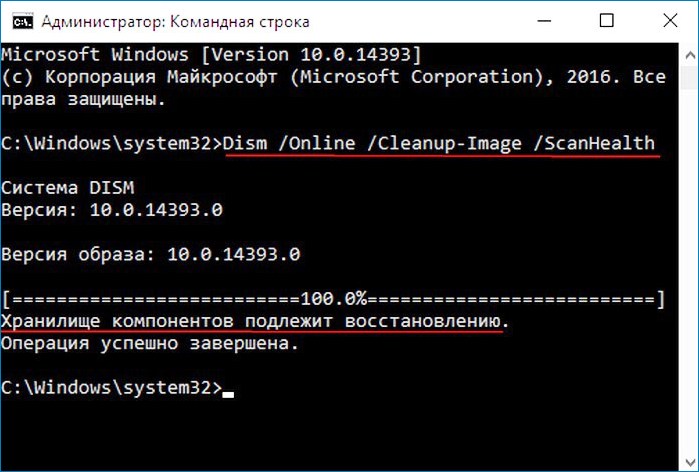
то в этом случае нужно сначала восстановить хранилище компонентов, а уже затем восстанавливать целостность системных файлов с помощью «sfc /scannow», вот здесь начинается самое интересное, так как имеется очень много нюансов, давайте разберём их все.
Запускаем командную строку администратора и вводим команду:
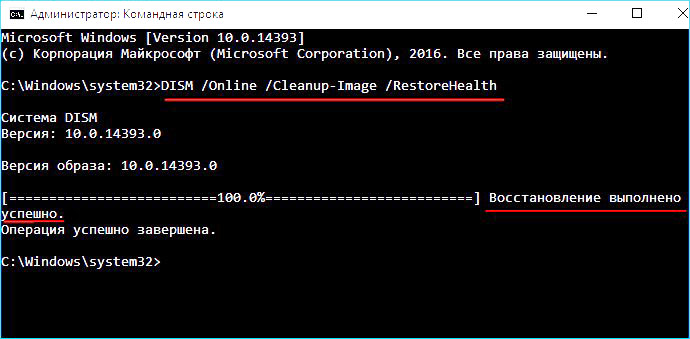
Dism /Online /Cleanup-Image /RestoreHealth
Данная команда восстанавливает хранилище компонентов с помощью Центра обновлений Windows (у вас должен работать Интернет), отсутствующие компоненты будут скачаны на серверах Майкрософт и восстановлены в вашей системе. В итоге должны получить сообщение «Восстановление выполнено успешно».
Но если данная команда выдаст ошибку 0x800f0906 «Не удалось скачать исходные файлы. Укажите расположение файлов, необходимых для восстановления компонента, с помощью параметра «Источник»» или

выйдет другая ошибка 0x800f081f «Не удалось найти исходные файлы. Укажите расположение файлов, необходимых для восстановления компонента, с помощью параметра «Источник»»,
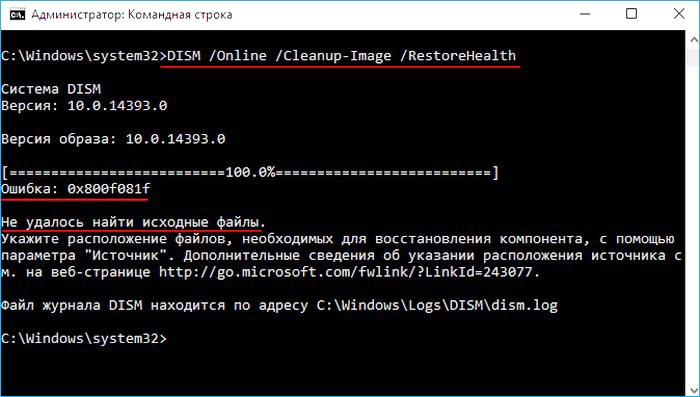
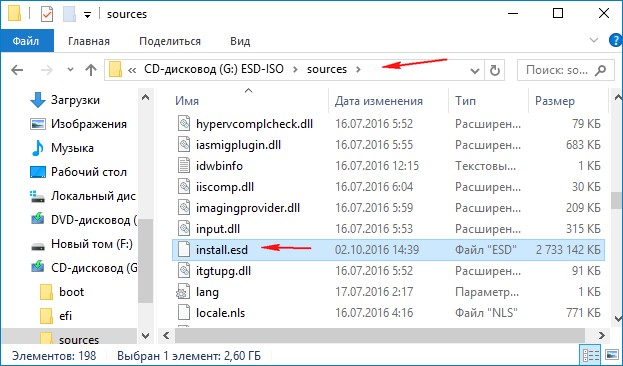
то нужно использовать для восстановления хранилища ISO-образ Windows 10. Скачиваем дистрибутив Windows 10 на сайте Майкрософт и подсоединяем его к виртуальному дисководу (в моём случае (G:)), затем заходим в папку sources и смотрим какое сжатие у файла-образа Windows 10,
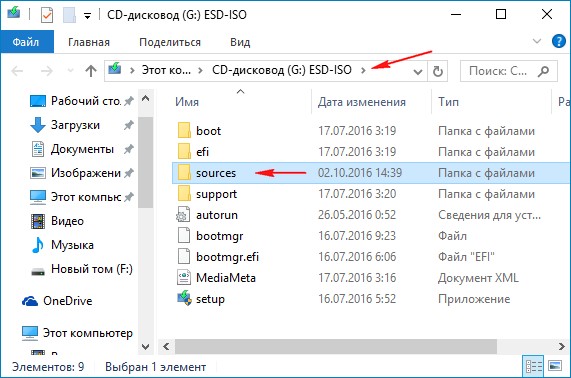
обычно бывает install.esd, запоминаем это, пригодится при вводе последующих команд (если в вашем случае попадётся файл install.wim, то читайте информацию в конце статьи).
соответственно вводим следующую команду:
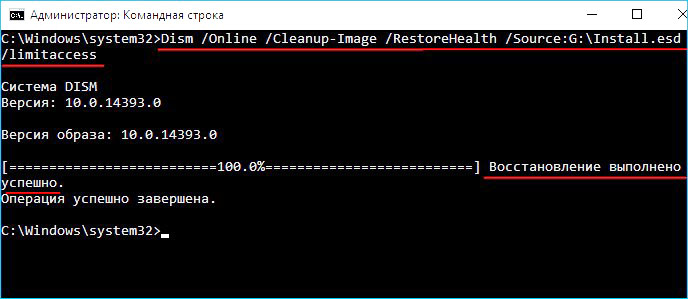
Dism /Online /Cleanup-Image /RestoreHealth /Source:G:Install.esd /limitaccess
где G: — буква виртуального дисковода с Windows 10,
Install.esd — файл-образ Win 10,
/limitaccess — параметр, закрывающий доступ к центру обновлений (ведь мы используем для восстановления дистрибутив Win 10)
В итоге получаем сообщение «Восстановление выполнено успешно. Операция успешно завершена».
Вот таким способом мы с вами восстановили повреждённое хранилище компонентов Windows 10.
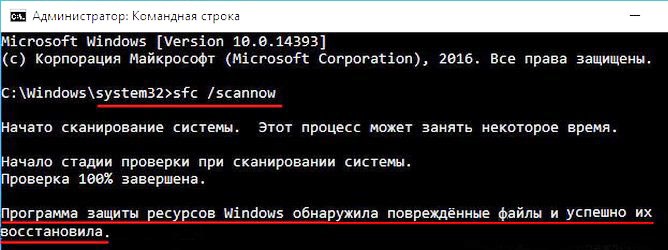
Хранилище компонентов восстановлено, теперь восстанавливаем целостность системных файлов Windows 10 командой «sfc /scannow». Получаем сообщение «Программа защиты ресурсов Windows обнаружила повреждённые файлы и успешно их восстановила». Целостность системных файлов Windows 10 восстановлена.
Ещё один способ восстановления хранилища компонентов с помощью файла виртуального жёсткого диска VHD
Друзья, но хочу сказать вам, что в особо сложных случаях, при вводе команды:
Dism /Online /Cleanup-Image /RestoreHealth /Source:G:Install.esd /limitaccess
вы опять получите ошибку, к примеру, «Ошибка: 1726 Сбой при удалённом вызове процедуры».
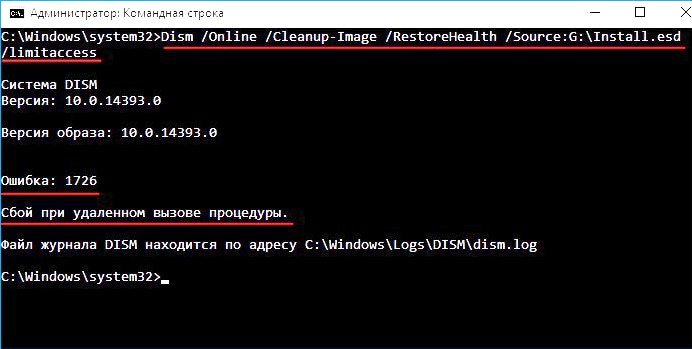
В этом случае нужно поступить так. Создать виртуальный жёсткий диск и распаковать на него содержимое файла-образа install.esd, после этого запустить команду:
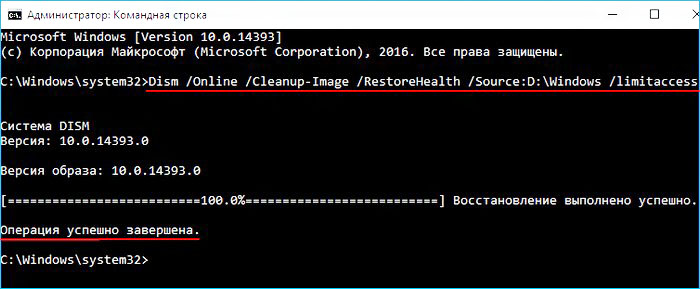
Dism /Online /Cleanup-Image /RestoreHealth /Source:D:Windows /limitaccess
Где D: — буква подсоединённого виртуального диска VHD с развёрнутыми файлами Windows 10.
в результате будет произведено восстановление хранилища компонентов за счёт распакованных на виртуальный диск VHD файлов операционной системы.
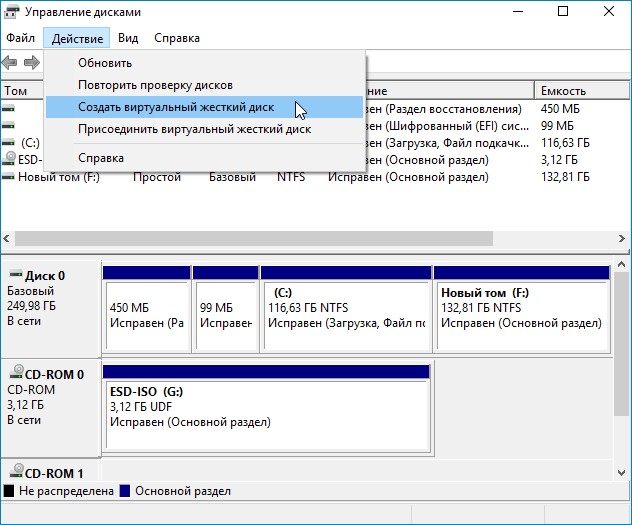
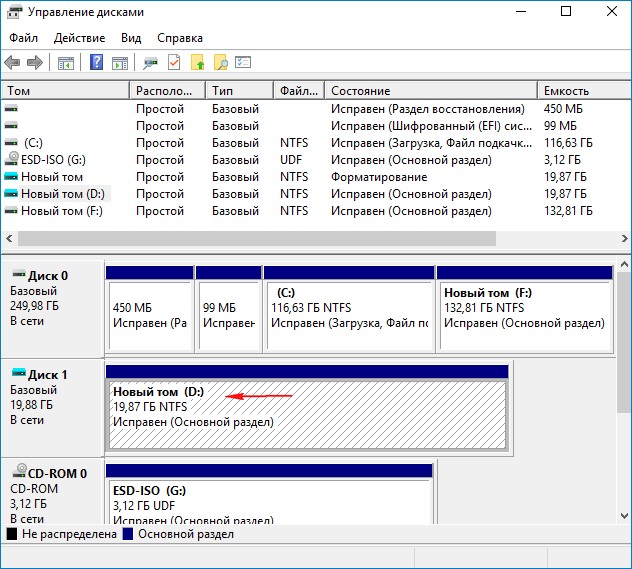
Идём в Управлении дисками и создаём виртуальный диск VHD. «Действие»—>«Создать виртуальный жёсткий диск»
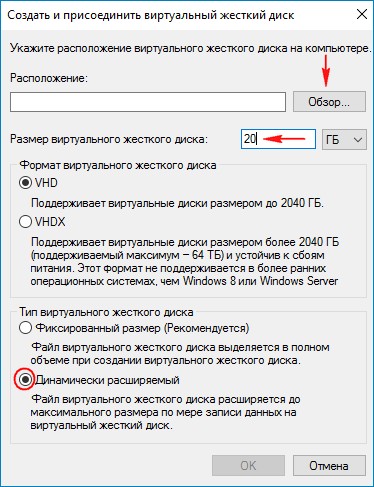
Отмечаем пункт «Динамический расширяемый». Размер виртуального жёсткого диска — 20 Гб. Жмём на кнопку «Обзор».
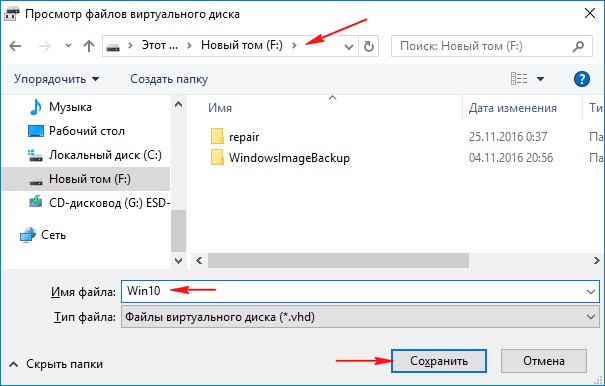
Выбираем в проводнике место сохранения виртуального жёсткого диска. Я выберу диск (F:). Присваиваю имя виртуальному диску — «Win10» и жму кнопку «Сохранить».
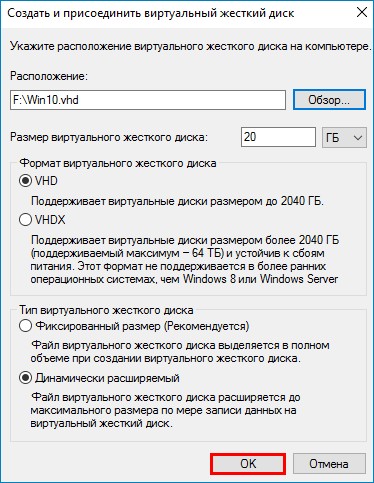
«ОК»
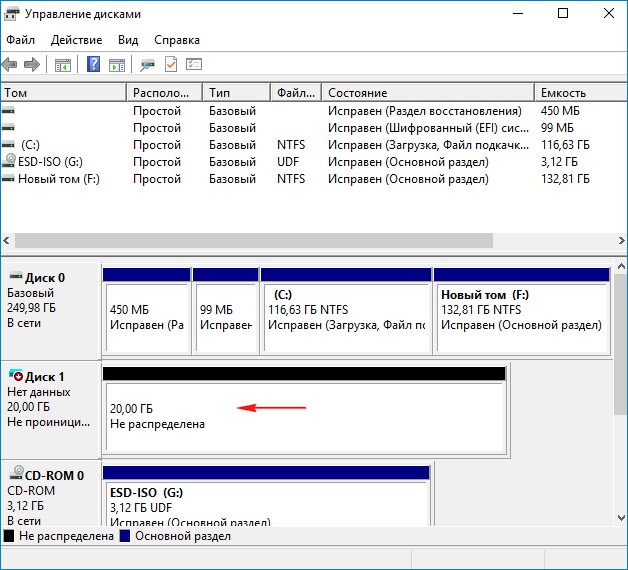
Созданный виртуальный диск представляет из себя в Управлении дисками нераспределённое пространство (Диск 1) размером 20 Гб.
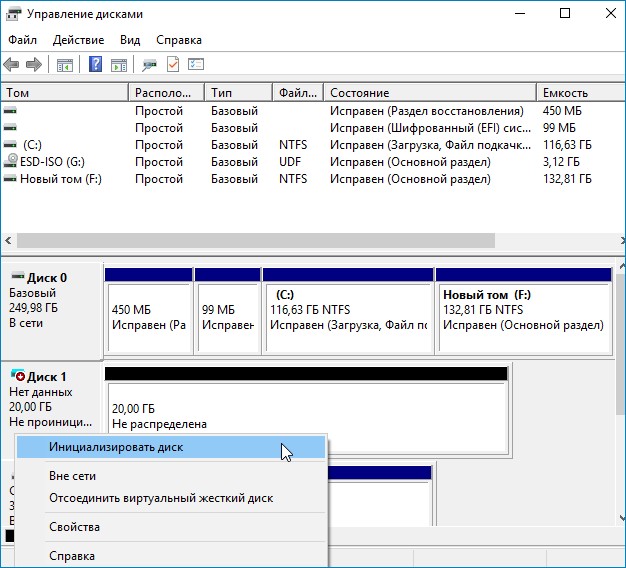
Щёлкаем на Диске 1 правой мышью и выбираем «Инициализировать диск»
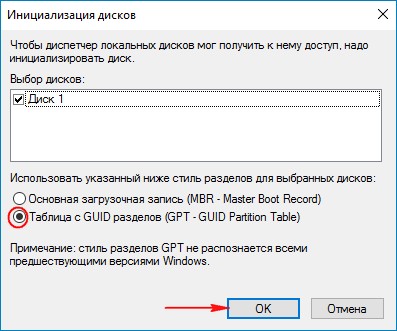
По большему счёту всё равно какой пункт отмечать — MBR или GPT. Я отмечу пункт «Таблица с GUID разделов (GPT)» и жму «ОК»
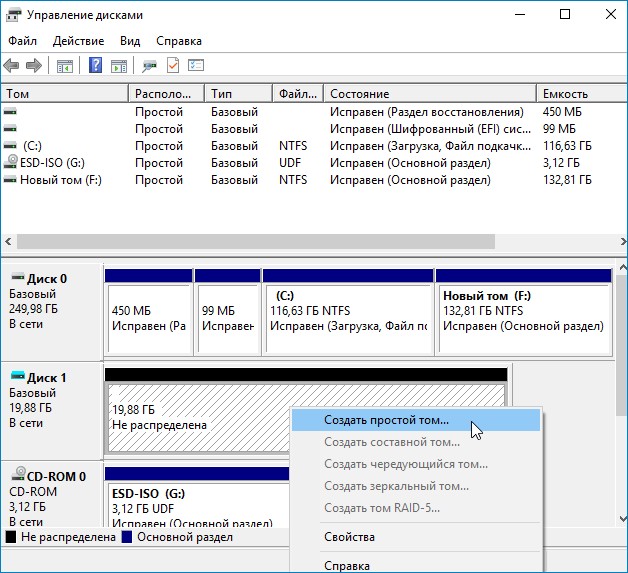
После инициализации диска создаём на нераспределённом пространстве простой том.
Новый том (G:) создан.
Архивы операционной системы — install.esd или install.wim могут содержать в себе несколько других архивов (релизов) операционных систем (Про, Домашняя и т.д.) и этим образам присваиваются индексы 1, 2, 3, 4. Чтобы узнать, какие образы находятся внутри нашего файла install.esd, вводим команду:
Dism /Get-WimInfo /WimFile:G:\sourcesinstall.esd
Где G: буква виртуального дисковода с Windows 10,
sourcesinstall.esd — адрес файла-образа install.esd в дистрибутиве Win 10.
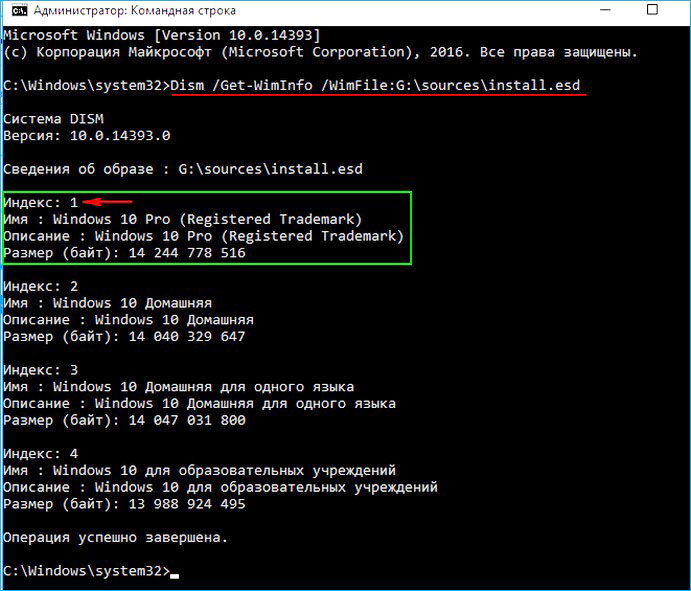
На моём компьютере установлена Windows 10 PRO и именно её я хочу восстановить. Нужный мне образ Win 10 PRO имеет индекс 1.
Вводим команду:
Dism /apply-image /imagefile:G:\sourcesinstall.esd /index:1 /ApplyDir:D:\
Где G:sources — адрес расположения файла install.esd,
index:1 — индекс Windows 10 PRO,
D: — подключенный виртуальный диск VHD (раздел D:).
Операция успешно завершена.
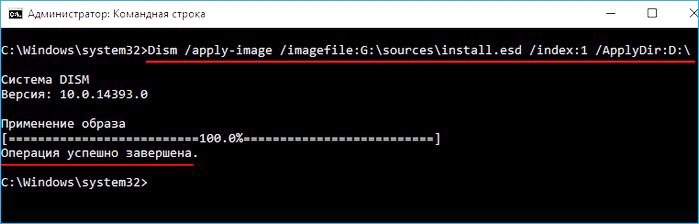
Файл install.esd (Win 10 PRO) развёрнут на виртуальный диск VHD (раздел D:).
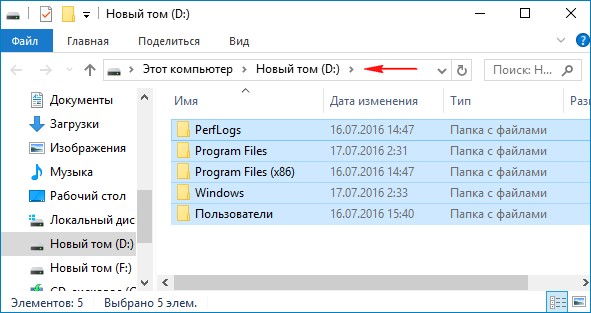
Ну и теперь восстанавливаем хранилище компонентов за счёт распакованных на виртуальный диск VHD (раздел D:) файлов операционной
системы Win 10, командой:
Dism /Online /Cleanup-Image /RestoreHealth /Source:D:Windows /limitaccess
Восстановление выполнено успешно. Операция успешно завершена.
Вот таким ещё способом мы с вами восстановили повреждённое хранилище компонентов Windows 10! Теперь восстанавливаем целостность системных файлов Windows 10 командой «sfc /scannow».
В конце статьи вам пригодится такая информация. Если в ISO-образе Windows 10, в папке sourses, вам попадётся вместо файла install.esd файл install.wim, то команда восстановления немного изменится:
Dism /Online /Cleanup-Image /RestoreHealth /Source:G:install.wim /limitaccess
Это команда восстановления хранилища компонентов.
- Remove From My Forums

SOLVED: Writing RPi2 image to SD Card: dism Error: 1168 — cannot find element
-
Question
-
Hello all,
I have installed Windows 10 build 10074 (Dutch language) on a PC, no VM.
I have downloaded and extracted Windows_IoT_Core_RPI2_BUILD.zip
One of the files extracted is Flash.ffu
I have established that my SD card is a class 10 and 16 GB
I open an Administrator command prompt.
I have established the SD card is seen as «Disk 1» 14 GB size
I change directory to the directory containing Flash.ffu
I execute the command: «dism.exe /Apply-Image /ImageFile:flash.ffu /ApplyDrive:.PhysicalDrive1 /SkipPlatformCheck»
I receive follwing error:
Deployment Image Servicing and Management tool
Version: 10.0.10074.0Kan element niet vinden.
The DISM log file can be found at C:WindowsLogsDISMdism.log
> «Kan element niet vinden» translates as : «Cannot find element»
I notice a difference in filename between the extracted «Flash.ffu» and the «flash.ffu» (capital F) so I retry the command as:
«dism.exe /Apply-Image /ImageFile:Flash.ffu /ApplyDrive:.PhysicalDrive1 /SkipPlatformCheck»
but with same error 1168
The DISM log entry follows below.
Anyone encountering the same issue, and better still, have found a solution?
Many thanks!
Ralph
DISM log file entry:
2015-05-02 13:36:06, Info DISM PID=4348 TID=4092 Scratch directory set to ‘C:UsersralphAppDataLocalTemp’. — CDISMManager::put_ScratchDir
2015-05-02 13:36:06, Info DISM PID=4348 TID=4092 DismCore.dll version: 10.0.10074.0 — CDISMManager::FinalConstruct
2015-05-02 13:36:06, Info DISM PID=4348 TID=4092 Successfully loaded the ImageSession at «C:WindowsSystem32Dism» — CDISMManager::LoadLocalImageSession
2015-05-02 13:36:06, Info DISM DISM Provider Store: PID=4348 TID=4092 Found and Initialized the DISM Logger. — CDISMProviderStore::Internal_InitializeLogger
2015-05-02 13:36:06, Info DISM DISM Provider Store: PID=4348 TID=4092 Failed to get and initialize the PE Provider. Continuing by assuming
that it is not a WinPE image. — CDISMProviderStore::Final_OnConnect
2015-05-02 13:36:06, Info DISM DISM Provider Store: PID=4348 TID=4092 Finished initializing the Provider Map. — CDISMProviderStore::Final_OnConnect
2015-05-02 13:36:06, Info DISM DISM Provider Store: PID=4348 TID=4092 Getting Provider DISMLogger — CDISMProviderStore::GetProvider
2015-05-02 13:36:06, Info DISM DISM Provider Store: PID=4348 TID=4092 Provider has previously been initialized. Returning the existing instance.
— CDISMProviderStore::Internal_GetProvider
2015-05-02 13:36:06, Info DISM DISM Manager: PID=4348 TID=4092 Successfully created the local image session and provider store. — CDISMManager::CreateLocalImageSession
2015-05-02 13:36:06, Info DISM DISM Provider Store: PID=4348 TID=4092 Getting Provider DISMLogger — CDISMProviderStore::GetProvider
2015-05-02 13:36:06, Info DISM DISM Provider Store: PID=4348 TID=4092 Provider has previously been initialized. Returning the existing instance.
— CDISMProviderStore::Internal_GetProvider
2015-05-02 13:36:06, Info DISM DISM.EXE:2015-05-02 13:36:06, Info DISM DISM.EXE: <—— Starting Dism.exe session ——>
2015-05-02 13:36:06, Info DISM DISM.EXE:2015-05-02 13:36:06, Info DISM DISM.EXE: Host machine information: OS Version=10.0.10074, Running architecture=amd64, Number of processors=2
2015-05-02 13:36:06, Info DISM DISM.EXE: Dism.exe version: 10.0.10074.0
2015-05-02 13:36:06, Info DISM DISM.EXE: Executing command line: dism.exe /Apply-Image /ImageFile:flash.ffu /ApplyDrive:.PhysicalDrive1
/SkipPlatformCheck
2015-05-02 13:36:06, Info DISM DISM Provider Store: PID=4348 TID=4092 Getting the collection of providers from a local provider store type. — CDISMProviderStore::GetProviderCollection
2015-05-02 13:36:06, Info DISM DISM Provider Store: PID=4348 TID=4092 Provider has not previously been encountered. Attempting to initialize
the provider. — CDISMProviderStore::Internal_GetProvider
2015-05-02 13:36:06, Info DISM DISM Provider Store: PID=4348 TID=4092 Loading Provider from location C:WindowsSystem32DismFolderProvider.dll
— CDISMProviderStore::Internal_GetProvider
2015-05-02 13:36:06, Info DISM DISM Provider Store: PID=4348 TID=4092 Connecting to the provider located at C:WindowsSystem32DismFolderProvider.dll.
— CDISMProviderStore::Internal_LoadProvider
2015-05-02 13:36:06, Info DISM DISM Provider Store: PID=4348 TID=4092 Provider has not previously been encountered. Attempting to initialize
the provider. — CDISMProviderStore::Internal_GetProvider
2015-05-02 13:36:06, Info DISM DISM Provider Store: PID=4348 TID=4092 Loading Provider from location C:WindowsSystem32DismWimProvider.dll —
CDISMProviderStore::Internal_GetProvider
2015-05-02 13:36:06, Info DISM DISM Provider Store: PID=4348 TID=4092 Connecting to the provider located at C:WindowsSystem32DismWimProvider.dll.
— CDISMProviderStore::Internal_LoadProvider
2015-05-02 13:36:06, Info DISM DISM Provider Store: PID=4348 TID=4092 Provider has not previously been encountered. Attempting to initialize
the provider. — CDISMProviderStore::Internal_GetProvider
2015-05-02 13:36:06, Info DISM DISM Provider Store: PID=4348 TID=4092 Loading Provider from location C:WindowsSystem32DismVHDProvider.dll —
CDISMProviderStore::Internal_GetProvider
2015-05-02 13:36:06, Info DISM DISM Provider Store: PID=4348 TID=4092 Connecting to the provider located at C:WindowsSystem32DismVHDProvider.dll.
— CDISMProviderStore::Internal_LoadProvider
2015-05-02 13:36:06, Info DISM DISM Provider Store: PID=4348 TID=4092 Provider has not previously been encountered. Attempting to initialize
the provider. — CDISMProviderStore::Internal_GetProvider
2015-05-02 13:36:06, Info DISM DISM Provider Store: PID=4348 TID=4092 Loading Provider from location C:WindowsSystem32DismImagingProvider.dll
— CDISMProviderStore::Internal_GetProvider
2015-05-02 13:36:06, Info DISM DISM Provider Store: PID=4348 TID=4092 Connecting to the provider located at C:WindowsSystem32DismImagingProvider.dll.
— CDISMProviderStore::Internal_LoadProvider
2015-05-02 13:36:06, Info DISM DISM Provider Store: PID=4348 TID=4092 Provider has not previously been encountered. Attempting to initialize
the provider. — CDISMProviderStore::Internal_GetProvider
2015-05-02 13:36:06, Info DISM DISM Provider Store: PID=4348 TID=4092 Loading Provider from location C:WindowsSystem32DismCompatProvider.dll
— CDISMProviderStore::Internal_GetProvider
2015-05-02 13:36:06, Info DISM DISM Provider Store: PID=4348 TID=4092 Connecting to the provider located at C:WindowsSystem32DismCompatProvider.dll.
— CDISMProviderStore::Internal_LoadProvider
2015-05-02 13:36:06, Info DISM DISM Provider Store: PID=4348 TID=4092 Provider has not previously been encountered. Attempting to initialize
the provider. — CDISMProviderStore::Internal_GetProvider
2015-05-02 13:36:06, Info DISM DISM Provider Store: PID=4348 TID=4092 Loading Provider from location C:WindowsSystem32DismFfuProvider.dll —
CDISMProviderStore::Internal_GetProvider
2015-05-02 13:36:06, Info DISM DISM Provider Store: PID=4348 TID=4092 Connecting to the provider located at C:WindowsSystem32DismFfuProvider.dll.
— CDISMProviderStore::Internal_LoadProvider
2015-05-02 13:36:06, Info DISM DISM.EXE: Got the collection of providers. Now enumerating them to build the command table.
2015-05-02 13:36:06, Info DISM DISM.EXE: Attempting to add the commands from provider: DISM Log Provider
2015-05-02 13:36:06, Info DISM DISM.EXE: Attempting to add the commands from provider: FolderManager
2015-05-02 13:36:06, Info DISM DISM.EXE: Attempting to add the commands from provider: WimManager
2015-05-02 13:36:06, Info DISM DISM.EXE: Succesfully registered commands for the provider: WimManager.
2015-05-02 13:36:06, Info DISM DISM.EXE: Attempting to add the commands from provider: VHDManager
2015-05-02 13:36:06, Info DISM DISM.EXE: Attempting to add the commands from provider: GenericImagingManager
2015-05-02 13:36:06, Info DISM DISM.EXE: Succesfully registered commands for the provider: GenericImagingManager.
2015-05-02 13:36:06, Info DISM DISM.EXE: Attempting to add the commands from provider: Compatibility Manager
2015-05-02 13:36:06, Info DISM DISM.EXE: Succesfully registered commands for the provider: Compatibility Manager.
2015-05-02 13:36:06, Info DISM DISM.EXE: Attempting to add the commands from provider: FfuManager
2015-05-02 13:36:06, Info DISM DISM Provider Store: PID=4348 TID=4092 Getting Provider GenericImagingManager — CDISMProviderStore::GetProvider
2015-05-02 13:36:06, Info DISM DISM Provider Store: PID=4348 TID=4092 Provider has previously been initialized. Returning the existing instance.
— CDISMProviderStore::Internal_GetProvider
2015-05-02 13:36:06, Info DISM DISM Provider Store: PID=4348 TID=4092 Getting Provider FfuManager — CDISMProviderStore::GetProvider
2015-05-02 13:36:06, Info DISM DISM Provider Store: PID=4348 TID=4092 Provider has previously been initialized. Returning the existing instance.
— CDISMProviderStore::Internal_GetProvider
2015-05-02 13:36:06, Error DISM DISM Imaging Provider: PID=4348 TID=4092 basentsetupopktoolsdismprovidersimagingproviderdllgenericimagingmanager.cpp:2546
— CGenericImagingManager::InternalCmdFFUApply(hr:0x80070490)
2015-05-02 13:36:06, Error DISM DISM Imaging Provider: PID=4348 TID=4092 basentsetupopktoolsdismprovidersimagingproviderdllgenericimagingmanager.cpp:535
— CGenericImagingManager::ExecuteCmdLine(hr:0x80070490)
2015-05-02 13:36:06, Info DISM DISM.EXE: Image session has been closed. Reboot required=no.
2015-05-02 13:36:06, Info DISM DISM.EXE:2015-05-02 13:36:06, Info DISM DISM.EXE: <—— Ending Dism.exe session ——>
2015-05-02 13:36:06, Info DISM DISM.EXE:2015-05-02 13:36:06, Info DISM DISM Provider Store: PID=4348 TID=4092 Found the OSServices. Waiting to finalize it until all other providers
are unloaded. — CDISMProviderStore::Final_OnDisconnect
2015-05-02 13:36:06, Info DISM DISM Provider Store: PID=4348 TID=4092 Disconnecting Provider: FolderManager — CDISMProviderStore::Internal_DisconnectProvider
2015-05-02 13:36:06, Info DISM DISM Provider Store: PID=4348 TID=4092 Disconnecting Provider: WimManager — CDISMProviderStore::Internal_DisconnectProvider
2015-05-02 13:36:06, Info DISM DISM Provider Store: PID=4348 TID=4092 Disconnecting Provider: VHDManager — CDISMProviderStore::Internal_DisconnectProvider
2015-05-02 13:36:06, Info DISM DISM Provider Store: PID=4348 TID=4092 Disconnecting Provider: GenericImagingManager — CDISMProviderStore::Internal_DisconnectProvider
2015-05-02 13:36:06, Info DISM DISM Provider Store: PID=4348 TID=4092 Disconnecting Provider: Compatibility Manager — CDISMProviderStore::Internal_DisconnectProvider
2015-05-02 13:36:06, Info DISM DISM Provider Store: PID=4348 TID=4092 Disconnecting Provider: FfuManager — CDISMProviderStore::Internal_DisconnectProvider
2015-05-02 13:36:06, Info DISM DISM Provider Store: PID=4348 TID=4092 Releasing the local reference to DISMLogger. Stop logging. — CDISMProviderStore::Internal_DisconnectProvider- Edited by
Thursday, May 14, 2015 6:16 PM
- Edited by
Answers
-
According to my research FfuProvider.dll checks this values and fails if one of them is empty.
This is the only reason why dism fails with 1168 error on a Hyper-V virtual machine.You can patch x86 version of FfuProvider.dll with HEX editor.
File offset 0x7312, replace B8 90 04 07 80 with B8 00 00 00 00 (valid for 10074 and 10075)Be sure you are patch and use an appropriate version of x86 dism:
10074
C:windowsSysWOW64Dism.exe
C:windowsSysWOW64dismFfuProvider.dll
To replace this file you have to become his owner and modify access rights.10075
C:Program Files (x86)Windows Kits10Assessment and Deployment KitDeployment Toolsx86DISMdism.exe
C:Program Files (x86)Windows Kits10Assessment and Deployment KitDeployment Toolsx86DISMffuprovider.dllPaths is for x64 windows system.
Be careful: dism can rewrite any drive, including the system drive of running system if you specify its number in .PhysicalDriveN
- Edited by
komarov.biz
Thursday, May 14, 2015 9:20 AM - Marked as answer by
PA1RB
Thursday, May 14, 2015 6:14 PM
- Edited by
-
I’m very sorry to hear that you are still experiencing this issue. Please know that we are looking into it and hope to have a solution or work-around available for you soon.
The only other suggestion I can think of at the moment is if you could borrow a friends laptop that has a SD card reader built in you might get better results that way.
Jonathan Tanner | Microsoft | Windows 10 IoT Core Insider Preview Support | This posting is provided ‘as is’ with no warranties and confers no rights.
- Marked as answer by
PA1RB
Saturday, May 9, 2015 9:04 AM
- Marked as answer by
-
OK, today I copied the Flash.ffu file to a Surface PRO 3 running Windows 10 build 10074.
I have succesfully flashed two SD cards (SanDisk Ultra microSDHC UHS-1 cards with 8 GB, class 10) with the dism.exe on that Surface (dism version 10.0.10074.0).
The first card I flashed using the build-in micro SD-card reader of the Surface. The second card I flashed using the exact same USB cardreader that does not work on my other computer (recognized by wmic as ChipBank SD/MM Reader USB Device).
So the USB reader works on the Surface, but does not work on my other computer.
The Windows 10 builds are both 10074, but the Surface runs the English language, the other computer runs the Dutch language.
The computer on which the USB stick does not work is based on an ASUS P5LD2-VM motherboard (using the build in USB ports).
So I will be off playing with the RPI-2 this weekend, but I will keep an eye out for the solution to the issue in this forum.
Happy to provide more details if required by the engineers!
- Proposed as answer by
Jonathan TannerMicrosoft employee
Friday, May 8, 2015 11:54 PM - Edited by
PA1RB
Saturday, May 9, 2015 9:02 AM - Marked as answer by
PA1RB
Saturday, May 9, 2015 9:04 AM
- Proposed as answer by
-
Hi,
I had a similar problem with the above mentioned error. I tested all recomended methods/solutions with two USB card readers and three SD cards (class 10) but with no success. Now I installed Windows on the laptop that has SD card reader built
in, as recomended above, and it works fine. Thanks for the tip!- Marked as answer by
PA1RB
Saturday, May 9, 2015 9:04 AM
- Marked as answer by
-
Hello MiPiGamer,
The page with instructions is here: http://ms-iot.github.io/content/win10/SetupRPI.htm
The package including the image can be downloaded in step 3:
Download the package «Windows 10 IoT Core Insider Preview Image for Raspberry Pi 2» from Microsoft Connect (you must be signed in to Microsoft Connect).Aside from the issue above writing the image, all went according to the description, and «Blinky» made the LED blink!
- Marked as answer by
PA1RB
Sunday, May 10, 2015 8:49 PM
- Marked as answer by
-
Wow — that did the trick allright:
Deployment Image Servicing and Management tool
Version: 10.0.10074.0Applying image
[==========================100.0%==========================]
The operation completed successfully.I confirm this patch absolutely fixed the issue, well done and many thanks indeed !!!
Hope this finds its way into the next release of Windows 10.
Ralph
- Marked as answer by
PA1RB
Thursday, May 14, 2015 6:14 PM
- Marked as answer by
Have you ever tried to use your VPN app only to be slapped by an error message saying error 1168 element not found? It is not only annoying but frustrating.
As an avid VPN user, it is normal to encounter one of these errors because VPNs are not as fail-proof as one might think.
But you are in the right place if you have experienced this error, so read till the end to know how to clear VPN error 1168 element not found for good.
What is the element not found error?
The element not found error is usually a network connection problem that appears on Windows versions 7 and 8.
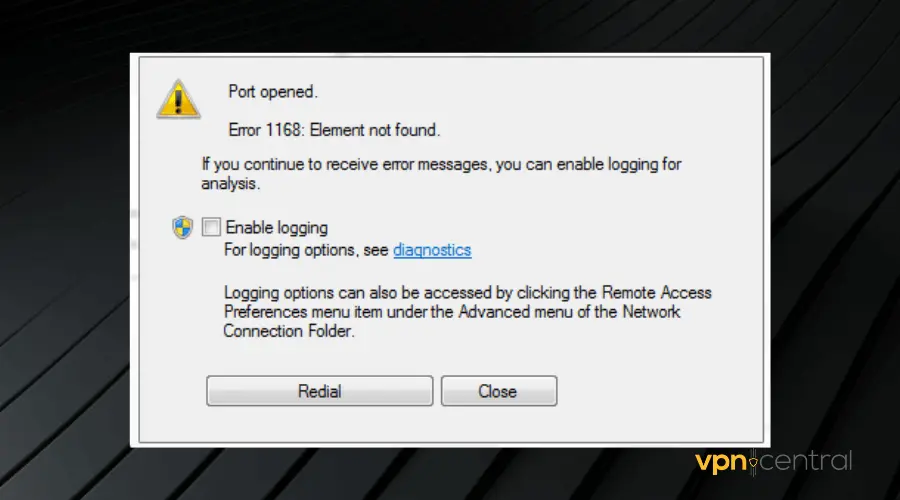
Oftentimes, this error message pops up when launching your VPN app.
However, it can also happen with apps like File Explorer, Microsoft Edge, Command Prompt, or even the Settings app in Windows.
It usually appears either as a result of a bad Windows update, corrupt drivers, or interference from third-party applications.
Below are some fixes you can try:
- Install pending Windows updates
- Reload Explorer.exe
- Uninstall any recently installed apps
- Run the DSM tool
- Reset your PC
- Use a modern VPN
1. Install pending updates
This error may occur if one of your computer’s software components is outdated.
Therefore, ensure that you update your software to the latest version. Follow the steps below to achieve this:
- Open Windows settings.
- Click Update and Security.
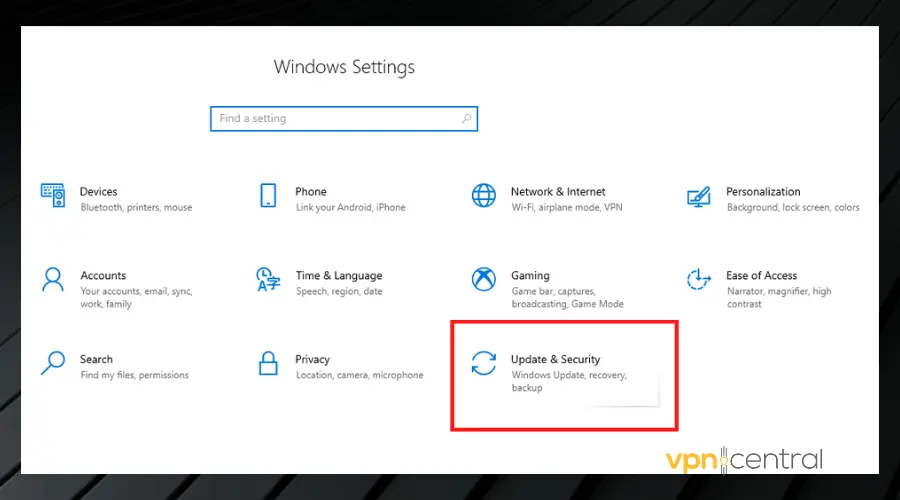
- Click Check for updates.
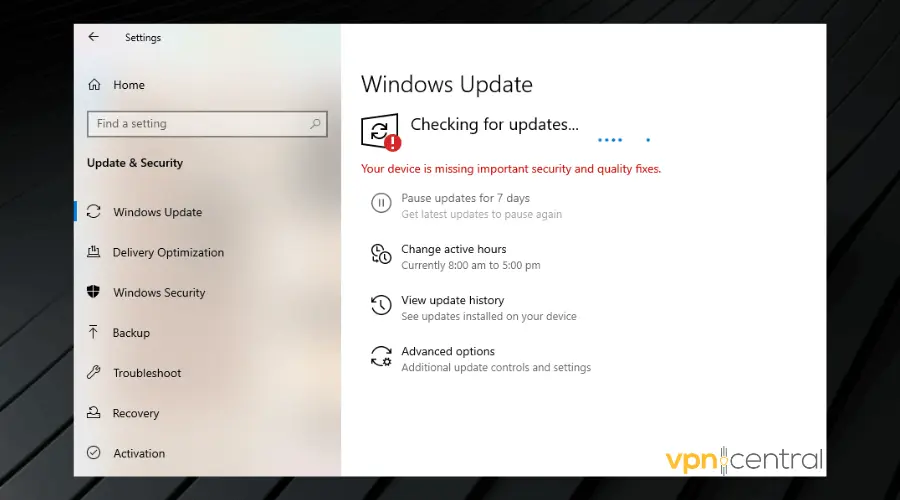
Your PC will search the internet for any relevant updates. Click the Update button to download and install any available updates.
2. Reload Explorer.exe
If you get the element not found error whenever you start up your VPN, you may need to reload your File Explorer. Here is how to do that:
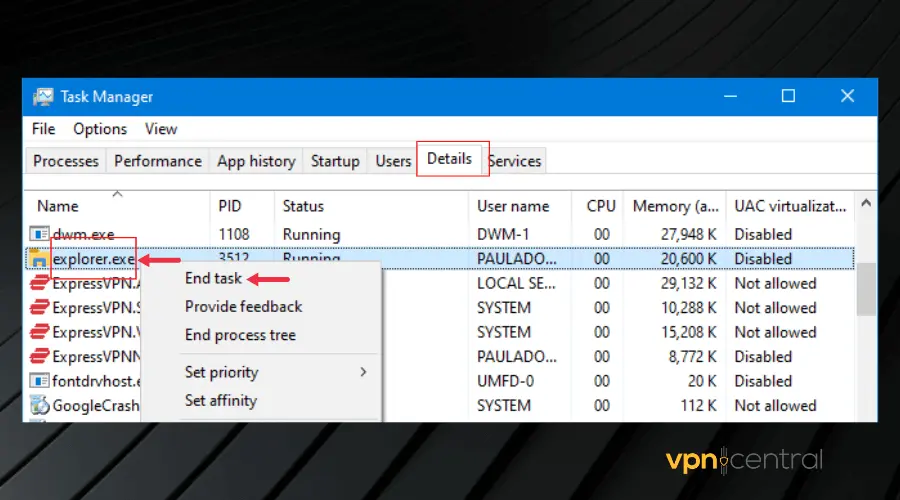
- Press the Ctrl + Shift + Esc keys on your keyboard to launch the Task Manager.
- Click on the Details tab.
- Right-click Explorer.exe and select End Task. This will close all Windows Explorer processes so you can reload it.
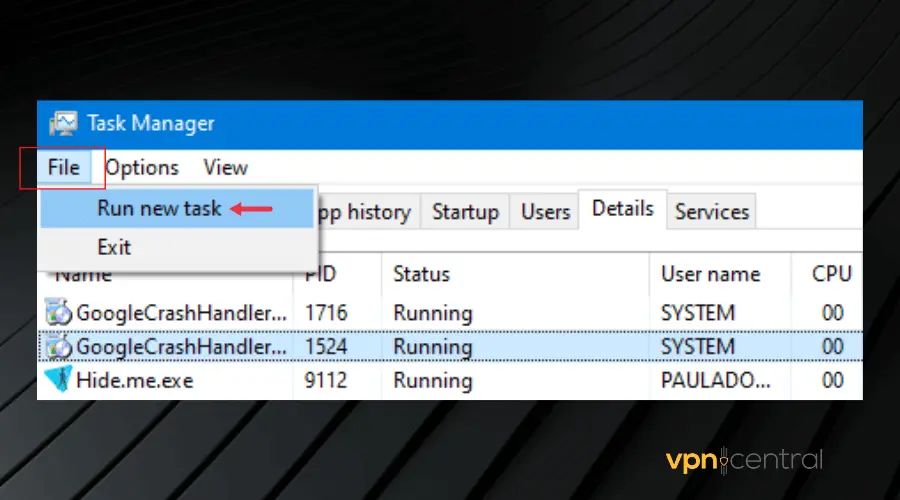
- Click on File and select Create new task.
- Type explorer.exe into the text box.
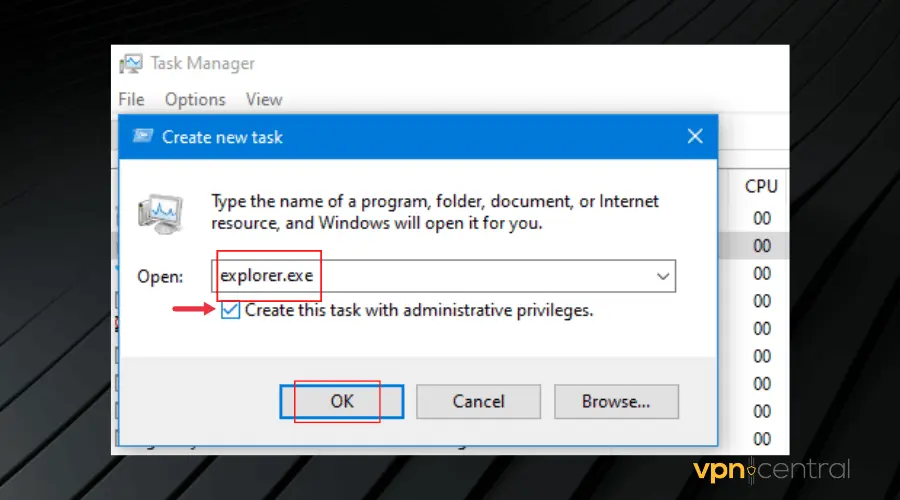
- Tick the Create this task with administrative privileges box and click OK.
Doing this refreshes your computer so that the Windows Explorer process can start afresh.
3. Uninstall any recently installed apps
If you started getting the error message after installing an app, then it’s only logical to uninstall it and check if it fixes the issue.
This is because the new app may have installed a driver that doesn’t support the VPN application. This has worked in many cases, so you should try it if you have any recently installed apps.
To uninstall apps on your computer, follow these steps:
- Press the Windows + R keys on your keyboard.
- Type Control Panel and press Enter to launch the Control Panel.

- Click on Programs.
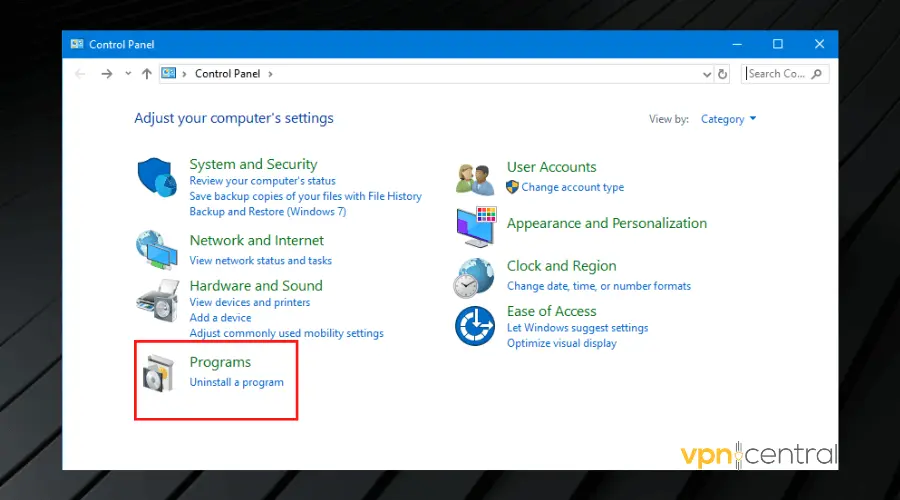
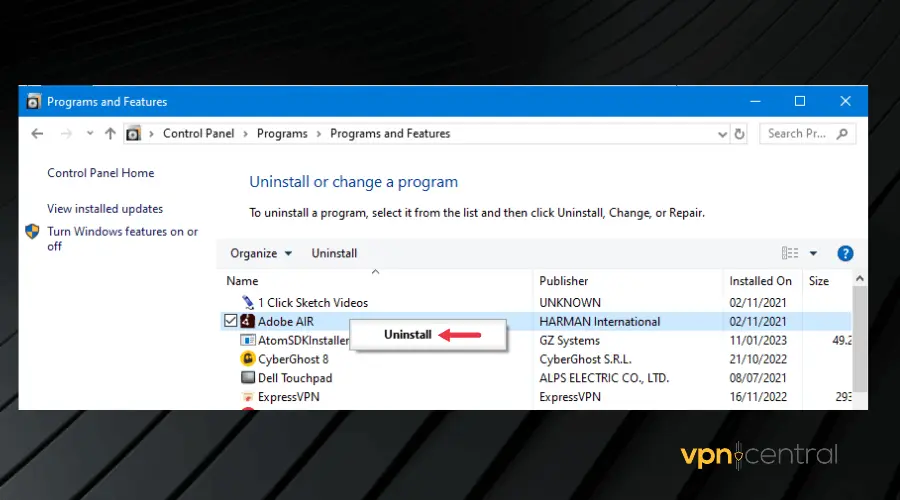
- Click on Uninstall a program.
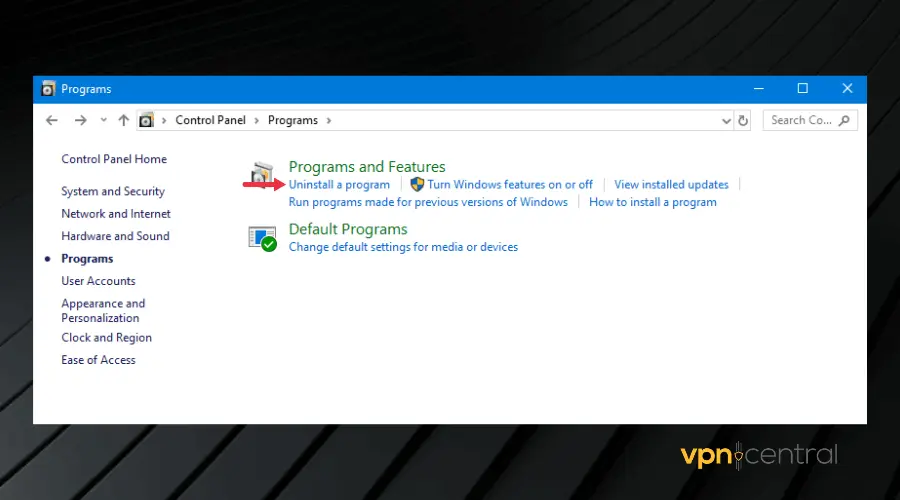
- Search for the recently installed app, right-click on it, and click Uninstall.
Now check to see if your VPN works properly.
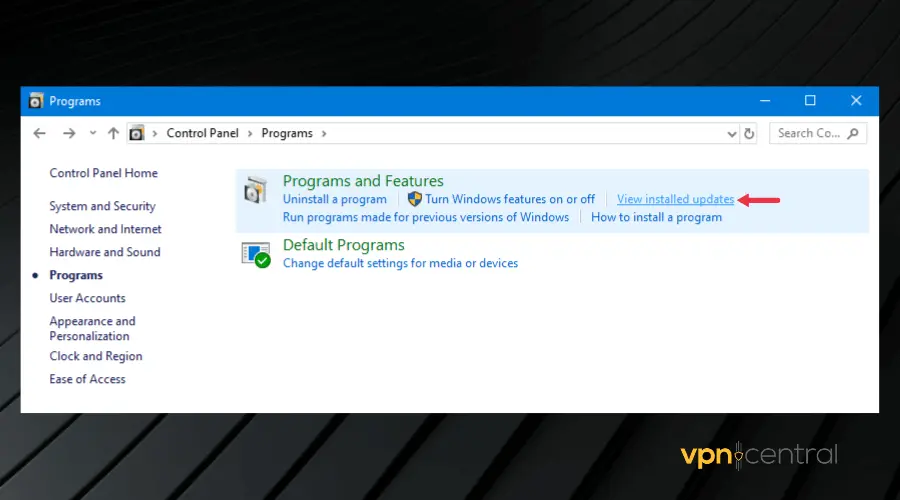
Alternatively, some windows updates can cause this error to happen. Therefore, you may need to uninstall recent updates. The process is similar to the one above. However, instead of clicking on Uninstall a program,
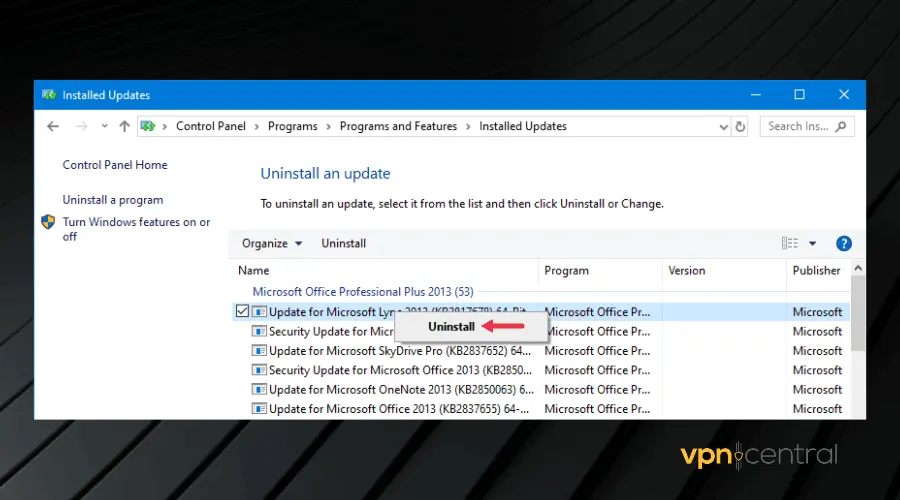
- Click on View installed updates.
- Then right-click on the affected updates and click Uninstall.
Check back to see if the error message is now clear.
4. Run the DISM tool
Running the Deployment Image Servicing and Management tool is another fix for the element not found error.
The purpose of the tool is to scan your PC for problems that can lead to errors and repair them for you.
To run this tool:
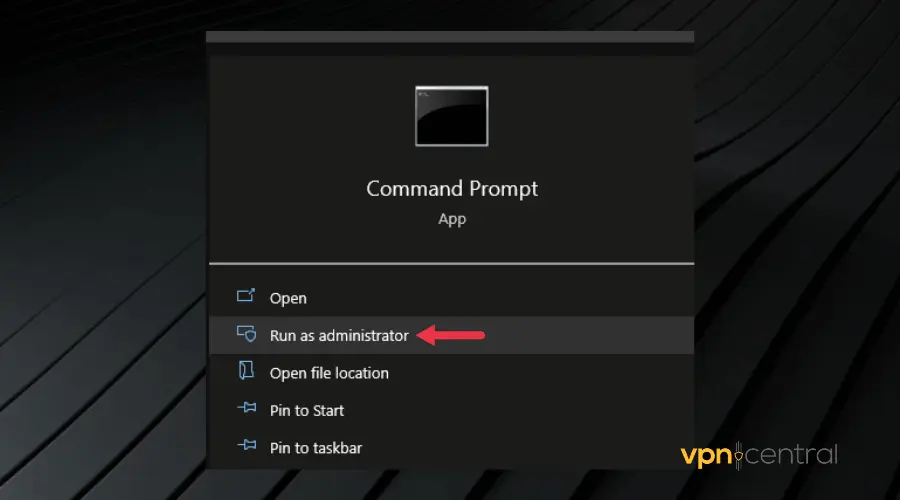
- Search for Command Prompt from your Start Menu.
- Right-click on its icon and select Run as administrator. After this, a black rectangular window will pop up, asking for a command.

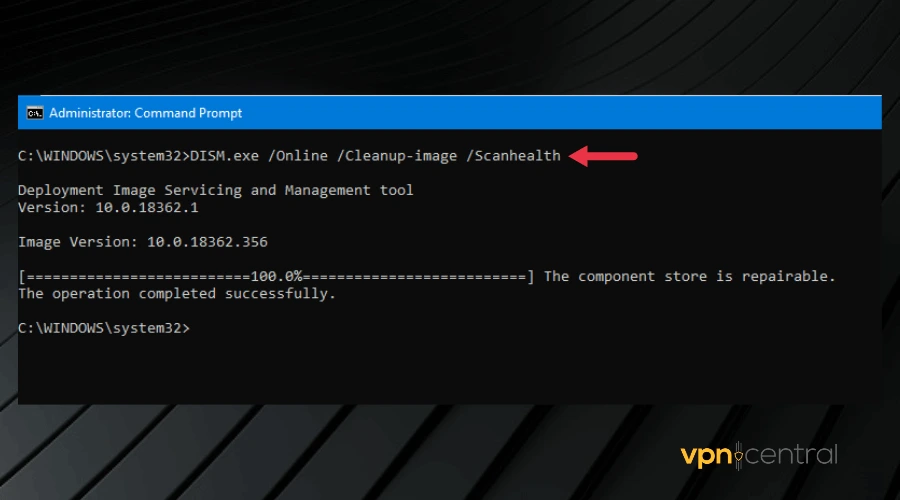
- Type in the following command: DISM.exe /Online /Cleanup-image /Scanhealth and press the Enter key.
- After the scan is complete, type this second command: DISM.exe /Online /Cleanup-image /Restorehealth and press Enter to run it.
This fix requires a little bit of patience if there are serious or multiple issues with your configuration.
The good news is that it can get rid of a lot of errors and there’s not a lot of work on your end, you just have to make sure you enter the correct commands.
5. Reset Your PC
Resetting your PC should be the last fix to try if you have tried fixes 1- 4 and none worked. Although intense, performing a full reset on your PC is definitely going to clear this error from your computer.
Follow these steps to reset your PC:
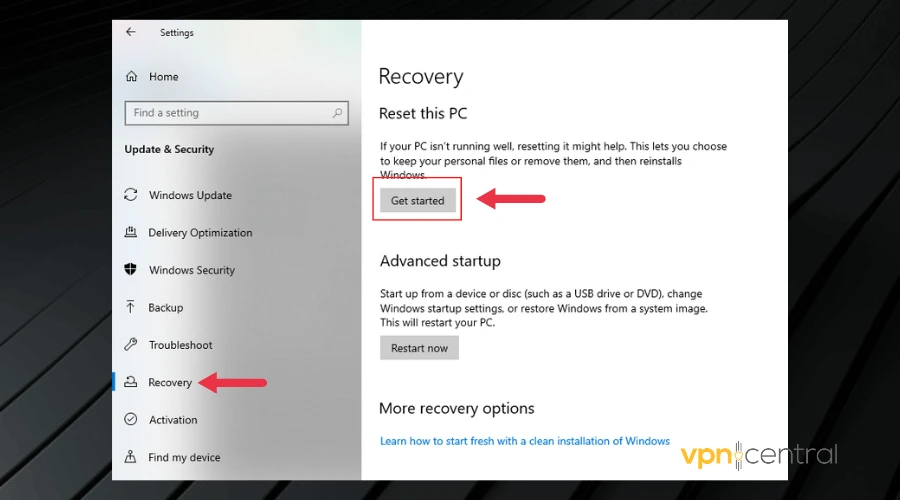
- Open Computer Settings and click Update and Security.
- Click Recovery.
- Then click on Get Started below the Reset PC menu.
- Select an option from the menu that appears and follow the instructions to reset your PC.
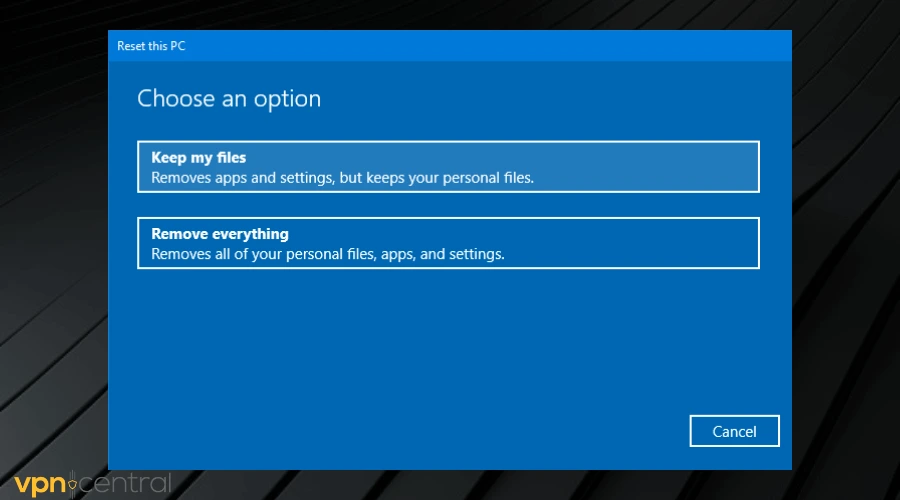
Resetting your PC returns the Windows OS to its original condition – as it was when you first installed it without all the installed programs so it is important to back up your personal files.
6. Use a modern VPN
This element not found error is most pronounced on VPNs with old tunneling protocols, especially L2TP and PPTP.
Therefore, switching to a provider with modern protocols such as OpenVPN and Wireguard is a sure way to fix the issue permanently.
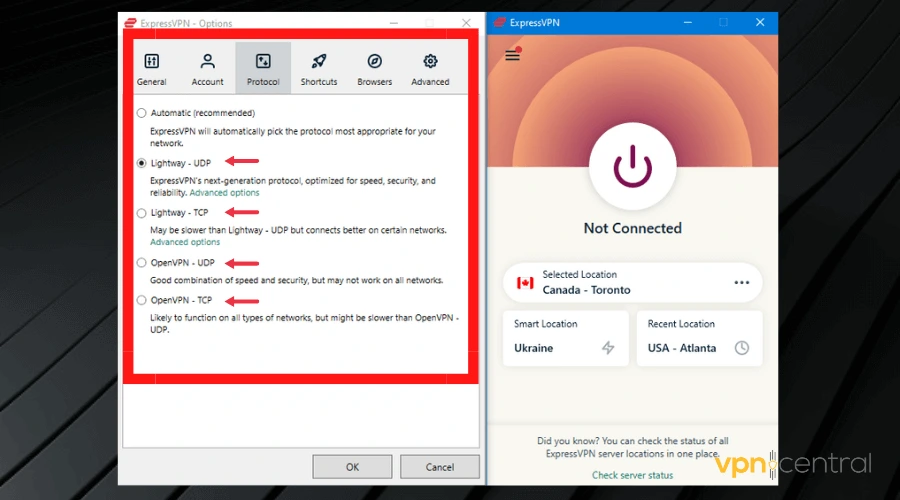
If you want an error-free experience and very fast connections, consider ExpressVPN.
The tool is frequently updated to avoid errors. On top of that, as you can see in the screenshot, it gives you the possibility to pick from multiple VPN protocols.
We must also mention that the VPN has a large network of 3000+ servers located in 94 countries. This is great for anyone who uses VPNs for a better connection or to bypass geo-blocking.

ExpressVPN
Use this up-to-date VPN to prevent any errors and enjoy all the benefits of private browsing!
Conclusion
We tested all the fixes in this article. Therefore, we hope that one of them works for you and helps you get rid of the VPN error 1168 element not found on your PC.
by Teodor Nechita
Eager to help those in need, Teodor writes articles daily on subjects regarding Windows, Xbox, and all things tech-related. When not working, you may usually find him either… read more
Updated on December 14, 2021
XINSTALL BY CLICKING THE DOWNLOAD FILE
This software will keep your drivers up and running, thus keeping you safe from common computer errors and hardware failure. Check all your drivers now in 3 easy steps:
- Download DriverFix (verified download file).
- Click Start Scan to find all problematic drivers.
- Click Update Drivers to get new versions and avoid system malfunctionings.
- DriverFix has been downloaded by 0 readers this month.
Several users have been reporting on the official Microsoft forums that they are having issues with the XPS printer:
I was unable to print from software using the XPS writer. I attempted to reinstall the printer but the installation fails reporting “printer driver not installed. Element not found”
Apparently, they are getting an error 1168: Element not found can have a wide variety of causes.
This article will guide you step-by-step on how to fix this error with the XPS printer.
How do you fix a generic error 1168?
1. Update your drivers
- Click on the Start button, then go to Settings
- Select Update & Security
- Click on Check for updates
- Allow Windows Update to download and install the updated driver
Follow these steps to install the latest printer drivers using Windows Update.
Alternatively, you can use a professional third-party tool that performs this process automatically and aims to keep your printer drivers updated and healthy.
More so, by choosing this automated method of managing drivers you also stay secure from potential damages caused by devices incompatibility.
Thus if you need reliable support to install or update any driver, the following software will accomplish this mission with no exception.
⇒ Get DriverFix
2. Try reinstalling the Windows XPS feature
- Press Windows
- Click on Settings (the cogwheel-shaped button)
- Select Apps
- Go to Apps & features
- Click Optional features
- Look for XPS feature if it is present
- If it is, right-click it and select uninstall
- Restart your PC
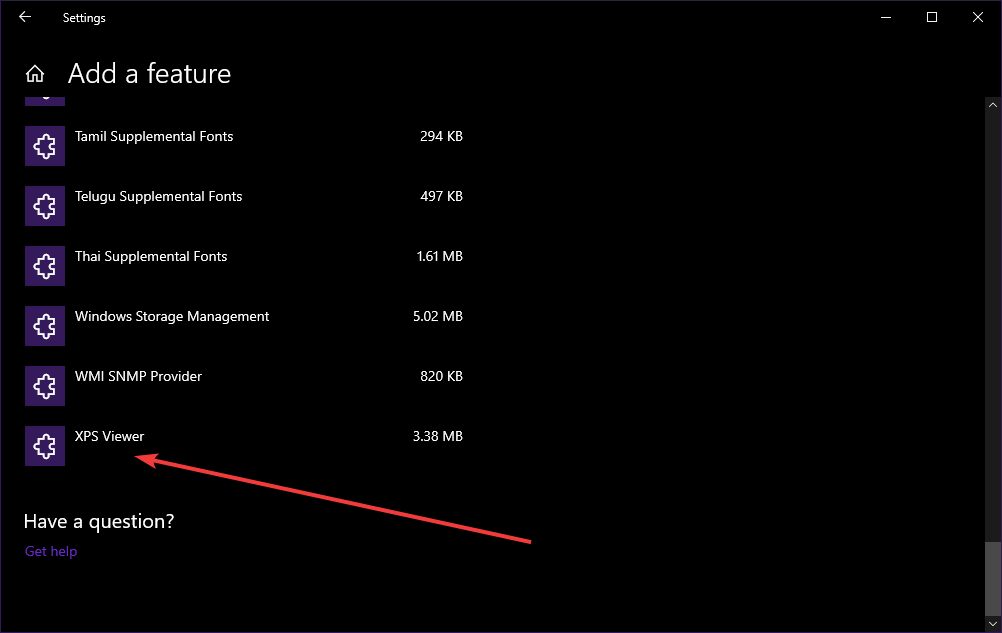
- After the restart or if your PC didn’t have the feature, go to the Manage optional features screen, and select Add a new feature
- When on the Add a new feature screen, select the XPS Viewer
- Restart your PC
3. Manually search for the location of your XPS Writer
Depending on which version of Windows 10 you have installed, the location of the XPS Writer may vary.
As such, if the solution listed above didn’t work, try this:
- Press Windows + R
- Type in control.exe
- Click Programs
- Select Programs and Features
- Click Turn Windows features on or off
- See if XPS Services and XPS Viewer are listed
- If the services are marked in their checkbox, unmark them and restart the PC
- If the services are unmarked in their checkbox, mark them and restart the PC
- Press Windows + R
- Type in control.exe
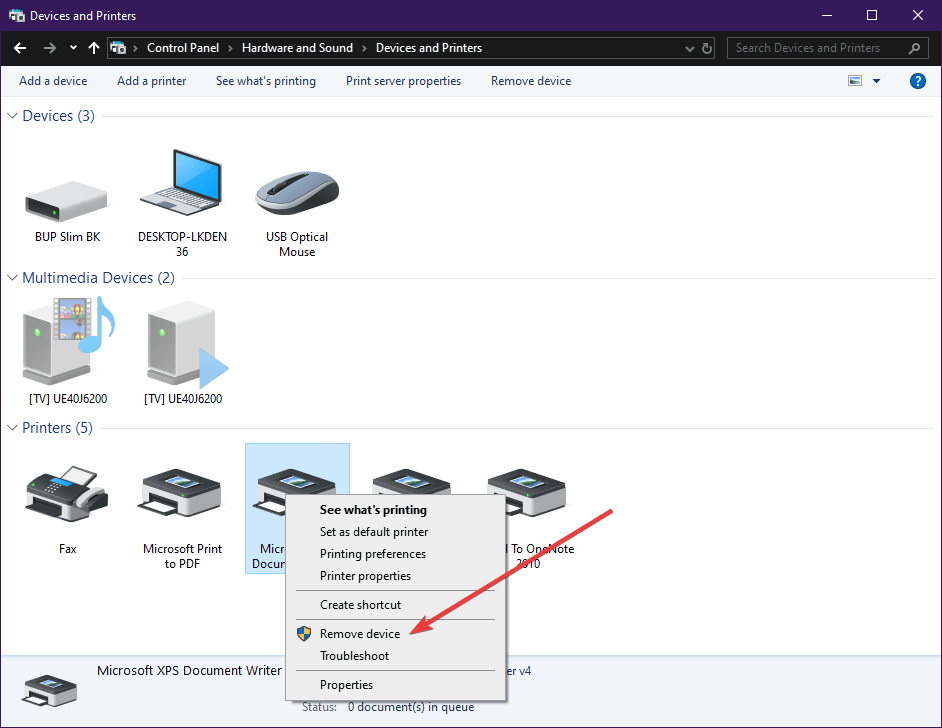
- Go to Hardware and Sound
- Click Devices and Printers
- See if Microsoft XPS Document Writer is installed as a printer.
- If it is, right-click it and choose Remove device
- Restart your PC
- Go back to Devices and Printers and select Add a printer
- Select The printer that I want isn’t listed
- Click Add a local printer or network printer with manual setting
- In the Choose a printer port screen, select Use an existing port and PORTPROMPT: (Local Port)
- In the Install a printer driver screen, select Microsoft on the left pane and Microsoft XPS Document Writer on the right
- When asked Which version of the driver do you want to use? select Use the driver that is currently installed (recommended)
If these particular steps didn’t help, you could also try to:
- Uninstall Recent Windows Updates
- Reset Your PC
![]()
Newsletter
SUPPORT COMMUNICATION- CUSTOMER ADVISORY
Document ID: c06417547
Version: 1
Notice: The information in this document, including products and software versions, is current as of the release date.The document is subject to change without notice.
Release date : 22-Jul-2019
Last updated : 22-Jul-2019
DESCRIPTION
When using Microsoft System Center Configuration Manager (SCCM) to configure systems in the SCOPE, the following DISM error occurs:
Error: 1168.
Element Not Found.
This occurs when the Microsoft Deployment Image Servicing and Management (DISM) command tool executes commands to configure the Realtek HD Audio driver (SoftPaq SP95193). The issue occurs because the driver includes a Universal Windows Platform (UWP) component that is not being handled properly.
SCOPE
Information in this document applies to the following:
Computers:
HP EliteBook 830 G5 Notebook PC
Operating Systems:
Microsoft Windows 10 RS5 (Version 1809)
RESOLUTION
Below are the steps necessary to install this component with SCCM.
-
Extract SoftPaq .
-
Add a batch file to install the UWP component with DISM. Here is the DISM command to insert into the batch file:
@echo ON dism.exe /image:%OSD_System% /add-Driver /Driver:%~dp0HSAcb68d18decd44cd44c94bec5cd2a2c354180.appxbundle /Region=»all» /LicensePath:%~dp0HSAcb68d18decd44cd44c94bec5cd2a2c354180_License1.xml /DependencyPackagePath:%~dp0HSA Micrsooft.VCLibs.140.00_14.0.26706.0_x64_8wekyb3d8bbwe.appx
note:
The variable
%OSD_System%, used in the command above, is set by the partitioning step previous in the task sequence. -
Create a package and add a command line step to execute the batch file right after windows image, and before Apply Windows Settings.
-
Deploy the task sequence and use Device Manager to verify that the Realtek Audio driver is installed.
Hardware platforms affected :
HP EliteBook 830 G5 Notebook PC
Operating systems affected : Not applicable
Software affected : Not applicable
Support Communication Cross Reference ID : IA06417547
© Copyright 2023 HP Development Company, L.P.
HP Inc. shall not be liable for technical or editorial errors or omissions contained herein. The information provided is provided «as is» without warranty of any kind. To the extent permitted by law, neither HP or its affiliates, subcontractors or suppliers will be liable for incidental, special or consequential damages including downtime cost; lost profits; damages relating to the procurement of substitute products or services; or damages for loss of data, or software restoration. The information in this document is subject to change without notice. HP Inc. and the names of HP products referenced herein are trademarks of HP Inc. in the United States and other countries. Other product and company names mentioned herein may be trademarks of their respective owners.
- Remove From My Forums
-
Question
-
I am trying to install printer drivers on two Windows 2012R2 servers and I am getting the error: Printer driver was not installed ‘Element not found’. In the setupapi.dev.log file it shows ‘
Class installer: failed(0x00000490)!
Error 1168: Element not found
I have tried using the pnputil to add the driver, but nothing has worked.
Answers
-
This sounds like the print drivers are not package aware print drivers.
I assume other printer drivers install without any issue, just some drivers that you have not mentioned where they were obtained.
If the print driver does install on one 2012R2 machine, use the print backup utility c:windowssystem32spooltoolsprintbrm.exe to backup the driver and then restore the driver to the machine with the issue adding the driver to the driverstore.
printbrm -b -f backup.printerexport
printbrm -r -s printserver -f backup.printerexport
Alan Morris formerly with Windows Printing Team
- Proposed as answer by
Wednesday, June 17, 2015 9:36 AM
- Marked as answer by
Vivian_Wang
Monday, June 22, 2015 5:19 AM
- Proposed as answer by
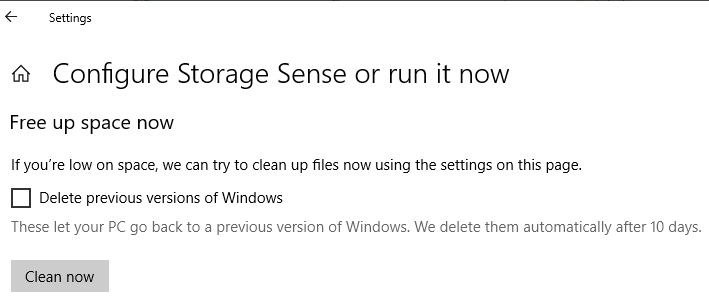
After you upgrade to Windows 10 or install a Windows 10 Feature update, you’ll be able to go back to your previous version of Windows within a limited time of 10 days. This can be done by opening Settings → Update & Security → Recovery → Go back to the previous version of Windows 10.
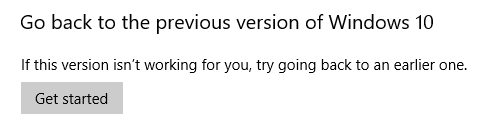
(If you have upgraded from Windows 7, you’ll see Go back to Windows 7 instead.)
Rolling back to the previous version using this method keeps your personal files, but it’ll remove your customizations, apps, and drivers installed after the upgrade. By default, you have ten days, before which you can roll back to the previous version of Windows.
Uninstalling the current version and going back to the previous version of Windows also frees up gigabytes of data on your hard disk, as the Windows.old folder is deleted.
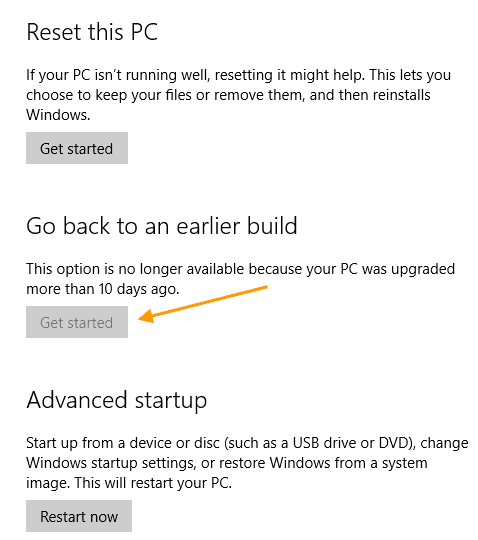
After the 10-day window, the previous Windows installation files under the Windows.old directory would be automatically erased (maybe using Disk Cleanup) by the Operating System. The Get started button would then be grayed out.
In Windows 10 versions before the Anniversary Update (v1607), the rollback timeframe was 30 days. Since the Anniversary Update, Microsoft has reduced the uninstall window to 10 days. As per Microsoft, it was a data-driven decision (based on telemetry) to change the rollback timeframe from 30 to just 10 days. Quoting the source:
Based on our user research, we noticed most users who choose to go back to a previous version of Windows do it within the first several days. As such, we changed the setting to 10 days to free storage space used by previous copies.
Evaluating an Operating System may need more time for end-users, and a 10-day window is insufficient for most people. The good news is that you can increase the Go back to the previous version of Windows to a maximum of 60 days manually.
This article tells you how to extend the 10-day rollback window on your Windows 10 computer.
Using the DISM utility, you can do the following:
- Find out how many days after an upgrade that an OS can be uninstalled.
- Initiate an uninstall or roll back to the previous OS or version.
- Remove the ability to uninstall a Windows upgrade.
- Set the number of days that a user has to uninstall a Windows upgrade.
(Reference: DISM Operating System uninstall Command-Line Options.)
Find the rollback timeframe (number of days)
To determine the uninstall window timeframe (days) of your existing Windows installation, run this command from admin Command Prompt:
DISM /Online /Get-OSUninstallWindow
You’ll see the following output:
Deployment Image Servicing and Management tool
Version: 10.0.19041.572

Image Version: 10.0.19042.661

Uninstall Window : 10
The operation completed successfully.
Increase the rollback timeframe (number of days)
Run this command to set the number of days after an upgrade that an uninstall can be initiated.
Syntax:
DISM /Online /Set-OSUninstallWindow /Value:<days>
The value (i.e., number of days) must be in the range of 2 to 60. If the value you input doesn’t fall in that range, the default value of 10 will be set.
Example:
DISM /Online /Set-OSUninstallWindow /Value:30
You should see the message “The operation completed successfully” in the output.
The above command-line sets the rollback window to 30 days. Windows won’t erase the Windows.old folder before 30 days.
Set the Rollback timeframe via the Registry
You can set the rollback window timeframe by editing the registry, as well.
- Start the Registry Editor, and go to the following branch:
HKEY_LOCAL_MACHINESYSTEMSetup
- Create a new DWORD value named
UninstallWindowif it doesn’t already exist. - Double-click
UninstallWindow, select Decimal, and type in the desired value (>2to<60), and click OK.
Note that if the above registry value doesn’t exist, “10” days will be the default threshold limit used by Windows. - Exit the Registry Editor.
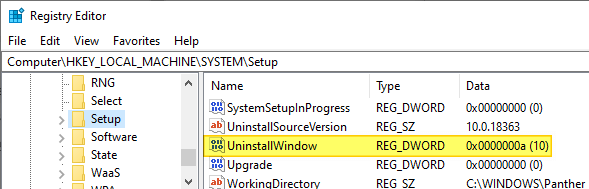
After the registry modification, it’s better that you restart Windows, though the DISM Get-OSUninstallWindow command would reflect the registry change even if you don’t reboot.
Additional Tip
There are two more DISM switches namely, Initiate-OSUninstall and Remove-OSUninstall that you may like to know about. The former is to initiate a rollback using command-line, and the latter is to remove the ability to rollback by users.
The Remove-OSUninstall switch would gray out the Get Started button under the Go back to the previous… section. The command deletes the following registry values from the abovesaid branch. It may also remove the corresponding BCD data and the Windows Recovery Environment entry named “Go back to the previous build.”
Registry values:
- UninstallActive
- UninstallGUID
- UninstallMark
- UninstallScenario
Error: 1168 – Element not found
In some cases, the error 1168 (‘element not found’) may occur when running the DISM Get-OSUninstallWindow or Set-OSUninstallWindow command.
Deployment Image Servicing and Management tool
Version: 10.0.19041.572

Image Version:

Error: 1168

Element not found.

The DISM log file can be found at C:WINDOWSLogsDISMdism.log
The DISM.log file would show the following entries:
Error pGetUninstallInterfaceCommon: Failed loading the setupplatform, hr = 0x80070490 [gle=0x00000003]
Error DISM DISM SetupPlatform Provider: PID=3944 TID=9192 Failed getting UninstallInterface Online. - CSetupPlatformManager::GetUninstallWindow(hr:0x80070490)
Error DISM DISM SetupPlatform Provider: PID=3944 TID=9192 Failed to get the uninstall window. - CSetupPlatformManager::ProcessCmdLine_GetUninstallWindow(hr:0x80070490)
Error DISM DISM SetupPlatform Provider: PID=3944 TID=9192 Failed while processing command get-osuninstallwindow. - CSetupPlatformManager::ExecuteCmdLine(hr:0x80070490)
Error 1168 (0x80070490), which denotes “Element not found”, occurs if the Windows.old folder (especially the subfolder $WINDOWS.~BT) has been deleted by Windows after the rollback window has expired.
It’s also possible that you’ve manually cleared the “Previous Windows installation(s)” files using Disk Cleanup or Storage settings to recover the disk space.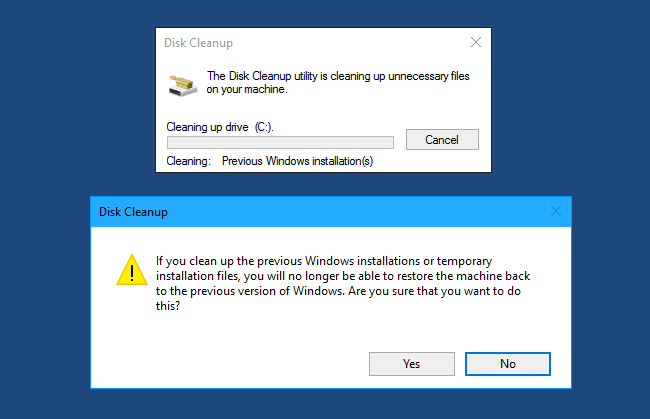
The DISM DISM Get-OSUninstallWindow and Set-OSUninstallWindow commands would need the following files in order to work correctly:
C:windows.old$WINDOWS.~BTSourcesapi-ms-win-core-kernel32-legacy-l1-1-0.dll
C:windows.old$WINDOWS.~BTSourcesfltLib.dll
C:windows.old$WINDOWS.~BTSourcesmpr.dll
C:windows.old$WINDOWS.~BTSourcessetupplatform.dll
C:windows.old$WINDOWS.~BTSourcessspicli.dll
C:windows.old$WINDOWS.~BTSourcesunbcl.dll
C:windows.old$WINDOWS.~BTSourcesvirtdisk.dll
C:windows.old$WINDOWS.~BTSourceswinhttp.dll
C:windows.old$WINDOWS.~BTSourceswtsapi32.dll
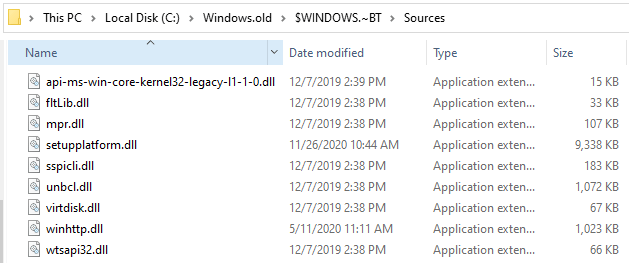
If Windows.old or its subfolder $WINDOWS.~BT is missing, or if some of the DLLs are missing in that location, you’ll get one of the following errors:
Error: 1168

Element not found.

The DISM log file can be found at C:WINDOWSLogsDISMdism.log
Error: 126

The specified module could not be found.

The DISM log file can be found at C:WINDOWSLogsDISMdism.log
Error 3: The system cannot find the path specified
![]() Despite this, you should be able to set the uninstall threshold or timeframe using the registry method described above.
Despite this, you should be able to set the uninstall threshold or timeframe using the registry method described above.
Closing words
It’s unclear whether the uninstall window you set using DISM or the registry will the preserved or not if you install an update (Feature Update) in the future.
Of course, the ultimate trick of renaming C:Windows.old and C:$Windows~BT would prevent Windows 10 from erasing them automatically. By renaming the folders, you get unlimited time to go back to the chosen version.
One small request: If you liked this post, please share this?
One «tiny» share from you would seriously help a lot with the growth of this blog.
Some great suggestions:
- Pin it!
- Share it to your favorite blog + Facebook, Reddit
- Tweet it!
So thank you so much for your support. It won’t take more than 10 seconds of your time. The share buttons are right below.
- Remove From My Forums
SOLVED: Writing RPi2 image to SD Card: dism Error: 1168 — cannot find element
-
Question
-
Hello all,
I have installed Windows 10 build 10074 (Dutch language) on a PC, no VM.
I have downloaded and extracted Windows_IoT_Core_RPI2_BUILD.zip
One of the files extracted is Flash.ffu
I have established that my SD card is a class 10 and 16 GB
I open an Administrator command prompt.
I have established the SD card is seen as «Disk 1» 14 GB size
I change directory to the directory containing Flash.ffu
I execute the command: «dism.exe /Apply-Image /ImageFile:flash.ffu /ApplyDrive:\.PhysicalDrive1 /SkipPlatformCheck»
I receive follwing error:
Deployment Image Servicing and Management tool
Version: 10.0.10074.0Kan element niet vinden.
The DISM log file can be found at C:WindowsLogsDISMdism.log
> «Kan element niet vinden» translates as : «Cannot find element»
I notice a difference in filename between the extracted «Flash.ffu» and the «flash.ffu» (capital F) so I retry the command as:
«dism.exe /Apply-Image /ImageFile:Flash.ffu /ApplyDrive:\.PhysicalDrive1 /SkipPlatformCheck»
but with same error 1168
The DISM log entry follows below.
Anyone encountering the same issue, and better still, have found a solution?
Many thanks!
Ralph
DISM log file entry:
2015-05-02 13:36:06, Info DISM PID=4348 TID=4092 Scratch directory set to ‘C:UsersralphAppDataLocalTemp’. — CDISMManager::put_ScratchDir
2015-05-02 13:36:06, Info DISM PID=4348 TID=4092 DismCore.dll version: 10.0.10074.0 — CDISMManager::FinalConstruct
2015-05-02 13:36:06, Info DISM PID=4348 TID=4092 Successfully loaded the ImageSession at «C:WindowsSystem32Dism» — CDISMManager::LoadLocalImageSession
2015-05-02 13:36:06, Info DISM DISM Provider Store: PID=4348 TID=4092 Found and Initialized the DISM Logger. — CDISMProviderStore::Internal_InitializeLogger
2015-05-02 13:36:06, Info DISM DISM Provider Store: PID=4348 TID=4092 Failed to get and initialize the PE Provider. Continuing by assuming
that it is not a WinPE image. — CDISMProviderStore::Final_OnConnect
2015-05-02 13:36:06, Info DISM DISM Provider Store: PID=4348 TID=4092 Finished initializing the Provider Map. — CDISMProviderStore::Final_OnConnect
2015-05-02 13:36:06, Info DISM DISM Provider Store: PID=4348 TID=4092 Getting Provider DISMLogger — CDISMProviderStore::GetProvider
2015-05-02 13:36:06, Info DISM DISM Provider Store: PID=4348 TID=4092 Provider has previously been initialized. Returning the existing instance.
— CDISMProviderStore::Internal_GetProvider
2015-05-02 13:36:06, Info DISM DISM Provider Store: PID=4348 TID=4092 Getting Provider DISMLogger — CDISMProviderStore::GetProvider
2015-05-02 13:36:06, Info DISM DISM Provider Store: PID=4348 TID=4092 Provider has previously been initialized. Returning the existing instance.
— CDISMProviderStore::Internal_GetProvider
2015-05-02 13:36:06, Info DISM DISM Manager: PID=4348 TID=4092 Successfully created the local image session and provider store. — CDISMManager::CreateLocalImageSession
2015-05-02 13:36:06, Info DISM DISM Provider Store: PID=4348 TID=4092 Getting Provider DISMLogger — CDISMProviderStore::GetProvider
2015-05-02 13:36:06, Info DISM DISM Provider Store: PID=4348 TID=4092 Provider has previously been initialized. Returning the existing instance.
— CDISMProviderStore::Internal_GetProvider
2015-05-02 13:36:06, Info DISM DISM.EXE:
2015-05-02 13:36:06, Info DISM DISM.EXE: <—— Starting Dism.exe session ——>
2015-05-02 13:36:06, Info DISM DISM.EXE:
2015-05-02 13:36:06, Info DISM DISM.EXE: Host machine information: OS Version=10.0.10074, Running architecture=amd64, Number of processors=2
2015-05-02 13:36:06, Info DISM DISM.EXE: Dism.exe version: 10.0.10074.0
2015-05-02 13:36:06, Info DISM DISM.EXE: Executing command line: dism.exe /Apply-Image /ImageFile:flash.ffu /ApplyDrive:\.PhysicalDrive1
/SkipPlatformCheck
2015-05-02 13:36:06, Info DISM DISM Provider Store: PID=4348 TID=4092 Getting the collection of providers from a local provider store type. — CDISMProviderStore::GetProviderCollection
2015-05-02 13:36:06, Info DISM DISM Provider Store: PID=4348 TID=4092 Provider has not previously been encountered. Attempting to initialize
the provider. — CDISMProviderStore::Internal_GetProvider
2015-05-02 13:36:06, Info DISM DISM Provider Store: PID=4348 TID=4092 Loading Provider from location C:WindowsSystem32DismFolderProvider.dll
— CDISMProviderStore::Internal_GetProvider
2015-05-02 13:36:06, Info DISM DISM Provider Store: PID=4348 TID=4092 Connecting to the provider located at C:WindowsSystem32DismFolderProvider.dll.
— CDISMProviderStore::Internal_LoadProvider
2015-05-02 13:36:06, Info DISM DISM Provider Store: PID=4348 TID=4092 Provider has not previously been encountered. Attempting to initialize
the provider. — CDISMProviderStore::Internal_GetProvider
2015-05-02 13:36:06, Info DISM DISM Provider Store: PID=4348 TID=4092 Loading Provider from location C:WindowsSystem32DismWimProvider.dll —
CDISMProviderStore::Internal_GetProvider
2015-05-02 13:36:06, Info DISM DISM Provider Store: PID=4348 TID=4092 Connecting to the provider located at C:WindowsSystem32DismWimProvider.dll.
— CDISMProviderStore::Internal_LoadProvider
2015-05-02 13:36:06, Info DISM DISM Provider Store: PID=4348 TID=4092 Provider has not previously been encountered. Attempting to initialize
the provider. — CDISMProviderStore::Internal_GetProvider
2015-05-02 13:36:06, Info DISM DISM Provider Store: PID=4348 TID=4092 Loading Provider from location C:WindowsSystem32DismVHDProvider.dll —
CDISMProviderStore::Internal_GetProvider
2015-05-02 13:36:06, Info DISM DISM Provider Store: PID=4348 TID=4092 Connecting to the provider located at C:WindowsSystem32DismVHDProvider.dll.
— CDISMProviderStore::Internal_LoadProvider
2015-05-02 13:36:06, Info DISM DISM Provider Store: PID=4348 TID=4092 Provider has not previously been encountered. Attempting to initialize
the provider. — CDISMProviderStore::Internal_GetProvider
2015-05-02 13:36:06, Info DISM DISM Provider Store: PID=4348 TID=4092 Loading Provider from location C:WindowsSystem32DismImagingProvider.dll
— CDISMProviderStore::Internal_GetProvider
2015-05-02 13:36:06, Info DISM DISM Provider Store: PID=4348 TID=4092 Connecting to the provider located at C:WindowsSystem32DismImagingProvider.dll.
— CDISMProviderStore::Internal_LoadProvider
2015-05-02 13:36:06, Info DISM DISM Provider Store: PID=4348 TID=4092 Provider has not previously been encountered. Attempting to initialize
the provider. — CDISMProviderStore::Internal_GetProvider
2015-05-02 13:36:06, Info DISM DISM Provider Store: PID=4348 TID=4092 Loading Provider from location C:WindowsSystem32DismCompatProvider.dll
— CDISMProviderStore::Internal_GetProvider
2015-05-02 13:36:06, Info DISM DISM Provider Store: PID=4348 TID=4092 Connecting to the provider located at C:WindowsSystem32DismCompatProvider.dll.
— CDISMProviderStore::Internal_LoadProvider
2015-05-02 13:36:06, Info DISM DISM Provider Store: PID=4348 TID=4092 Provider has not previously been encountered. Attempting to initialize
the provider. — CDISMProviderStore::Internal_GetProvider
2015-05-02 13:36:06, Info DISM DISM Provider Store: PID=4348 TID=4092 Loading Provider from location C:WindowsSystem32DismFfuProvider.dll —
CDISMProviderStore::Internal_GetProvider
2015-05-02 13:36:06, Info DISM DISM Provider Store: PID=4348 TID=4092 Connecting to the provider located at C:WindowsSystem32DismFfuProvider.dll.
— CDISMProviderStore::Internal_LoadProvider
2015-05-02 13:36:06, Info DISM DISM.EXE: Got the collection of providers. Now enumerating them to build the command table.
2015-05-02 13:36:06, Info DISM DISM.EXE: Attempting to add the commands from provider: DISM Log Provider
2015-05-02 13:36:06, Info DISM DISM.EXE: Attempting to add the commands from provider: FolderManager
2015-05-02 13:36:06, Info DISM DISM.EXE: Attempting to add the commands from provider: WimManager
2015-05-02 13:36:06, Info DISM DISM.EXE: Succesfully registered commands for the provider: WimManager.
2015-05-02 13:36:06, Info DISM DISM.EXE: Attempting to add the commands from provider: VHDManager
2015-05-02 13:36:06, Info DISM DISM.EXE: Attempting to add the commands from provider: GenericImagingManager
2015-05-02 13:36:06, Info DISM DISM.EXE: Succesfully registered commands for the provider: GenericImagingManager.
2015-05-02 13:36:06, Info DISM DISM.EXE: Attempting to add the commands from provider: Compatibility Manager
2015-05-02 13:36:06, Info DISM DISM.EXE: Succesfully registered commands for the provider: Compatibility Manager.
2015-05-02 13:36:06, Info DISM DISM.EXE: Attempting to add the commands from provider: FfuManager
2015-05-02 13:36:06, Info DISM DISM Provider Store: PID=4348 TID=4092 Getting Provider GenericImagingManager — CDISMProviderStore::GetProvider
2015-05-02 13:36:06, Info DISM DISM Provider Store: PID=4348 TID=4092 Provider has previously been initialized. Returning the existing instance.
— CDISMProviderStore::Internal_GetProvider
2015-05-02 13:36:06, Info DISM DISM Provider Store: PID=4348 TID=4092 Getting Provider FfuManager — CDISMProviderStore::GetProvider
2015-05-02 13:36:06, Info DISM DISM Provider Store: PID=4348 TID=4092 Provider has previously been initialized. Returning the existing instance.
— CDISMProviderStore::Internal_GetProvider
2015-05-02 13:36:06, Error DISM DISM Imaging Provider: PID=4348 TID=4092 basentsetupopktoolsdismprovidersimagingproviderdllgenericimagingmanager.cpp:2546
— CGenericImagingManager::InternalCmdFFUApply(hr:0x80070490)
2015-05-02 13:36:06, Error DISM DISM Imaging Provider: PID=4348 TID=4092 basentsetupopktoolsdismprovidersimagingproviderdllgenericimagingmanager.cpp:535
— CGenericImagingManager::ExecuteCmdLine(hr:0x80070490)
2015-05-02 13:36:06, Info DISM DISM.EXE: Image session has been closed. Reboot required=no.
2015-05-02 13:36:06, Info DISM DISM.EXE:
2015-05-02 13:36:06, Info DISM DISM.EXE: <—— Ending Dism.exe session ——>
2015-05-02 13:36:06, Info DISM DISM.EXE:
2015-05-02 13:36:06, Info DISM DISM Provider Store: PID=4348 TID=4092 Found the OSServices. Waiting to finalize it until all other providers
are unloaded. — CDISMProviderStore::Final_OnDisconnect
2015-05-02 13:36:06, Info DISM DISM Provider Store: PID=4348 TID=4092 Disconnecting Provider: FolderManager — CDISMProviderStore::Internal_DisconnectProvider
2015-05-02 13:36:06, Info DISM DISM Provider Store: PID=4348 TID=4092 Disconnecting Provider: WimManager — CDISMProviderStore::Internal_DisconnectProvider
2015-05-02 13:36:06, Info DISM DISM Provider Store: PID=4348 TID=4092 Disconnecting Provider: VHDManager — CDISMProviderStore::Internal_DisconnectProvider
2015-05-02 13:36:06, Info DISM DISM Provider Store: PID=4348 TID=4092 Disconnecting Provider: GenericImagingManager — CDISMProviderStore::Internal_DisconnectProvider
2015-05-02 13:36:06, Info DISM DISM Provider Store: PID=4348 TID=4092 Disconnecting Provider: Compatibility Manager — CDISMProviderStore::Internal_DisconnectProvider
2015-05-02 13:36:06, Info DISM DISM Provider Store: PID=4348 TID=4092 Disconnecting Provider: FfuManager — CDISMProviderStore::Internal_DisconnectProvider
2015-05-02 13:36:06, Info DISM DISM Provider Store: PID=4348 TID=4092 Releasing the local reference to DISMLogger. Stop logging. — CDISMProviderStore::Internal_DisconnectProvider-
Edited by
Thursday, May 14, 2015 6:16 PM
-
Edited by
Answers
-
According to my research FfuProvider.dll checks this values and fails if one of them is empty.
This is the only reason why dism fails with 1168 error on a Hyper-V virtual machine.You can patch x86 version of FfuProvider.dll with HEX editor.
File offset 0x7312, replace B8 90 04 07 80 with B8 00 00 00 00 (valid for 10074 and 10075)Be sure you are patch and use an appropriate version of x86 dism:
10074
C:windowsSysWOW64Dism.exe
C:windowsSysWOW64dismFfuProvider.dll
To replace this file you have to become his owner and modify access rights.10075
C:Program Files (x86)Windows Kits10Assessment and Deployment KitDeployment Toolsx86DISMdism.exe
C:Program Files (x86)Windows Kits10Assessment and Deployment KitDeployment Toolsx86DISMffuprovider.dllPaths is for x64 windows system.
Be careful: dism can rewrite any drive, including the system drive of running system if you specify its number in \.PhysicalDriveN
-
Edited by
komarov.biz
Thursday, May 14, 2015 9:20 AM -
Marked as answer by
PA1RB
Thursday, May 14, 2015 6:14 PM
-
Edited by
-
I’m very sorry to hear that you are still experiencing this issue. Please know that we are looking into it and hope to have a solution or work-around available for you soon.
The only other suggestion I can think of at the moment is if you could borrow a friends laptop that has a SD card reader built in you might get better results that way.
Jonathan Tanner | Microsoft | Windows 10 IoT Core Insider Preview Support | This posting is provided ‘as is’ with no warranties and confers no rights.
-
Marked as answer by
PA1RB
Saturday, May 9, 2015 9:04 AM
-
Marked as answer by
-
OK, today I copied the Flash.ffu file to a Surface PRO 3 running Windows 10 build 10074.
I have succesfully flashed two SD cards (SanDisk Ultra microSDHC UHS-1 cards with 8 GB, class 10) with the dism.exe on that Surface (dism version 10.0.10074.0).
The first card I flashed using the build-in micro SD-card reader of the Surface. The second card I flashed using the exact same USB cardreader that does not work on my other computer (recognized by wmic as ChipBank SD/MM Reader USB Device).
So the USB reader works on the Surface, but does not work on my other computer.
The Windows 10 builds are both 10074, but the Surface runs the English language, the other computer runs the Dutch language.
The computer on which the USB stick does not work is based on an ASUS P5LD2-VM motherboard (using the build in USB ports).
So I will be off playing with the RPI-2 this weekend, but I will keep an eye out for the solution to the issue in this forum.
Happy to provide more details if required by the engineers!
-
Proposed as answer by
Jonathan TannerMicrosoft employee
Friday, May 8, 2015 11:54 PM -
Edited by
PA1RB
Saturday, May 9, 2015 9:02 AM -
Marked as answer by
PA1RB
Saturday, May 9, 2015 9:04 AM
-
Proposed as answer by
-
Hi,
I had a similar problem with the above mentioned error. I tested all recomended methods/solutions with two USB card readers and three SD cards (class 10) but with no success. Now I installed Windows on the laptop that has SD card reader built
in, as recomended above, and it works fine. Thanks for the tip!-
Marked as answer by
PA1RB
Saturday, May 9, 2015 9:04 AM
-
Marked as answer by
-
Hello MiPiGamer,
The page with instructions is here: http://ms-iot.github.io/content/win10/SetupRPI.htm
The package including the image can be downloaded in step 3:
Download the package «Windows 10 IoT Core Insider Preview Image for Raspberry Pi 2» from Microsoft Connect (you must be signed in to Microsoft Connect).Aside from the issue above writing the image, all went according to the description, and «Blinky» made the LED blink!
-
Marked as answer by
PA1RB
Sunday, May 10, 2015 8:49 PM
-
Marked as answer by
-
Wow — that did the trick allright:
Deployment Image Servicing and Management tool
Version: 10.0.10074.0Applying image
[==========================100.0%==========================]
The operation completed successfully.I confirm this patch absolutely fixed the issue, well done and many thanks indeed !!!
Hope this finds its way into the next release of Windows 10.
Ralph
-
Marked as answer by
PA1RB
Thursday, May 14, 2015 6:14 PM
-
Marked as answer by
ИНФОРМАЦИОННАЯ ПОДДЕРЖКА- CUSTOMER ADVISORY
Номер документа: c06424402
Версия: 1
Внимание: Информация, содержащаяся в данном документе, в том числе о продуктах и версиях программного обеспечения, является актуальной на дату выпуска.Документ может быть изменен без предварительного уведомления.
Дата выпуска : 30-Jul-2019
Последнее обновление : 30-Jul-2019
ОПИСАНИЕ
При использовании Microsoft System Center Configuration Manager (SCCM) для настройки систем в области «ПРИМЕНЕНИЕ» появляется следующее сообщение об ошибке DISM:
Ошибка: 1168.
Элемент не найден.
Это может произойти, когда средство командной строки Microsoft Deployment Image Servicing and Management (DISM) выполняет команды для настройки драйвера Realtek HD Audio (SoftPaq SP95193). Проблема возникает из-за того, что драйвер содержит неправильно работающий компонент универсальной платформы Windows (UWP).
ПРИМЕНЕНИЕ
Информация в этом документе относится к следующему:
Компьютеры:
Ноутбук HP EliteBook 830 G5
Операционные системы:
Microsoft Windows 10 RS5 (версия 1809)
РЕШЕНИЕ
Ниже приведены действия, которые необходимо выполнить для установки данного компонента с SCCM.
-
Разархивируйте SoftPaq
-
Дополните командный файл для установки компонента UWP с DISM. Вот команда DISM, которую нужно вставить в командный файл:
@echo ON dism.exe /image:%OSD_System% /add-Driver /Driver:%~dp0HSAcb68d18decd44cd44c94bec5cd2a2c354180.appxbundle /Region=»all» /LicensePath:%~dp0HSAcb68d18decd44cd44c94bec5cd2a2c354180_License1.xml /DependencyPackagePath:%~dp0HSA Micrsooft.VCLibs.140.00_14.0.26706.0_x64_8wekyb3d8bbwe.appx
Примечание.
Переменная
%OSD_System%, используемая в приведенной выше команде, устанавливается предыдущим действием последовательности задач. -
Создайте пакет и добавьте действие командной строки, чтобы выполнить командный файл сразу после образа Windows и перед установкой параметров Windows.
-
Разверните последовательность задач и используйте диспетчер устройств, чтобы убедиться в правильности установки драйвера Realtek Audio.
Hardware platforms affected :
HP EliteBook 830 G5 Notebook PC
Повережденные операционные системы : Не применимо
Поврежденное программное обеспечение : Не применимо
Идентификатор Перекрестной Ссылки Информационной Поддержки : IA06417547
© Copyright 2023 HP Development Company, L.P.
HP Inc. не несет ответственность за технические или редакторские ошибки или упущения, содержащиеся в данном документе. Предоставленная информация предоставляется «как есть» без каких-либо гарантий. В пределах, допускаемых законом, ни HP, ни ее аффилированные лица, субподрядчики или поставщики не будут нести ответственность за случайные, специальные или косвенные убытки, включая стоимость простоя; упущенную прибыль; убытки, связанные с приобретением товаров или услуг-заменителей; убытки за потерю данных или восстановление программного обеспечения. Информация в этом документе может быть изменена без предварительного уведомления. Компания HP Inc. и названия продуктов HP, упомянутые в данном документе, являются товарными знаками HP Inc. в США и других странах. Названия других продуктов и компаний, упомянутые здесь, могут являться товарными знаками соответствующих владельцев.
Using the latest version of DISM (Version: 10.0.14393.0) I mounted the Install.wim for W10 1607 and injected the five roll-up updates (KB3193494, KB3176938, KB3176934, KB3176495, KB3176929.) I got no errors during the installs, but afterward I got
the 1168 error and the message that the image was no longer serviceable.
I first tried this on my host system running W10 1511, then my Hyper-V VM running W10 1607 (with SecureBoot enabled). The error is the same on both. Injecting only one KB gave no error.
The roll-up updates were DLed from Microsoft Update Catalog and the hash codes confirmed.
Below is the DISM log (LogLevel:1).
Thanks and enjoy, John.
[6632] Caller did not request sparse mount
[6632] Mounting new image.
Wim: [tsclientWW10-FXsourcesinstall.wim]
Image Index: [1]
Mount Path: [C:FastMount]
[6632] Wimserv process started for guid 577426ba-4a55-4981-9d32-ba6794ce4ab8. Id is 1920
[1920] ImageUnmarshallHandle: Reconstituting wim at tsclientWW10-FXsourcesinstall.wim.
[1920] Mounted image at C:FastMount.
[696] ImageUnmarshallHandle: Reconstituting wim at tsclientWW10-FXsourcesinstall.wim.
[696] ImageUnmarshallHandle: Reconstituting wim at tsclientWW10-FXsourcesinstall.wim.
2016-09-26 12:47:39, Error DISM DISM Package Manager: PID=5736 TID=2476 Incorrect parameter E:W10-ComponentsBuild-ComponentsUpdates — path not found
— CDISMPackageManager::Internal_CreatePackageByPath(hr:0x80070003)
2016-09-26 12:47:39, Error DISM DISM Package Manager: PID=5736 TID=2476 Failed to get the underlying CBS package. — CDISMPackageManager::OpenPackageByPath(hr:0x80070003)
2016-09-26 12:47:39, Error DISM DISM Package Manager: PID=5736 TID=2476 Failed to open the package at location: «E:W10-ComponentsBuild-ComponentsUpdates»
— CPackageManagerCLIHandler::ProcessPackagePath(hr:0x80070003)
2016-09-26 12:47:39, Error DISM DISM Package Manager: PID=5736 TID=2476 Failed while processing command add-package. — CPackageManagerCLIHandler::ExecuteCmdLine(hr:0x80070003)
[4944] ImageUnmarshallHandle: Reconstituting wim at tsclientWW10-FXsourcesinstall.wim.
[4944] ImageUnmarshallHandle: Reconstituting wim at tsclientWW10-FXsourcesinstall.wim.
[1920] ReadWriteDataInternal:(135)
[1920] ResExtract:(558)
[1920] [ResExtract:(559) -> WIMCopyFileEx failed] C:FastMountWindowsWinSxSamd64_microsoft-windows-ui-search_31bf3856ad364e35_10.0.14393.0_none_2285a4ae39b49b48logo.scale-80.png (Error = 59)
[1920]
2016-09-26 13:16:37, Error CBS Doqe: Failed processing queue [HRESULT = 0x80070490 — ERROR_NOT_FOUND]
2016-09-26 13:16:37, Error CBS Doqe: Failed while processing driver operations queue. [HRESULT = 0x80070490 — ERROR_NOT_FOUND]
2016-09-26 13:16:37, Error CBS Failed to process single phase execution. [HRESULT = 0x80070490 — ERROR_NOT_FOUND]
2016-09-26 13:16:38, Error CBS Failed to perform operation. [HRESULT = 0x80070490 — ERROR_NOT_FOUND]
2016-09-26 13:16:38, Error DISM DISM Package Manager: PID=1352 TID=4416 Failed finalizing changes. — CDISMPackageManager::Internal_Finalize(hr:0x80070490)
2016-09-26 13:16:42, Error DISM DISM Package Manager: PID=1352 TID=4416 Failed processing package changes — CDISMPackageManager::ProcessChanges(hr:0x80070490)
2016-09-26 13:16:42, Error DISM DISM Package Manager: PID=1352 TID=4416 Failed to process package changes in unattend file. — CPackageManagerUnattendHandler::Internal_ProcessChanges(hr:0x80070490)
2016-09-26 13:16:42, Error DISM DISM Package Manager: PID=1352 TID=4416 Failed to process package changes. — CPackageManagerUnattendHandler::Apply(hr:0x80070490)
2016-09-26 13:16:42, Error DISM DISM Package Manager: PID=1352 TID=4416 Failed to Apply the unattend. — CDISMPackageManager::Apply(hr:0x80070490)
2016-09-26 13:16:42, Error DISM DISM Unattend Manager: PID=1352 TID=4416 «Error applying unattend for provider: DISM Package Manager» — CUnattendManager::Apply(hr:0x80070490)
2016-09-26 13:16:42, Error DISM DISM Package Manager: PID=1352 TID=4416 Failed applying the unattend file from the MSU package. — CMsuPackage::ApplyMsuUnattend(hr:0x80070490)
2016-09-26 13:16:42, Error DISM DISM Package Manager: PID=1352 TID=4416 Failed to apply the MSU unattend file to the image. — CMsuPackage::Install(hr:0x80070490)
2016-09-26 13:16:43, Error DISM DISM Package Manager: PID=1352 TID=4416 Discard this Windows image and try the operation again on a new Windows image.
— GetCbsErrorMsg
2016-09-26 13:16:43, Error DISM DISM Package Manager: PID=1352 TID=4416 The specified image is no longer serviceable. Unmount the image and discard your
changes. Mount the original image to try the operation again. — CPackageManagerCLIHandler::ReportFailedPackage
2016-09-26 13:17:27, Error CBS The image has been damaged by an offline servicing failure and no further servicing is allowed. [HRESULT = 0x800f0830
— CBS_E_IMAGE_UNSERVICEABLE]
2016-09-26 13:17:27, Error CBS Failed to perform operation. [HRESULT = 0x800f0830 — CBS_E_IMAGE_UNSERVICEABLE]
2016-09-26 13:17:27, Error DISM DISM Package Manager: PID=1352 TID=4416 Failed finalizing changes. — CDISMPackageManager::Internal_Finalize(hr:0x800f0830)
2016-09-26 13:17:27, Error DISM DISM Package Manager: PID=1352 TID=4416 Discard this Windows image and try the operation again on a new Windows image.
— GetCbsErrorMsg
2016-09-26 13:17:27, Error DISM DISM Package Manager: PID=1352 TID=4416 Failed processing package changes — CDISMPackageManager::ProcessChanges(hr:0x800f0830)
2016-09-26 13:17:27, Error DISM DISM Package Manager: PID=1352 TID=4416 Discard this Windows image and try the operation again on a new Windows image.
— GetCbsErrorMsg
2016-09-26 13:17:27, Error DISM DISM Package Manager: PID=1352 TID=4416 Failed to process package changes in unattend file. — CPackageManagerUnattendHandler::Internal_ProcessChanges(hr:0x800f0830)
2016-09-26 13:17:27, Error DISM DISM Package Manager: PID=1352 TID=4416 Failed to process package changes. — CPackageManagerUnattendHandler::Apply(hr:0x800f0830)
2016-09-26 13:17:27, Error DISM DISM Package Manager: PID=1352 TID=4416 Failed to Apply the unattend. — CDISMPackageManager::Apply(hr:0x800f0830)
2016-09-26 13:17:27, Error DISM DISM Unattend Manager: PID=1352 TID=4416 «Error applying unattend for provider: DISM Package Manager» — CUnattendManager::Apply(hr:0x800f0830)
2016-09-26 13:17:27, Error DISM DISM Package Manager: PID=1352 TID=4416 Failed applying the unattend file from the MSU package. — CMsuPackage::ApplyMsuUnattend(hr:0x800f0830)
2016-09-26 13:17:27, Error DISM DISM Package Manager: PID=1352 TID=4416 Failed to apply the MSU unattend file to the image. — CMsuPackage::Install(hr:0x800f0830)
2016-09-26 13:17:27, Error DISM DISM Package Manager: PID=1352 TID=4416 Failed while processing command add-package. — CPackageManagerCLIHandler::ExecuteCmdLine(hr:0x80070490)
внезапно моя Visual Studio Express 2010 c ++ перестала перестраивать мой проект. Когда я впервые нажимаю F7, проект строится и работает нормально (черт возьми, это привет, мир). Затем я вношу некоторые изменения и снова нажимаю F7, после чего получаю: 1> ССЫЛКА: фатальная ошибка LNK1168: невозможно открыть C: Users username Documents Visual Studio 2010 Projects console Debug console.exe для записи А теперь самое смешное:
- приложение не запущено и не отображается в диспетчере задач.
- зайти в директорию проекта и попытаться удалить его руками увенчался успехом, но файл ПОЯВЛЯЕТСЯ ВНОВЬ ОТКУДА o_O
- восстановление системы отключено
- Я также пытался завладеть всем чертовым приводом
- каждый раз, когда я удаляю файл, он воссоздает себя снова, но иногда перестает это делать
- если удалить файл (и после этого он воссоздается), а затем я запускаю sysinternals procmon, файл исчезнет.
- если я запускаю procmon раньше — то файл продолжает появляться после удаления, как всегда
ОС: W7 SP1 64-бит, с последними обновлениями какие идеи, пожалуйста? гугл мне не помог
- 1 Для меня простая перезагрузка устранила эту ошибку (аналогично ответу CodeMed ниже).
Включите службу «Опыт работы с приложением». Запустите окно консоли и введите
- http://support.microsoft.com/kb/902196
- Большое вам спасибо, я бы никогда не подумал об этом без вашей помощи!
- Спасибо так много, это сводило меня с ума
- 25 Windows 10 выдает ошибку: «Неверное имя службы»
- Как включить взаимодействие с приложением?
- 3 У меня сработало. Еще один нелепый взлом Windows. Microsoft должна заплатить Google изрядную сумму за поддержку своей ОС, иначе никто не сможет воспользоваться этой штукой.
Проблема, вероятно, в том, что вы забыли закрыть программу и вместо этого она работает в фоновом режиме.
Найдите окно консоли, в котором запущена программа exe-файла, и закройте его, щелкнув X в правом верхнем углу. Затем попробуйте перекомпилировать программу. В моем случае это решило проблему.
Я знаю, что эта публикация устарела, но я отвечаю за других людей вроде меня, которые находят ее через поисковые системы.
- 3 Это исправило это для меня. Я скажу, что мне пришлось искать процессы в диспетчере задач Windows, потому что окно консоли исчезло.
- Я не могу закрыть кнопкой X, есть ли другой способ …? Один из способов, который я нашел, — это потерять вашу IDE, а затем она автоматически закроет окно подсказки.
- Win10 VS 2017. Завершение всего до тех пор, пока в диспетчере задач не осталось ничего значимого, не помогает, вместо этого мне приходится перезагружать компьютер. При завершении работы внезапно появляется диалоговое окно с ошибкой, которое немедленно закрывается, предположительно, это диалоговое окно необходимо закрыть, прежде чем отладчик сможет снова получить доступ к приложению, но диалоговое окно не появляется (до завершения работы). Возможно, этот процесс существовал в диспетчере задач, но с общим / бесполезным именем.
- 2 Добавляя к моему вышеупомянутому комментарию, Диспетчер задач не отображает процесс filename.exe, но монитор ресурсов отображает, поэтому я могу убить его оттуда, что решает проблему без перезагрузки.
- @CodeMed ой … вот почему я люблю StackOverflow
Перезапуск Visual Studio решил проблему для меня.
- 1 Мне действительно пришлось перезагрузить весь компьютер.
Я столкнулся с этой проблемой, когда сборка внезапно закрывается перед загрузкой. В диспетчере задач не будет отображаться ни один процесс, но если вы перейдете к исполняемому файлу, созданному в папке проекта, и попытаетесь удалить его, Windows заявит, что приложение уже используется. (Если нет, просто удалите файл и выполните повторную сборку, в результате чего будет создан новый исполняемый файл). В Windows (Visual Studio 2019) файл по умолчанию находится в этом каталоге:
Чтобы завершить предположительно запущенный процесс, откройте командную строку и введите следующую команду:
Это принудительно завершает любой запущенный экземпляр. Восстановите и выполните!
В моем случае очистка и перестройка проекта решили проблему.
ну, на самом деле я просто сохранил и закрыл проект и перезапустил VS Express 2013 в Windows 8, и это решило мою проблему.
- Привет, Спарш Джайн, в вопросе упоминалось, что «визуальная студия экспресс 2010«на»W7 SP1«использовалось. Более того, я не думаю, что ваш ответ не добавляет ничего, чего не охватили существующие ответы.
- Спасибо! Я сделал это с VS 2015 на Windows 10, и это мне помогло
Я думаю, что это самый простой способ решить эту проблему.
Причина в том, что ваша предыдущая сборка все еще работает в фоновом режиме. Я решаю эту проблему, выполнив следующие действия:
- Открыть диспетчер задач
- Перейти к вкладке сведений
- Найдите свое приложение
- Завершите задачу, щелкнув по ней правой кнопкой мыши
- Готово!
Это также может быть проблемой из-за неправильного использования таких функций, как FindNextFile, когда FindClose никогда не выполняется. Процесс созданного файла завершается, и саму сборку можно удалить, но LNK1168 предотвратит перестройку из-за открытого дескриптора. Это может создать утечку дескрипторов в проводнике, которую можно устранить, завершив и перезапустив проводник, но во многих случаях необходима немедленная перезагрузка.
Я знаю, что это старый вопрос, но подумал, что расскажу, как я решил проблему.
Если вы используете Visual Studio и возникает эта ошибка, вы можете попытаться подключиться к процессу (CTRL + ALT + P) и найти процесс «(программа) .exe». Когда вы попытаетесь подключиться к нему, отобразится сообщение об ошибке о том, что подключиться не удалось, что выводит процесс из «запущенного» (даже если это не так …). Вы также сможете удалить (программу) .exe из ваша папка отладки.
Надеюсь, это кому-то поможет!
НАКОНЕЦ НАИЛУЧШИЙ СПОСОБ Сработал идеально для меня
Ни одно из решений на этой странице не помогло мне ЗА ИСКЛЮЧЕНИЕМ СЛЕДУЮЩЕГО
Под секциями комментариев ко второму ответу попробуйте следующее:
Добавляя к моему вышеупомянутому комментарию, Диспетчер задач не отображает процесс filename.exe, но Монитор ресурсов делает, поэтому я могу убить его оттуда, что решает проблему без перезагрузки. — A__ 19 июня ’19 в 21:23
У меня тоже была такая же проблема. Мое окно консоли больше не было открыто, но я мог видеть, как работает мое приложение, перейдя к процессам в диспетчере задач. Имя процесса было именем моего приложения. Как только я закончил процесс, я смог без проблем собрать и скомпилировать свой код.
Запустите вашу программу как администратор. Программа не может перезаписать ваши файлы, потому что они находятся в защищенном месте на жестком диске.
Suddenly, my Visual Studio Express 2010 C++ stopped rebuilding my project.
When I first hit F7 the project builds and runs fine (heck, it’s a hello world example).
Then I make some changes and hit F7 again, then I get:
1>LINK : fatal error LNK1168: cannot open C:UsersusernameDocumentsVisual Studio 2010ProjectsconsoleDebugconsole.exe for writing**<br><br>
Now the funny thing comes:
- The app is not running and it’s not shown in the Task Manager.
- Going into the project directory and trying to remove it with hands comes with success but the file APPEARS AGAIN FROM NOWHERE.
- The system restore is disabled.
- I also tried to take the ownership of the whole damn drive.
- Every time I delete the file it recreates itself again but sometimes it stops doing that.
- If I delete the file (and it recreates after that), and then I start sysinternals procmon then the file disappears.
- If I start procmon before — then the file keeps appearing after delete like always.
OS: W7 SP1 64-bit, with latest updates
Any ideas, please?
![]()
Amal K
4,0642 gold badges18 silver badges43 bronze badges
asked Aug 25, 2012 at 17:25
![]()
1
The problem is probably that you forgot to close the program and that you instead have the program running in the background.
Find the console window where the exe file program is running, and close it by clicking the X in the upper right corner. Then try to recompile the program. In my case this solved the problem.
I know this posting is old, but I am answering for the other people like me who find this through the search engines.
answered Jul 6, 2013 at 6:53
![]()
CodeMedCodeMed
9,69869 gold badges205 silver badges354 bronze badges
7
I’ve encountered this problem when the build is abruptly closed before it is loaded. No process would show up in the Task Manager, but if you navigate to the executable generated in the project folder and try to delete it, Windows claims that the application is in use. (If not, just delete the file and rebuild, which generates a new executable)
In Windows(Visual Studio 2019), the file is located in this directory by default:
%USERPROFILE%sourcereposProjectFolderNameDebug
To end the allegedly running process, open the command prompt and type in the following command:
taskkill /F /IM ApplicationName.exe
This forces any running instance to be terminated.
Rebuild and execute!
answered Sep 17, 2019 at 16:20
![]()
Amal KAmal K
4,0642 gold badges18 silver badges43 bronze badges
1
Restarting Visual Studio solved the problem for me.
answered Jan 7, 2017 at 18:15
![]()
Aleksei MialkinAleksei Mialkin
2,1371 gold badge26 silver badges25 bronze badges
1
In my case, cleaning and rebuilding the project resolved the problem.
![]()
Uli Köhler
12.8k15 gold badges69 silver badges117 bronze badges
answered Mar 2, 2014 at 15:35
![]()
Hau LeHau Le
1211 silver badge5 bronze badges
If the above solutions didn’t work, you can try this which worked for me.
Open an elevated command prompt (cmd -> Run as administrator), then write following command and hit enter:
wmic process where name='YOUR_PROCESS_NAME.exe' delete
If you see a message: Instance deletion successful., then you will be again able to build and run project from VS.
e.g. in OP’s case, the command will be:
wmic process where name='console.exe' delete
answered Aug 3, 2021 at 9:06
![]()
UkFLSUIUkFLSUI
5,4016 gold badges34 silver badges47 bronze badges
well, I actually just saved and closed the project and restarted VS Express 2013 in windows 8 and that sorted my problem.
answered Apr 8, 2015 at 17:50
![]()
2
The Reason is that your previous build is still running in the background.
I solve this problem by following these steps:
- Open Task Manager
- Goto Details Tab
- Find Your Application
- End Task it by right clicking on it
- Done!
answered Aug 4, 2020 at 12:48
![]()
back2Lobbyback2Lobby
4836 silver badges12 bronze badges
This solved same problem I also came across very well
- Close the app if it is still running on the taskbar,
- Open cmd (command prompt) and run the following
taskkill /F /IM ApplicationName.exe
- Rebuild your project!! error solved!
![]()
answered Sep 25, 2022 at 1:11
![]()
niosnios
611 silver badge7 bronze badges
This can also be a problem from the improper use of functions like FindNextFile when a FindClose is never executed. The process of the built file is terminated, and the build itself can be deleted, but LNK1168 will prevent a rebuild because of the open handle. This can create a handle leak in Explorer which can be addressed by terminating and restarting Explorer, but in many cases an immediate reboot is necessary.
answered Oct 9, 2015 at 2:44
![]()
Laurie StearnLaurie Stearn
9431 gold badge12 silver badges33 bronze badges
I know this is an old question but thought I’d share how I resolved the issue.
If you’re using Visual Studio and this error occurs, you can try to attach to process (CTRL+ALT+P) and find the «(program).exe» process. When you try to attach to it, an error will display stating that it failed to attach which removes the process from «running» (even though it’s not…) You’ll also be able to delete the (program).exe from your Debug folder.
Hope this helps someone!
answered Oct 4, 2019 at 5:25
![]()
tw1tch01tw1tch01
491 silver badge4 bronze badges
FINALLY THE BEST WAY WORKED PERFECTLY FOR ME
None of the solutions in this page worked for me EXCEPT THE FOLLOWING
Below the comment sections of the second answer, try the following :
Adding to my above comment, Task Manager does not display the
filename.exe process but Resource Monitor does, so I’m able to
kill it from there which solves the issue without having to reboot. –
A__ Jun 19 ’19 at 21:23
answered Aug 14, 2020 at 14:32
![]()
SamSam
2523 silver badges10 bronze badges
If none of the above suggested work for you, which was the case for me, just change the project name. It creates a new exe in the new project name. Later when you restart, you can change it back to your original project name.
answered Aug 22, 2021 at 9:43
![]()
RathnavelRathnavel
751 silver badge12 bronze badges
I know this is an old thread but I was stumbling in the same problem also. Finding it in task manager is tricky, and I started to grow tired of having to restart my PC every time this happened.
A solution would be to download Process Explorer and there you can search for running tasks. In my case I was having the following error:
1>LINK : fatal error LNK1168: cannot open C:OutBuildVS12_appDebugplatform_test.exe for writing [C:BuildVS12_appplatform_test.vcxproj]
I searched for C:OutBuildVS12_appDebugplatform_test.exe in Process Explorer, killed it and I was able to compile.
answered Sep 15, 2022 at 11:15
![]()
Ra’wRa’w
1132 silver badges10 bronze badges
I also had this same issue. My console window was no longer open, but I was able to see my application running by going to processes within task manager. The process name was the name of my application. Once I ended the process I was able to build and compile my code with no issues.
answered Sep 12, 2013 at 23:54
![]()
JasonJason
1471 gold badge2 silver badges11 bronze badges
Start your program as an administrator. The program can’t rewrite your files cause your files are in a protected location on your hard drive.
![]()
answered Jan 6, 2014 at 15:07
![]()
0
| Номер ошибки: | Ошибка 1168 | |
| Название ошибки: | Windows Defender Error Code 1168 | |
| Описание ошибки: | Ошибка 1168: Возникла ошибка в приложении Windows Defender. Приложение будет закрыто. Приносим извинения за неудобства. | |
| Разработчик: | Microsoft Corporation | |
| Программное обеспечение: | Windows Defender | |
| Относится к: | Windows XP, Vista, 7, 8, 10, 11 |
Фон «Windows Defender Error Code 1168»
Эксперты обычно называют «Windows Defender Error Code 1168» «ошибкой времени выполнения». Программисты, такие как Microsoft Corporation, стремятся создавать программное обеспечение, свободное от этих сбоев, пока оно не будет публично выпущено. Как и во всем в жизни, иногда такие проблемы, как ошибка 1168, упускаются из виду.
После первоначального выпуска пользователи Windows Defender могут столкнуться с сообщением «Windows Defender Error Code 1168» во время запуска программы. Когда это происходит, конечные пользователи могут сообщить Microsoft Corporation о наличии ошибок «Windows Defender Error Code 1168». Microsoft Corporation может устранить обнаруженные проблемы, а затем загрузить измененный файл исходного кода, позволяя пользователям обновлять свою версию. Поэтому, когда вы сталкиваетесь с запросом на обновление Windows Defender, это обычно связано с тем, что это решение для исправления ошибки 1168 и других ошибок.
Вполне вероятно, что при загрузке Windows Defender вы столкнетесь с «Windows Defender Error Code 1168». Проанализируем некоторые из наиболее распространенных причин ошибок ошибки 1168 во время выполнения:
Ошибка 1168 Crash — это распространенная ошибка 1168 во время выполнения ошибки, которая приводит к полному завершению работы программы. Обычно это происходит, когда Windows Defender не может обработать данные в удовлетворительной форме и поэтому не может получить ожидаемый результат.
Утечка памяти «Windows Defender Error Code 1168» — ошибка 1168 утечка памяти приводит к тому, что Windows Defender постоянно использует все больше и больше памяти, увяская систему. Возможные причины включают сбой Microsoft Corporation для девыделения памяти в программе или когда плохой код выполняет «бесконечный цикл».
Error 1168 Logic Error — Ошибка программной логики возникает, когда, несмотря на точный ввод от пользователя, производится неверный вывод. Это связано с ошибками в исходном коде Microsoft Corporation, обрабатывающих ввод неправильно.
Повреждение, отсутствие или удаление файлов Windows Defender Error Code 1168 может привести к ошибкам Windows Defender. Как правило, решить проблему можно заменой файла Microsoft Corporation. В некоторых случаях реестр Windows пытается загрузить файл Windows Defender Error Code 1168, который больше не существует; в таких ситуациях рекомендуется запустить сканирование реестра, чтобы исправить любые недопустимые ссылки на пути к файлам.
Распространенные проблемы Windows Defender Error Code 1168
Усложнения Windows Defender с Windows Defender Error Code 1168 состоят из:
- «Ошибка программного обеспечения Windows Defender Error Code 1168. «
- «Недопустимая программа Win32: Windows Defender Error Code 1168»
- «Windows Defender Error Code 1168 должен быть закрыт. «
- «Файл Windows Defender Error Code 1168 не найден.»
- «Windows Defender Error Code 1168 не может быть найден. «
- «Проблема при запуске приложения: Windows Defender Error Code 1168. «
- «Windows Defender Error Code 1168 не выполняется. «
- «Windows Defender Error Code 1168 выйти. «
- «Windows Defender Error Code 1168: путь приложения является ошибкой. «
Проблемы Windows Defender Error Code 1168 с участием Windows Defenders возникают во время установки, при запуске или завершении работы программного обеспечения, связанного с Windows Defender Error Code 1168, или во время процесса установки Windows. При появлении ошибки Windows Defender Error Code 1168 запишите вхождения для устранения неполадок Windows Defender и чтобы HelpMicrosoft Corporation найти причину.
Причины проблем Windows Defender Error Code 1168
Проблемы Windows Defender Error Code 1168 могут быть отнесены к поврежденным или отсутствующим файлам, содержащим ошибки записям реестра, связанным с Windows Defender Error Code 1168, или к вирусам / вредоносному ПО.
В первую очередь, проблемы Windows Defender Error Code 1168 создаются:
- Недопустимая или поврежденная запись Windows Defender Error Code 1168.
- Вирус или вредоносное ПО, которые повредили файл Windows Defender Error Code 1168 или связанные с Windows Defender программные файлы.
- Windows Defender Error Code 1168 злонамеренно удален (или ошибочно) другим изгоем или действительной программой.
- Другая программа, конфликтующая с Windows Defender Error Code 1168 или другой общей ссылкой Windows Defender.
- Windows Defender (Windows Defender Error Code 1168) поврежден во время загрузки или установки.
Продукт Solvusoft
Загрузка
WinThruster 2022 — Проверьте свой компьютер на наличие ошибок.
Совместима с Windows 2000, XP, Vista, 7, 8, 10 и 11
Установить необязательные продукты — WinThruster (Solvusoft) | Лицензия | Политика защиты личных сведений | Условия | Удаление
- Remove From My Forums
-
Вопрос
-
Подскажите пожалуйста. Пишу исходник в Microsoft Visual C++ 2008 Express Edition. Компилирую — все нормально, работает. вношу какие либо изменения в коде и пытаюсь заново скомпилировать. Выдает вот такую ошибку.
1>—— Построение начато: проект: 5_stepen’, Конфигурация: Debug Win32 ——
1>Компиляция…
1>stepen’.cpp
1>Компоновка…
1>LINK : fatal error LNK1168: не удается открыть C:UsersAntonDocumentsVisual Studio 2008Projects5_stepen’Debug5_stepen’.exe для записи
1>Журнал построения был сохранен в «file://c:UsersAntonDocumentsVisual Studio 2008Projects5_stepen’5_stepen’DebugBuildLog.htm»
1>5_stepen’ — ошибок 1, предупреждений 0
========== Построение: успешно: 0, с ошибками: 1, без изменений: 0, пропущено: 0 ==========Для устранения приходится сохранить мой.cpp и закрыть прогу. через 2 минуты отрывать. тогда запускается компиляция. Ни чего не могу поделать.
-
Перемещено
2 октября 2010 г. 0:53
MSDN Forums Consolidation (От:Visual Studio — отзывы и пожелания)
-
Перемещено
Ответы
-
Добрый день.
Такое происходит, когда Ваш файл 5_stepen.exe не доступен для записи. В ОС WinNT это ситуация возникает, когда файл залочен. Причиной может служить следующее: Вы скомпилировали проект и запустили полученный код. Вносите изменения, компилируете, но запись в файл .exe линковщиком не может быть выполнена, т.к. программа продолжает выполняться, т.е. она продолжает висеть в памяти. Для решения проблемы необходимо просто остановить выполнение Вашей программы 5_stepen.exe.
-
Помечено в качестве ответа
-An-
9 мая 2010 г. 19:15
-
Помечено в качестве ответа
В этой статье представлена ошибка с номером Ошибка 1168, известная как Код ошибки Защитника Windows 1168, описанная как Ошибка 1168: Возникла ошибка в приложении Windows Defender. Приложение будет закрыто. Приносим свои извинения за неудобства.
О программе Runtime Ошибка 1168
Время выполнения Ошибка 1168 происходит, когда Windows Defender дает сбой или падает во время запуска, отсюда и название. Это не обязательно означает, что код был каким-то образом поврежден, просто он не сработал во время выполнения. Такая ошибка появляется на экране в виде раздражающего уведомления, если ее не устранить. Вот симптомы, причины и способы устранения проблемы.
Определения (Бета)
Здесь мы приводим некоторые определения слов, содержащихся в вашей ошибке, в попытке помочь вам понять вашу проблему. Эта работа продолжается, поэтому иногда мы можем неправильно определить слово, так что не стесняйтесь пропустить этот раздел!
- Код ошибки . Код ошибки — это значение, возвращаемое для предоставления контекста, почему произошла ошибка.
- Windows — ОБЩАЯ ПОДДЕРЖКА WINDOWS ВНЕШНЯЯ ТЕМА
Симптомы Ошибка 1168 — Код ошибки Защитника Windows 1168
Ошибки времени выполнения происходят без предупреждения. Сообщение об ошибке может появиться на экране при любом запуске %программы%. Фактически, сообщение об ошибке или другое диалоговое окно может появляться снова и снова, если не принять меры на ранней стадии.
Возможны случаи удаления файлов или появления новых файлов. Хотя этот симптом в основном связан с заражением вирусом, его можно отнести к симптомам ошибки времени выполнения, поскольку заражение вирусом является одной из причин ошибки времени выполнения. Пользователь также может столкнуться с внезапным падением скорости интернет-соединения, но, опять же, это не всегда так.
 Repair Tool")
(Только для примера)
Причины Код ошибки Защитника Windows 1168 — Ошибка 1168
При разработке программного обеспечения программисты составляют код, предвидя возникновение ошибок. Однако идеальных проектов не бывает, поскольку ошибки можно ожидать даже при самом лучшем дизайне программы. Глюки могут произойти во время выполнения программы, если определенная ошибка не была обнаружена и устранена во время проектирования и тестирования.
Ошибки во время выполнения обычно вызваны несовместимостью программ, запущенных в одно и то же время. Они также могут возникать из-за проблем с памятью, плохого графического драйвера или заражения вирусом. Каким бы ни был случай, проблему необходимо решить немедленно, чтобы избежать дальнейших проблем. Ниже приведены способы устранения ошибки.
Методы исправления
Ошибки времени выполнения могут быть раздражающими и постоянными, но это не совсем безнадежно, существует возможность ремонта. Вот способы сделать это.
Если метод ремонта вам подошел, пожалуйста, нажмите кнопку upvote слева от ответа, это позволит другим пользователям узнать, какой метод ремонта на данный момент работает лучше всего.
Обратите внимание: ни ErrorVault.com, ни его авторы не несут ответственности за результаты действий, предпринятых при использовании любого из методов ремонта, перечисленных на этой странице — вы выполняете эти шаги на свой страх и риск.
Метод 1 — Закройте конфликтующие программы
Когда вы получаете ошибку во время выполнения, имейте в виду, что это происходит из-за программ, которые конфликтуют друг с другом. Первое, что вы можете сделать, чтобы решить проблему, — это остановить эти конфликтующие программы.
- Откройте диспетчер задач, одновременно нажав Ctrl-Alt-Del. Это позволит вам увидеть список запущенных в данный момент программ.
- Перейдите на вкладку «Процессы» и остановите программы одну за другой, выделив каждую программу и нажав кнопку «Завершить процесс».
- Вам нужно будет следить за тем, будет ли сообщение об ошибке появляться каждый раз при остановке процесса.
- Как только вы определите, какая программа вызывает ошибку, вы можете перейти к следующему этапу устранения неполадок, переустановив приложение.
Метод 3 — Обновите программу защиты от вирусов или загрузите и установите последнюю версию Центра обновления Windows.
Заражение вирусом, вызывающее ошибку выполнения на вашем компьютере, необходимо немедленно предотвратить, поместить в карантин или удалить. Убедитесь, что вы обновили свою антивирусную программу и выполнили тщательное сканирование компьютера или запустите Центр обновления Windows, чтобы получить последние определения вирусов и исправить их.
Метод 4 — Переустановите библиотеки времени выполнения
Вы можете получить сообщение об ошибке из-за обновления, такого как пакет MS Visual C ++, который может быть установлен неправильно или полностью. Что вы можете сделать, так это удалить текущий пакет и установить новую копию.
- Удалите пакет, выбрав «Программы и компоненты», найдите и выделите распространяемый пакет Microsoft Visual C ++.
- Нажмите «Удалить» в верхней части списка и, когда это будет сделано, перезагрузите компьютер.
- Загрузите последний распространяемый пакет от Microsoft и установите его.
Метод 6 — Переустановите графический драйвер
Если ошибка связана с плохим графическим драйвером, вы можете сделать следующее:
- Откройте диспетчер устройств и найдите драйвер видеокарты.
- Щелкните правой кнопкой мыши драйвер видеокарты, затем нажмите «Удалить», затем перезагрузите компьютер.
Метод 2 — Обновите / переустановите конфликтующие программы
Использование панели управления
- В Windows 7 нажмите кнопку «Пуск», затем нажмите «Панель управления», затем «Удалить программу».
- В Windows 8 нажмите кнопку «Пуск», затем прокрутите вниз и нажмите «Дополнительные настройки», затем нажмите «Панель управления»> «Удалить программу».
- Для Windows 10 просто введите «Панель управления» в поле поиска и щелкните результат, затем нажмите «Удалить программу».
- В разделе «Программы и компоненты» щелкните проблемную программу и нажмите «Обновить» или «Удалить».
- Если вы выбрали обновление, вам просто нужно будет следовать подсказке, чтобы завершить процесс, однако, если вы выбрали «Удалить», вы будете следовать подсказке, чтобы удалить, а затем повторно загрузить или использовать установочный диск приложения для переустановки. программа.
Использование других методов
- В Windows 7 список всех установленных программ можно найти, нажав кнопку «Пуск» и наведя указатель мыши на список, отображаемый на вкладке. Вы можете увидеть в этом списке утилиту для удаления программы. Вы можете продолжить и удалить с помощью утилит, доступных на этой вкладке.
- В Windows 10 вы можете нажать «Пуск», затем «Настройка», а затем — «Приложения».
- Прокрутите вниз, чтобы увидеть список приложений и функций, установленных на вашем компьютере.
- Щелкните программу, которая вызывает ошибку времени выполнения, затем вы можете удалить ее или щелкнуть Дополнительные параметры, чтобы сбросить приложение.
Метод 5 — Запустить очистку диска
Вы также можете столкнуться с ошибкой выполнения из-за очень нехватки свободного места на вашем компьютере.
- Вам следует подумать о резервном копировании файлов и освобождении места на жестком диске.
- Вы также можете очистить кеш и перезагрузить компьютер.
- Вы также можете запустить очистку диска, открыть окно проводника и щелкнуть правой кнопкой мыши по основному каталогу (обычно это C
- Щелкните «Свойства», а затем — «Очистка диска».
Метод 7 — Ошибка выполнения, связанная с IE
Если полученная ошибка связана с Internet Explorer, вы можете сделать следующее:
- Сбросьте настройки браузера.
- В Windows 7 вы можете нажать «Пуск», перейти в «Панель управления» и нажать «Свойства обозревателя» слева. Затем вы можете перейти на вкладку «Дополнительно» и нажать кнопку «Сброс».
- Для Windows 8 и 10 вы можете нажать «Поиск» и ввести «Свойства обозревателя», затем перейти на вкладку «Дополнительно» и нажать «Сброс».
- Отключить отладку скриптов и уведомления об ошибках.
- В том же окне «Свойства обозревателя» можно перейти на вкладку «Дополнительно» и найти пункт «Отключить отладку сценария».
- Установите флажок в переключателе.
- Одновременно снимите флажок «Отображать уведомление о каждой ошибке сценария», затем нажмите «Применить» и «ОК», затем перезагрузите компьютер.
Если эти быстрые исправления не работают, вы всегда можете сделать резервную копию файлов и запустить восстановление на вашем компьютере. Однако вы можете сделать это позже, когда перечисленные здесь решения не сработают.
Другие языки:
How to fix Error 1168 (Windows Defender Error Code 1168) — Error 1168: Windows Defender has encountered a problem and needs to close. We are sorry for the inconvenience.
Wie beheben Fehler 1168 (Windows Defender-Fehlercode 1168) — Fehler 1168: Windows Defender hat ein Problem festgestellt und muss geschlossen werden. Wir entschuldigen uns für die Unannehmlichkeiten.
Come fissare Errore 1168 (Codice di errore di Windows Defender 1168) — Errore 1168: Windows Defender ha riscontrato un problema e deve essere chiuso. Ci scusiamo per l’inconveniente.
Hoe maak je Fout 1168 (Windows Defender-foutcode 1168) — Fout 1168: Windows Defender heeft een probleem ondervonden en moet worden afgesloten. Excuses voor het ongemak.
Comment réparer Erreur 1168 (Code d’erreur Windows Defender 1168) — Erreur 1168 : Windows Defender a rencontré un problème et doit se fermer. Nous sommes désolés du dérangement.
어떻게 고치는 지 오류 1168 (Windows Defender 오류 코드 1168) — 오류 1168: Windows Defender에 문제가 발생해 닫아야 합니다. 불편을 드려 죄송합니다.
Como corrigir o Erro 1168 (Código de erro 1168 do Windows Defender) — Erro 1168: O Windows Defender encontrou um problema e precisa fechar. Lamentamos o inconveniente.
Hur man åtgärdar Fel 1168 (Windows Defender felkod 1168) — Fel 1168: Windows Defender har stött på ett problem och måste avslutas. Vi är ledsna för besväret.
Jak naprawić Błąd 1168 (Kod błędu Windows Defender 1168) — Błąd 1168: Windows Defender napotkał problem i musi zostać zamknięty. Przepraszamy za niedogodności.
Cómo arreglar Error 1168 (Código de error 1168 de Windows Defender) — Error 1168: Windows Defender ha detectado un problema y debe cerrarse. Lamentamos las molestias.
![]()
(Только для примера)
Причины Код ошибки Защитника Windows 1168 — Ошибка 1168
При разработке программного обеспечения программисты составляют код, предвидя возникновение ошибок. Однако идеальных проектов не бывает, поскольку ошибки можно ожидать даже при самом лучшем дизайне программы. Глюки могут произойти во время выполнения программы, если определенная ошибка не была обнаружена и устранена во время проектирования и тестирования.
Ошибки во время выполнения обычно вызваны несовместимостью программ, запущенных в одно и то же время. Они также могут возникать из-за проблем с памятью, плохого графического драйвера или заражения вирусом. Каким бы ни был случай, проблему необходимо решить немедленно, чтобы избежать дальнейших проблем. Ниже приведены способы устранения ошибки.
Методы исправления
Ошибки времени выполнения могут быть раздражающими и постоянными, но это не совсем безнадежно, существует возможность ремонта. Вот способы сделать это.
Если метод ремонта вам подошел, пожалуйста, нажмите кнопку upvote слева от ответа, это позволит другим пользователям узнать, какой метод ремонта на данный момент работает лучше всего.
Обратите внимание: ни ErrorVault.com, ни его авторы не несут ответственности за результаты действий, предпринятых при использовании любого из методов ремонта, перечисленных на этой странице — вы выполняете эти шаги на свой страх и риск.
Метод 1 — Закройте конфликтующие программы
Когда вы получаете ошибку во время выполнения, имейте в виду, что это происходит из-за программ, которые конфликтуют друг с другом. Первое, что вы можете сделать, чтобы решить проблему, — это остановить эти конфликтующие программы.
- Откройте диспетчер задач, одновременно нажав Ctrl-Alt-Del. Это позволит вам увидеть список запущенных в данный момент программ.
- Перейдите на вкладку «Процессы» и остановите программы одну за другой, выделив каждую программу и нажав кнопку «Завершить процесс».
- Вам нужно будет следить за тем, будет ли сообщение об ошибке появляться каждый раз при остановке процесса.
- Как только вы определите, какая программа вызывает ошибку, вы можете перейти к следующему этапу устранения неполадок, переустановив приложение.
Метод 3 — Обновите программу защиты от вирусов или загрузите и установите последнюю версию Центра обновления Windows.
Заражение вирусом, вызывающее ошибку выполнения на вашем компьютере, необходимо немедленно предотвратить, поместить в карантин или удалить. Убедитесь, что вы обновили свою антивирусную программу и выполнили тщательное сканирование компьютера или запустите Центр обновления Windows, чтобы получить последние определения вирусов и исправить их.
Метод 4 — Переустановите библиотеки времени выполнения
Вы можете получить сообщение об ошибке из-за обновления, такого как пакет MS Visual C ++, который может быть установлен неправильно или полностью. Что вы можете сделать, так это удалить текущий пакет и установить новую копию.
- Удалите пакет, выбрав «Программы и компоненты», найдите и выделите распространяемый пакет Microsoft Visual C ++.
- Нажмите «Удалить» в верхней части списка и, когда это будет сделано, перезагрузите компьютер.
- Загрузите последний распространяемый пакет от Microsoft и установите его.
Метод 6 — Переустановите графический драйвер
Если ошибка связана с плохим графическим драйвером, вы можете сделать следующее:
- Откройте диспетчер устройств и найдите драйвер видеокарты.
- Щелкните правой кнопкой мыши драйвер видеокарты, затем нажмите «Удалить», затем перезагрузите компьютер.
Метод 2 — Обновите / переустановите конфликтующие программы
Использование панели управления
- В Windows 7 нажмите кнопку «Пуск», затем нажмите «Панель управления», затем «Удалить программу».
- В Windows 8 нажмите кнопку «Пуск», затем прокрутите вниз и нажмите «Дополнительные настройки», затем нажмите «Панель управления»> «Удалить программу».
- Для Windows 10 просто введите «Панель управления» в поле поиска и щелкните результат, затем нажмите «Удалить программу».
- В разделе «Программы и компоненты» щелкните проблемную программу и нажмите «Обновить» или «Удалить».
- Если вы выбрали обновление, вам просто нужно будет следовать подсказке, чтобы завершить процесс, однако, если вы выбрали «Удалить», вы будете следовать подсказке, чтобы удалить, а затем повторно загрузить или использовать установочный диск приложения для переустановки. программа.
Использование других методов
- В Windows 7 список всех установленных программ можно найти, нажав кнопку «Пуск» и наведя указатель мыши на список, отображаемый на вкладке. Вы можете увидеть в этом списке утилиту для удаления программы. Вы можете продолжить и удалить с помощью утилит, доступных на этой вкладке.
- В Windows 10 вы можете нажать «Пуск», затем «Настройка», а затем — «Приложения».
- Прокрутите вниз, чтобы увидеть список приложений и функций, установленных на вашем компьютере.
- Щелкните программу, которая вызывает ошибку времени выполнения, затем вы можете удалить ее или щелкнуть Дополнительные параметры, чтобы сбросить приложение.
Метод 5 — Запустить очистку диска
Вы также можете столкнуться с ошибкой выполнения из-за очень нехватки свободного места на вашем компьютере.
- Вам следует подумать о резервном копировании файлов и освобождении места на жестком диске.
- Вы также можете очистить кеш и перезагрузить компьютер.
- Вы также можете запустить очистку диска, открыть окно проводника и щелкнуть правой кнопкой мыши по основному каталогу (обычно это C
- Щелкните «Свойства», а затем — «Очистка диска».
Метод 7 — Ошибка выполнения, связанная с IE
Если полученная ошибка связана с Internet Explorer, вы можете сделать следующее:
- Сбросьте настройки браузера.
- В Windows 7 вы можете нажать «Пуск», перейти в «Панель управления» и нажать «Свойства обозревателя» слева. Затем вы можете перейти на вкладку «Дополнительно» и нажать кнопку «Сброс».
- Для Windows 8 и 10 вы можете нажать «Поиск» и ввести «Свойства обозревателя», затем перейти на вкладку «Дополнительно» и нажать «Сброс».
- Отключить отладку скриптов и уведомления об ошибках.
- В том же окне «Свойства обозревателя» можно перейти на вкладку «Дополнительно» и найти пункт «Отключить отладку сценария».
- Установите флажок в переключателе.
- Одновременно снимите флажок «Отображать уведомление о каждой ошибке сценария», затем нажмите «Применить» и «ОК», затем перезагрузите компьютер.
Если эти быстрые исправления не работают, вы всегда можете сделать резервную копию файлов и запустить восстановление на вашем компьютере. Однако вы можете сделать это позже, когда перечисленные здесь решения не сработают.
Другие языки:
How to fix Error 1168 (Windows Defender Error Code 1168) — Error 1168: Windows Defender has encountered a problem and needs to close. We are sorry for the inconvenience.
Wie beheben Fehler 1168 (Windows Defender-Fehlercode 1168) — Fehler 1168: Windows Defender hat ein Problem festgestellt und muss geschlossen werden. Wir entschuldigen uns für die Unannehmlichkeiten.
Come fissare Errore 1168 (Codice di errore di Windows Defender 1168) — Errore 1168: Windows Defender ha riscontrato un problema e deve essere chiuso. Ci scusiamo per l’inconveniente.
Hoe maak je Fout 1168 (Windows Defender-foutcode 1168) — Fout 1168: Windows Defender heeft een probleem ondervonden en moet worden afgesloten. Excuses voor het ongemak.
Comment réparer Erreur 1168 (Code d’erreur Windows Defender 1168) — Erreur 1168 : Windows Defender a rencontré un problème et doit se fermer. Nous sommes désolés du dérangement.
어떻게 고치는 지 오류 1168 (Windows Defender 오류 코드 1168) — 오류 1168: Windows Defender에 문제가 발생해 닫아야 합니다. 불편을 드려 죄송합니다.
Como corrigir o Erro 1168 (Código de erro 1168 do Windows Defender) — Erro 1168: O Windows Defender encontrou um problema e precisa fechar. Lamentamos o inconveniente.
Hur man åtgärdar Fel 1168 (Windows Defender felkod 1168) — Fel 1168: Windows Defender har stött på ett problem och måste avslutas. Vi är ledsna för besväret.
Jak naprawić Błąd 1168 (Kod błędu Windows Defender 1168) — Błąd 1168: Windows Defender napotkał problem i musi zostać zamknięty. Przepraszamy za niedogodności.
Cómo arreglar Error 1168 (Código de error 1168 de Windows Defender) — Error 1168: Windows Defender ha detectado un problema y debe cerrarse. Lamentamos las molestias.
![]() Об авторе: Фил Харт является участником сообщества Microsoft с 2010 года. С текущим количеством баллов более 100 000 он внес более 3000 ответов на форумах Microsoft Support и создал почти 200 новых справочных статей в Technet Wiki.
Об авторе: Фил Харт является участником сообщества Microsoft с 2010 года. С текущим количеством баллов более 100 000 он внес более 3000 ответов на форумах Microsoft Support и создал почти 200 новых справочных статей в Technet Wiki.
Следуйте за нами: ![]()
![]()
![]()
Последнее обновление:
22/06/22 08:03 : Пользователь Android проголосовал за то, что метод восстановления 1 работает для него.
Рекомендуемый инструмент для ремонта:

Этот инструмент восстановления может устранить такие распространенные проблемы компьютера, как синие экраны, сбои и замораживание, отсутствующие DLL-файлы, а также устранить повреждения от вредоносных программ/вирусов и многое другое путем замены поврежденных и отсутствующих системных файлов.
ШАГ 1:
Нажмите здесь, чтобы скачать и установите средство восстановления Windows.
ШАГ 2:
Нажмите на Start Scan и позвольте ему проанализировать ваше устройство.
ШАГ 3:
Нажмите на Repair All, чтобы устранить все обнаруженные проблемы.
СКАЧАТЬ СЕЙЧАС
Совместимость
![]()
Требования
1 Ghz CPU, 512 MB RAM, 40 GB HDD
Эта загрузка предлагает неограниченное бесплатное сканирование ПК с Windows. Полное восстановление системы начинается от $19,95.
ID статьи: ACX012672RU
Применяется к: Windows 10, Windows 8.1, Windows 7, Windows Vista, Windows XP, Windows 2000
Suddenly, my Visual Studio Express 2010 C++ stopped rebuilding my project.
When I first hit F7 the project builds and runs fine (heck, it’s a hello world example).
Then I make some changes and hit F7 again, then I get:
1>LINK : fatal error LNK1168: cannot open C:UsersusernameDocumentsVisual Studio 2010ProjectsconsoleDebugconsole.exe for writing**<br><br>
Now the funny thing comes:
- The app is not running and it’s not shown in the Task Manager.
- Going into the project directory and trying to remove it with hands comes with success but the file APPEARS AGAIN FROM NOWHERE.
- The system restore is disabled.
- I also tried to take the ownership of the whole damn drive.
- Every time I delete the file it recreates itself again but sometimes it stops doing that.
- If I delete the file (and it recreates after that), and then I start sysinternals procmon then the file disappears.
- If I start procmon before — then the file keeps appearing after delete like always.
OS: W7 SP1 64-bit, with latest updates
Any ideas, please?
![]()
Amal K
4,0642 gold badges18 silver badges43 bronze badges
asked Aug 25, 2012 at 17:25
![]()
1
The problem is probably that you forgot to close the program and that you instead have the program running in the background.
Find the console window where the exe file program is running, and close it by clicking the X in the upper right corner. Then try to recompile the program. In my case this solved the problem.
I know this posting is old, but I am answering for the other people like me who find this through the search engines.
answered Jul 6, 2013 at 6:53
![]()
CodeMedCodeMed
9,69869 gold badges205 silver badges354 bronze badges
7
I’ve encountered this problem when the build is abruptly closed before it is loaded. No process would show up in the Task Manager, but if you navigate to the executable generated in the project folder and try to delete it, Windows claims that the application is in use. (If not, just delete the file and rebuild, which generates a new executable)
In Windows(Visual Studio 2019), the file is located in this directory by default:
%USERPROFILE%sourcereposProjectFolderNameDebug
To end the allegedly running process, open the command prompt and type in the following command:
taskkill /F /IM ApplicationName.exe
This forces any running instance to be terminated.
Rebuild and execute!
answered Sep 17, 2019 at 16:20
![]()
Amal KAmal K
4,0642 gold badges18 silver badges43 bronze badges
1
Restarting Visual Studio solved the problem for me.
answered Jan 7, 2017 at 18:15
![]()
Aleksei MialkinAleksei Mialkin
2,1371 gold badge26 silver badges25 bronze badges
1
In my case, cleaning and rebuilding the project resolved the problem.
![]()
Uli Köhler
12.8k15 gold badges69 silver badges117 bronze badges
answered Mar 2, 2014 at 15:35
![]()
Hau LeHau Le
1211 silver badge5 bronze badges
If the above solutions didn’t work, you can try this which worked for me.
Open an elevated command prompt (cmd -> Run as administrator), then write following command and hit enter:
wmic process where name='YOUR_PROCESS_NAME.exe' delete
If you see a message: Instance deletion successful., then you will be again able to build and run project from VS.
e.g. in OP’s case, the command will be:
wmic process where name='console.exe' delete
answered Aug 3, 2021 at 9:06
![]()
UkFLSUIUkFLSUI
5,4016 gold badges34 silver badges47 bronze badges
well, I actually just saved and closed the project and restarted VS Express 2013 in windows 8 and that sorted my problem.
answered Apr 8, 2015 at 17:50
![]()
2
The Reason is that your previous build is still running in the background.
I solve this problem by following these steps:
- Open Task Manager
- Goto Details Tab
- Find Your Application
- End Task it by right clicking on it
- Done!
answered Aug 4, 2020 at 12:48
![]()
back2Lobbyback2Lobby
4836 silver badges12 bronze badges
This solved same problem I also came across very well
- Close the app if it is still running on the taskbar,
- Open cmd (command prompt) and run the following
taskkill /F /IM ApplicationName.exe
- Rebuild your project!! error solved!
![]()
answered Sep 25, 2022 at 1:11
![]()
niosnios
611 silver badge7 bronze badges
This can also be a problem from the improper use of functions like FindNextFile when a FindClose is never executed. The process of the built file is terminated, and the build itself can be deleted, but LNK1168 will prevent a rebuild because of the open handle. This can create a handle leak in Explorer which can be addressed by terminating and restarting Explorer, but in many cases an immediate reboot is necessary.
answered Oct 9, 2015 at 2:44
![]()
Laurie StearnLaurie Stearn
9431 gold badge12 silver badges33 bronze badges
I know this is an old question but thought I’d share how I resolved the issue.
If you’re using Visual Studio and this error occurs, you can try to attach to process (CTRL+ALT+P) and find the «(program).exe» process. When you try to attach to it, an error will display stating that it failed to attach which removes the process from «running» (even though it’s not…) You’ll also be able to delete the (program).exe from your Debug folder.
Hope this helps someone!
answered Oct 4, 2019 at 5:25
![]()
tw1tch01tw1tch01
491 silver badge4 bronze badges
FINALLY THE BEST WAY WORKED PERFECTLY FOR ME
None of the solutions in this page worked for me EXCEPT THE FOLLOWING
Below the comment sections of the second answer, try the following :
Adding to my above comment, Task Manager does not display the
filename.exe process but Resource Monitor does, so I’m able to
kill it from there which solves the issue without having to reboot. –
A__ Jun 19 ’19 at 21:23
answered Aug 14, 2020 at 14:32
![]()
SamSam
2523 silver badges10 bronze badges
If none of the above suggested work for you, which was the case for me, just change the project name. It creates a new exe in the new project name. Later when you restart, you can change it back to your original project name.
answered Aug 22, 2021 at 9:43
![]()
RathnavelRathnavel
751 silver badge12 bronze badges
I know this is an old thread but I was stumbling in the same problem also. Finding it in task manager is tricky, and I started to grow tired of having to restart my PC every time this happened.
A solution would be to download Process Explorer and there you can search for running tasks. In my case I was having the following error:
1>LINK : fatal error LNK1168: cannot open C:OutBuildVS12_appDebugplatform_test.exe for writing [C:BuildVS12_appplatform_test.vcxproj]
I searched for C:OutBuildVS12_appDebugplatform_test.exe in Process Explorer, killed it and I was able to compile.
answered Sep 15, 2022 at 11:15
![]()
Ra’wRa’w
1132 silver badges10 bronze badges
I also had this same issue. My console window was no longer open, but I was able to see my application running by going to processes within task manager. The process name was the name of my application. Once I ended the process I was able to build and compile my code with no issues.
answered Sep 12, 2013 at 23:54
![]()
JasonJason
1471 gold badge2 silver badges11 bronze badges
Start your program as an administrator. The program can’t rewrite your files cause your files are in a protected location on your hard drive.
![]()
answered Jan 6, 2014 at 15:07
![]()
0