
Kernel Mode heap corruption is a BSOD-type error with bug check value 0x0000013A. This blue screen error usually occurs due to corrupted device drivers, obsolete graphics cards, memory issues, or malfunctioning hardware. A few users recently encounter this bug after performing an in-place upgrade on their devices.
Well, in this guide, we present detailed information on how the Stop Error 0x13A occurs in the first place. Besides, we also discussed eight solutions that help in getting rid of the KERNEL_MODE_HEAP_CORRUPTION bug. Let’s explore the workarounds in detail –

How to Fix BSOD Error 0x13A in Windows 10
To solve the KERNEL_MODE_HEAP_CORRUPTION Error 0x0000013A, try the following suggestions –
Boot Windows 10 into Safe Mode
Since you are getting the Blue Screen, you won’t be able to log into Windows normally. So, you need to first boot into Safe Mode and then perform the below workarounds. Only a handful of Windows 10 programs and services run on this mode preventing any kind of conflicts from third-party apps.
Here are the essential steps to enter Safe Mode –
- Press the Power button for 5 seconds and wait till it shuts down successfully.
- Repeat this process 2-3 times until the Preparing Automatic Repair screen comes into view.
- Let the system diagnoses this error for a few seconds thereafter click Advanced options.
- On the Windows Recovery Environment (WinRE), go to – Troubleshoot > Advanced options.
- Hit Startup Settings on the next screen followed by the Restart button.
When Windows reboots, press F5 to boot into Safe Mode with Networking.

Note: Selecting “Safe Mode with Networking” is essential to fix black or blue screen issues. If not, this won’t connect to the Internet causing problems in troubleshooting the actual problem.
Check Event Viewer
Knowing the reasons that might have led to the bug at hand provides an opportunity to solve the BSOD error correctly. Interestingly, the system contains a log of all bugs and errors that ever occur on Windows 10. One can access the Windows log at Event Viewer containing information like Source and Event ID.
Now that you are already inside the Safe boot, use the below guideline to get the Windows log file –
- Use Win + S shortcut to start the Search UI.
- Type “event viewer” in the text field, and click the top result.
- Select Windows Logs > System from the left column.
- In the mid-section, scroll down and locate the log titled “Kernel Mode Heap corruption“.
- Once you find this file, double-click the same to read the description.
The log enlists the exact cause that might have caused this BSOD Error 0x13A. Usually, this error arises because of these three reasons –
- Corrupted Graphics Driver
- Software/Hardware Error
- Memory Issues
1] Check Graphics Drivers for issues
If you encounter the BSOD error 0x13A just after starting a heavy game, this problem might lie inside the graphics driver. A corrupted or obsolete graphics driver often causes the KERNEL_MODE_HEAP-CORRUPTION error on Windows 10. To fix this, you must try updating the existing graphics card driver.
Note: In case the update process fails, you may use the rollback feature. If this method fails as well, uninstall the graphics driver, restart the device, then reinstall the graphics card back.
- Right-click on the Windows icon and select Device Manager.
- Click “>” next to the display adapters and right-click again on the available graphics card.
- Now, select the correct option depending on what are you trying to do with this.
For Example:
- Update: Hit update driver option then choose “Search automatically for updated driver software“.
- Roll Back: Click Properties, switch to the Driver tab, and hit Roll back driver.
- Reinstall a New Driver: Click uninstall device then visit the manufacturer’s Site to download the latest version of the uninstalled graphics card. When the download completes, double-click the setup file to start the installation.
2] Run Driver Verifier Manager
Driver Verifier Manager is a great tool to discover the problematic drivers on Windows 10. So, if you are still getting the Kernel Mode Heap Corruption 0x0000013A error, you should run this tool to check the obsolete device drivers. Here’s how to perform this task –
- Launch Windows PowerShell (Admin).
- On the elevated console, type “
verifier“, and hit Enter.

- Subsequently, mark the “Create Standard Settings” checkbox followed by Next.
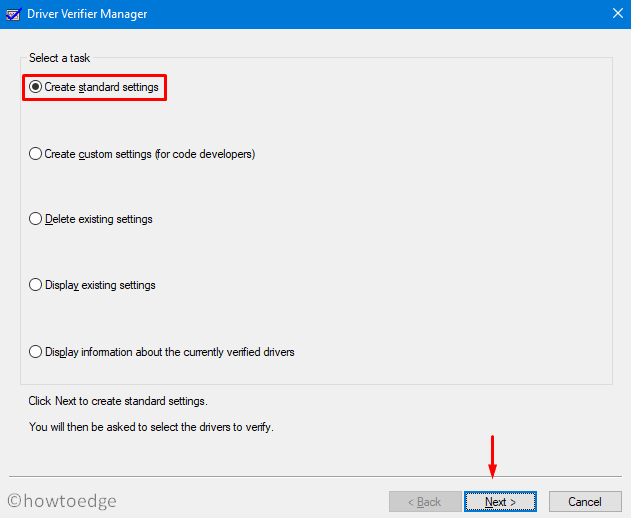
- Now, mark “Automatically select all drivers installed on this computer” and hit Finish.

- The system prompts to “Restart PC” so as to start scanning for any corrupted or damaged drivers.
- After the reboot, Windows will display a list of drivers that are found to have some errors.
You may now re-follow method #2 to update, rollback, or uninstall-reinstall the above-displayed device drivers.
3] Run Blue Screen Troubleshooter
This is another interesting tool designed to help users fix BSOD-type errors on Windows 10. Isn’t it great that one can address the blue screen issue possibly by running a simple troubleshooter? Indeed, this is an easy way to resolve different Stop Error codes on Windows 10 PC. Here’s how to use this tool –
- First of all, navigate to the below path –
Win + I > Update & Security > Troubleshoot
- Click to reveal the Blue Screen box and hit Run the troubleshooter.

4] Perform Disk Cleanup
The presence of unnecessarily stored cache, log files, Windows Prior Installation files, and other irrelevant data may also cause the 0x0000013A error. To solve this, perform a disk Cleanup on Windows 10.
5] Run CHKDSK Utility
If the BSOD error 0x0000013A still persists, this must be due to hardware-related issues. To check whether this indeed is the case or not, run the CHKDSK command line on the Windows Console. All you need is to follow these easy steps –
- Get access to the Command Prompt with administrative privileges.
- Near the blinking cursor, type the command –
chkdsk C: /f /r /x - Hit the Enter key on your keyboard to initiate a disk check.
- This probably won’t run and prompts doing this when the system reboots.
- Type “Y” and press Enter again.

- Now, restart Windows 10 to finally initiate the disk check.
When this completes scanning, Windows 10 OS loads containing a list of bugs and errors that it encountered.
For Desktop Users Only
In case running the CHKDSK command doesn’t reveal any issue, we suggest doing the following –
- Unplug all the HDD cables and wires, clean them for possible dirt, attach the connecting wires back, and then restart Windows.
Many a time, following this simple procedure, fixes BSOD Errors on Windows 10 PC.
6] Repair Missing or Damaged System Files
The presence of corrupted data inside Windows 10 may also lead to different bugs and errors. Kernel Mode Heap Corruption Error 0x0000013A is one such bug. System File Checker is an in-built tool by Microsoft that can replace corrupted, lost, or missing DLL files. One can use this utility program even when you are not able to boot into Windows normally. Here’s how to proceed –
Case 1: When you can’t enter Windows or Safe Mode
- Enter WinRE then follow
Troubleshoot > Advanced Options > Command Prompt.
Case 2: When you can enter Windows or Safe Mode
- Use Win + R to start Run, type cmd, and jointly press Ctrl + Shift + Enter keys.
- Now that you have entered Windows Console, type “
sfc/scannow” and hit Enter.
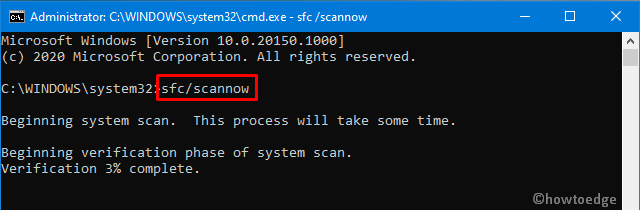
- Wait for the SFC to find and repair corrupted DLL files. Usually, this takes 10-15 minutes.
- Once over, Restart PC to incorporate the above changes.
Sign back into Windows and check whether you still encounter the BSOD Error 0x0000013A or if it has already been fixed.
7] Look for Memory Issues
Having a bad RAM slot is another faulty reason that may erupt the KERNEL_MODE_HEAP_CORRUPTION error. This situation may arise due to sudden power surges, excessive heating, or simply motherboard issues. So, you must consider the “Memory issues” as a possibility and try fixing them (if possible). Here’s how to check for bad memory issues on Windows 10 –
- Hit the Start Menu and start typing “memory” in the search box.
- Click the well-matching result to enter Windows Memory Diagnostic.
- Choose to Restart now and check for problems.

Note: Make sure to save any ongoing process on the computer.
- The system reboots and checks for any memory issues on the computer.
- After scanning for memory problems successfully, the device restarts with a list of all “detected issues”.
Tip: You may also use the Event viewer to view the complete diagnosis report.
- Use the Filter current log available on the right side inside the Event Viewer.

- Scroll down and Select MemoryDiagnostics-Results using the Event sources drop-down menu.

- Hit OK to view all result logs of the recently performed memory test.
- Now, double-click the latest result to see whether the diagnosis passed or not.
In case, the diagnosis doesn’t pass, you need to take appropriate measures to solve the persisting memory issues.
8] Use System Restore Points
If none of the above solutions work to resolve the 0x0000013A error, use restore points to revert back your system to an earlier state when everything was working fine. In case, you don’t have a restore point or haven’t created any system backup, perform a clean installation of Windows 10.
That’s it, if you have any queries or suggestions related to this article, ping us in the comment section.
Tip: If you are facing update, activation, or driver issues on your Windows PC, try RESTORO PC Repair Tool. This software will scan your device for potential issues and resolve them automatically.
Сообщение с кодом ошибки 0xc000013a возникает при выполнении скриптов, которые обрабатывают цифровые и текстовые массивы данных. В описании проблемы указывается, что она вызвана:
- нажатием сочетания клавиш Ctrl+C;
- принудительным закрытием Командной строки;
- выходом пользователя из системы.
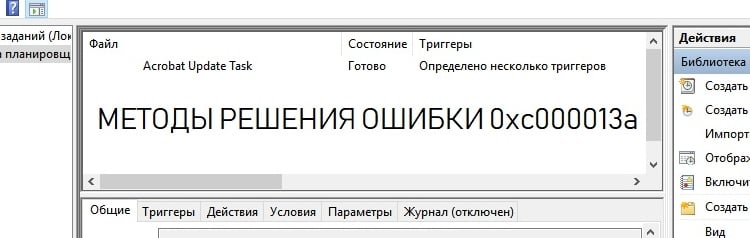
Для устранения ошибки предпринимайте следующие меры:
- Убедитесь, что планировщик задач не останавливает процесс после определенного отрезка времени. Для этого в ключевых местах скрипта стоить добавить строку echo %DATE% %TIME%;
- Проверьте, что у аккаунта, под которым выполняется скрипт, есть все необходимые права.
- Исследуйте лог Планировщика заданий. Ищите в хронологически последних строках значения *** — в них будут указаны детали ошибки, которые прольют свет на природу проблемы.
- Создайте лог для регистрации результатов выполнения скрипта. В самом коде измените все echo OFF на echo ON, чтобы проверить, что вы не прекращаете выполнение скрипта случайным образом, не замечая этого, ведь ошибка 0xc000013a чаще всего вызывается именно так.
Some Windows 11 are dealing with a weird issue where every attempt at putting their PC to sleep ends with a crash. Upon investigating the crash caused using Event Viewer, the error code displayed is 0x0000013A (KERNEL_MODE_HEAP_CORRUPTION).

We’ve investigated this particular issue thoroughly and we’ve discovered that this type of error always indicates a kernel-related issue where the heap manager has detected an underlying corrupted issue in a heap.
Now, when it comes to this issue, there are several underlying possible scenarios that might lead to the apparition of this issue. Here’s a list of possible culprits that you should watch out for:
- Update or Uninstall Dell supporting software – As it turns out, if you’re using a Dell computer and you have the supporting software installed, those programs might be responsible for causing the OS to crash while in hibernation. So far, there isn’t really a solution other than uninstalling the Dell Support Center.
- Generic drivers are causing a kernel crash – Another reason why you might expect to see this error when you attempt to put your Windows 11 to sleep is a series of generic Wi-Fi, Bluetooth, and USB Controller drivers that we’re migrated over from an older Windows version. In this case, the easiest way to fix the issue is to run the Intel Driver assistant and replace the generic drivers with dedicated equivalents from Intel.
- Kernel conflict caused by Paragon software – There is one driver (BioNTDrv_WINK.SYS) that often appears for being responsible for the crash (inside the crash dumps). This is a driver that gets installed with Paragon software, so the easiest solution to fix the kernel conflict is to uninstall the problematic tool altogether.
- Outdated BIOS version – Another scenario in which you might expect to see the 0x0000013A error occurring during hibernation or idle modes is an outdated BIOS version that is unstable when it needs to accommodate Windows 11 low-power mode. In this case, you should see if there is a new version available for your BIOS and install it.
Uninstall the Dell Support Center (If applicable)
In case you’re using Dell hardware, you should know about this weird incompatibility between Windows 11 and the Dell Supporting Center utility.
This might change in the future, but as of now, a lot of Dell desktop, ultrabook, and laptop users are reporting that their Windows 11 installation crashes every time they put it in Sleep mode or after they leave it idle for a long period of time.
Important: If you’re not using any Dell hardware or the Dell Supporting Center tool is not installed, skip this method entirely and move directly to the next method below.
As it turns out, this happens due to a program called Dell Supporting Center that apparently conflicts with a kernel process and causes the OS to crash.
As of now, the only way to resolve this major inconvenience with Windows 11 Dell computers is to simply uninstall the Dell Support Center.
Note: If a new version of the program is released, you can also try installing the latest version and see if the conflict has been patched by Dell’s engineers.
If you’re looking for step by step instructions on fixing this inconvenience, follow the instructions below:
- Press Windows key + R to open up a Run dialog box. Next, type ‘appwiz.cpl’ inside the text box and press Enter to open up the Programs and Features menu.

Opening up the Programs and Features menu - Once you see the User Account Control windows, click Yes to grant admin access.
- Inside the Programs and Features menu, scroll down through the list of installed programs and locate the Dell Supporting Center.
- When you locate the correct program, right-click on it and choose Uninstall from the context menu that just appeared.

Uninstall Dell supporting tool - Inside the uninstallation screen, follow the on-screen instructions to complete the uninstallation of Dell Supporting Center, then reboot your PC and see if the issue has been fixed by putting your PC into hibernation mode once again.


Note: If you’re fond of this tool, you can also go to the official download page of Dell and download the latest rebranded version of this tool – Dell Support Assist. Additionally, here are a few other troubleshooting steps that you can try for Dell computers.
If the same 0x0000013A (KERNEL_MODE_HEAP_CORRUPTION) error is still occurring despite the fact that you uninstalled the Dell Supporting Center tool.
Run Intel Driver Assistant to install every compatible driver
If the first method above was not applicable in your case, the next thing you should worry about is a potentially conflicting generic driver that is forcing the system to crash while in low-power mode.
This is commonly reported to occur with generic drivers that have been migrated to Windows 11 from an older Windows version.
Several other users that have dealt with this particular scenario have confirmed that the crashes with the 0x0000013A error have stopped once they used the Intel Driver Assistant to replace the generic equivalents of the CPU, Bluetooth, and Wi-Fi Card drivers with equivalents from Intel.
If you want to pursue this fix too, follow the instructions below:
- On your Windows 11 computer, open up your default browser and navigate to the official page of Intel Driver & Support assistant.
Note: If it’s the first time you’re using this tool, you will be asked to install a small utility that will scan your system locally for outdated driver and firmware. If asked to do so, install the local tool as instructed.
Downloading the Intel® Driver & Support Assistant - Once the tool is installed locally, wait until it scans your system of possible outdated drivers. If any occurrences are found, click on the Download All button and wait for the utility to download every pending driver.

Downloading all - Next, click on Install all to replace every current generic driver with Intel’s dedicated equivalents.
- When asked to restart your PC, do so and see if the issue is fixed once the next startup is complete.


In case you’re still seeing the same 0x0000013A error after your Windows 11 OS crashes when you put it into sleep, move down to the next method below.
Uninstall Paragon Software & remove BioNTDrv_WINK.SYS (if applicable)
One driver that is commonly mentioned as a potential cause for this type of KERNEL_MODE_HEAP_CORRUPTION crash is BioNTDrv_WINK.SYS. This is a driver that typically gets installed with Paragon software.
BioNTDrv_WINK.SYS is a backup or cloud service software driver that’s known to conflict with certain kernel processes on Windows 11.
If you find yourself in this scenario and you have the Paragon Software package installed, the first thing you should do is go over on the developer’s website and install the latest available version.
In case that’s not an option for you (as you already have the latest driver version installed), the only option for you is to simply uninstall the conflicting software.
Follow the guide below for step by step instructions on how to do this:
- Press Windows key + R to open up a Run dialog box. Next, type ‘appwiz.cpl’ inside the text box, then press Enter to open up the Programs and Features menu.

Open up the Programs and Features menu - Once you see the User Account Control, click Yes to grant admin access.
- Inside the Programs and Features menu, scroll down through the list of currently installed programs and locate the entry associated with Paragon software.
- When you see it, right-click on it and choose Uninstall from the context menu.

Uninstall the Paragon software - Inside the uninstallation screen, follow the on-screen instructions to complete the uninstallation prompts until you manage to get rid of the software.
- Reboot your PC and see if you still get the same kind of crash when you attempt to put your Windows 11 PC to sleep.


If this method was not applicable to you or you already uninstalled the Paragon software and the 0x0000013A (KERNEL_MODE_HEAP_CORRUPTION) error is still occurring, move down to the final potential fix below.
Update BIOS version to the latest
If none of the methods above have been effective in your case, the final culprit that you should investigate is an outdated BIOS driver that is not really compatible with the Windows 11 pre-release that you currently have installed.
Note: Keep in mind that Windows 11 just launched officially, so motherboard manufacturers are only now beginning to roll out BIOS firmware updates to accommodate this new operating system.
As of now, most of the major manufacturers have released BIOS updates to improve kernel stability on Windows 11. Chances are by installing the BIOS update compatible with your motherboard, you will be able to fix the 0x0000013A error appearing when you switch your PC to low power mode.
Of course, BIOS interfaces will vary a lot among different motherboard manufacturers, so we won’t be able to provide you with a dedicated guide that will walk you through the entire process of updating your BIOS version to the latest.
But a good start is to take the time and read the official documentation provided by your motherboard manufacturer in regards to updating your BIOS. Here are a few useful links:
- Dell
- ASUS
- Acer
- Lenovo
Note: If your motherboard is not among the list above, do a Google search on ‘BIOS Update + motherboard model’ and take the time to read the documentation thoroughly to get a grasp of the entire process.
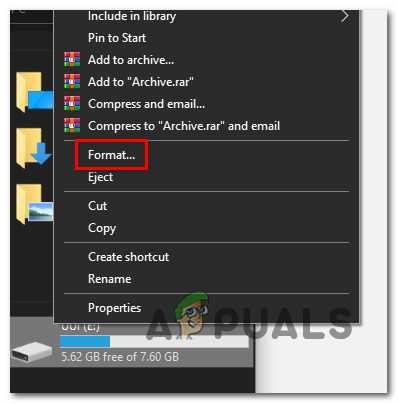
If your motherboard manufacturer recommends that you update via a flash drive, follow the instructions below for a general guideline that will show you how to set up a flash drive and use it to update your current BIOS version:
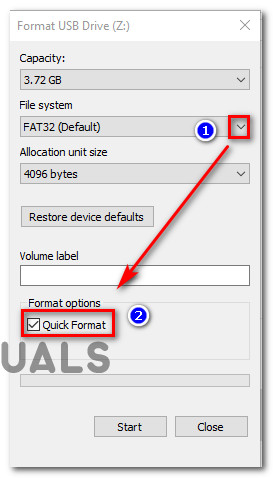
- First things first, start by ensuring that you have a blank USB flash drive at your disposal. If you have important data on your drive, take the time to store it away before advancing to the next step.
- Next, open File Explorer, right-click on the flash drive and choose Format from the context menu.

Formatting the removable drive - Inside the Format screen, choose FAT32 from the file system options, then click on Quick Format and hit the Start button to commence the process.

Formatting the drive to the required format - Once the operation is complete, visit the website of your motherboard manufacturer website and download the BIOS update after you take the time to read the entire documentation about updating.

Downloading the latest BIOS version - After you download the latest version of the BIOS driver, paste it on your flash drive (by following the instructions).
Important: You might need to place the BIOS update in a specific folder, so take the time to read the documentation properly. - Once you manage to copy the BIOS update on your flash drive, reboot your PC and press the SETUP key at the initial screen to access the BIOS Settings.

Press the Setup screen Note: In case you don’t manage to spot the Setup screen on screen, press the Esc key, the Dell key or one of the following F keys – F2, F4, F6, F8, and F12. Additionally, you can search online for specific instructions on accessing your BIOS settings according to the motherboard model that you’re using.
- Once you’re finally inside the BIOS settings menu, look for the Advanced (Expert) settings and see if you can spot an option similar to Update System BIOS (or similar).

Updating the BIOS - Follow the remaining instructions to complete the BIOS update, then reboot your PC normally and see if the 0x0000013A error is now fixed.


Windows operating system comes with a lot of facilities that help users perform different tasks on their PC. Whenever system files are corrupt or altered wrongfully. You will start experiencing problems when trying to launch some programs and will end up receiving error messages. Today we’ll talk about one of these error messages window users encounter when trying to run some programs, this error code is 0xc000013a.
This error code is very popular these days and most of the time it’s displayed when you’re trying run windows update. There are other programs that display this error code as well like Task Scheduler. Whenever the error code is displayed you can’t execute the program you’re trying to launch. In this post we’ll talk about how to fix this error and also explain its symptoms and causes so that you can to get rid of it.
Troubleshoot and Fix Error Code 0xc000013a
In general, Exit Code 0xC000013A means that the application force closed as a result of a CTRL+C or closing command prompt window.
Symptoms Of Error 0xc000013a On Windows
- Unable to run windows update service on your PC.
- Error message flashing on your screen when updating windows.
- Automatic closure of all active programs on your PC.
- Your system starts to freeze.
- Some programs can’t load normally.
- Blue screen error appear.
- Programs will open but are not responding.
- Slow PC performance.
- Your PC shutdown automatically.
When any of these symptoms occur on your PC it’s a sign of this error code even if the error code 0xc000013a has not been displayed.
What Are The Causes Of 0xc000013a?
- Lack of communication with BIOS
- Error in windows driver, in most cases this is the cause.
- Wrong system configuration.
- Unwanted programs are installed on your system without noticing.
- When your hard disk is overload.
- Some system files are deleted.
- When system driver is outdated.
- Presence of virus on your PC.
Now we’ll move on to share how to fix this error code effortlessly on your PC.
Error code on Task Scheduler
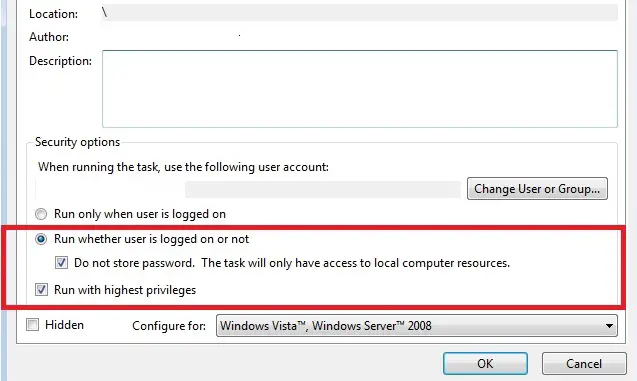
Error 0xc000013a can be seen also on Windows Task Scheduler. The error showes when the commnnad of the task was closed like “CTRL+C”. The following issue can happen if start the script from the Scheduled task as the “Run as” user and then log off the user. To Solve this you can:
- Enabling “run whether user is logged on or not”
- Enable “run with highest privileges”
So as far as the user with not loget off the script will not be force closed.
Error Code 0xc000013a
Effective Ways To Fix 0xc000013a Error
Edit Your Registry
Most of the time when you see this error, windows registry is affected, so you want to open the registry and make a minor change. Open the registry by typing ‘regedit’ on windows search box and then you should follow these path: HKEY_LOCAL_MACHINE > Software > Policies > Microsoft > Windows > Windows Update > AU. ‘Wu server’ option is shown and you need to open it and change the current value from 1 to 0. Click next button and then finish button. Restart your computer and launch your programs to see if the problem is cleared.
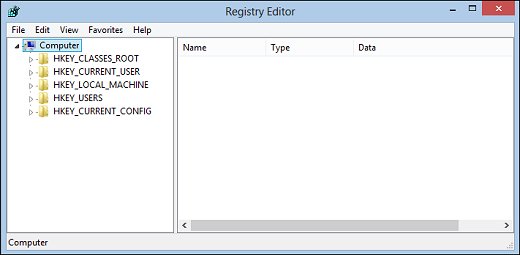
registry editor
Delete cache files
The next step to follow in order to fix windows error code 0xc000013a is by deleting cache files. These files can mess up with system files and that’s why you need to erase them because they might be the cause of this error code. To delete cache, just type ‘cache’ in your search box and click on it, this will display all cache files and data. Use Ctr + A to highlight all of them and then delete. Restart your PC again to see if things are OK.
Run SFC
As we’ve mentioned in the causes, it might be as a result of system files Misconfiguration, that’s why you need to run it. SFC will scan your entire system to find files or settings that aren’t well configured and then fix them automatically. Search for SFC on your system and you’ll be taken through the process of scanning your PC.
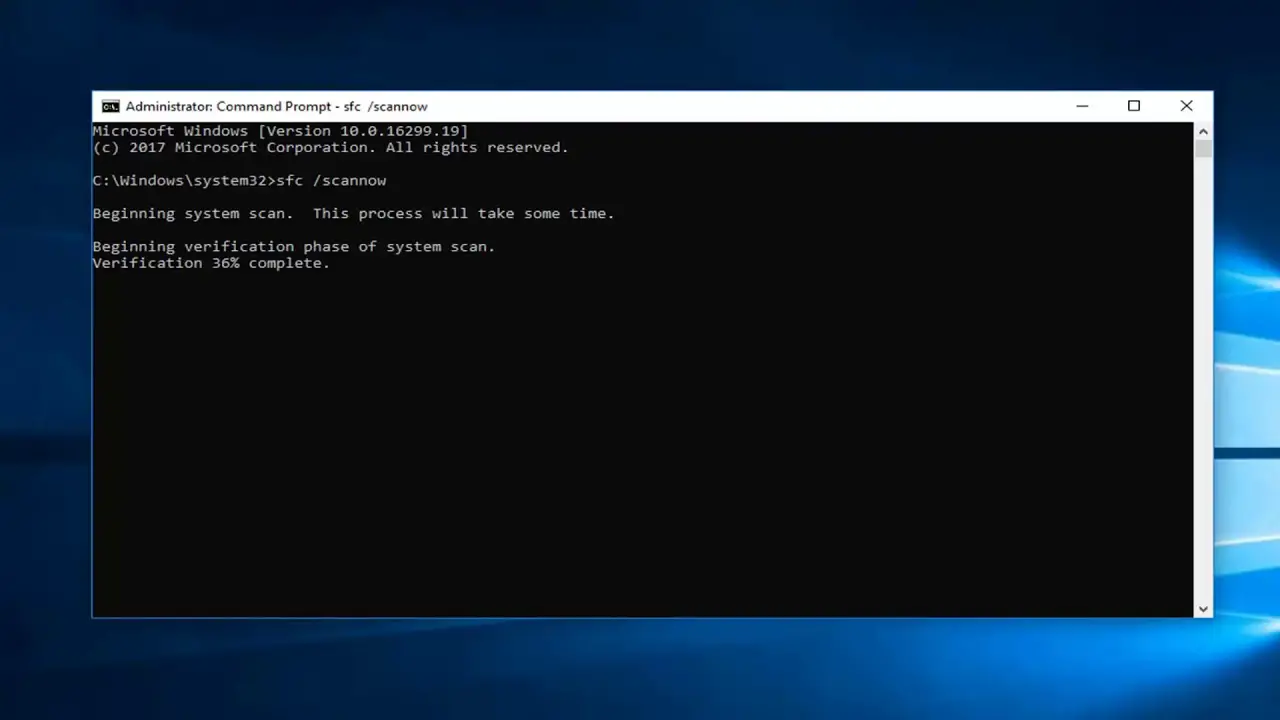
Run System File Checker
Update windows
As we’ve mentioned earlier also, the error can be received when you try to update windows. If however the error is received when trying to run other programs, you should check for windows update. Try to install all the missing updates on your PC.
Check and delete malicious files on your computer
Infected files can cause the display of this error code. You can find malicious files by running windows defender firewall. If you have powerful antivirus software, you can use as well. When malicious files are found, you need to delete them.
Run registry clean up
It might be possible your registry is corrupt and using a good registry cleaner will do the job. If you’re looking for free options you should start with CCleaner. This is an effective tool that can fix your windows registry with ease. You can as well use other tools that are effective.
Uninstall Recently Installed Programs
If you started receiving this error message after installing a few programs, you need to delete them from your PC because chances are they’re the root cause and you need to eliminate them. Remove these programs and restart your computer to see if the problem is solved.
Restore Your Pc From Previous Date
Whenever you receive the error 0xc000013a, it means some changes have been made on your PC that’s causing the error display. It could be missing files or corrupt registry. So a good way to fix the problem is by restoring your computer to an earlier date prior to the date you started receiving the error message. Search for restore on Pc search box and you’ll be presented with restore points to choose from. Most of the time this will fix the problem because all your settings will be back to normal and allow your PC to run smoothly.

system restore windows 10
Automatic fix
If the error isn’t gone by now, you should use 0xc000013a repair utility tools. These are tools designed to search for the cause of error 0xc000013a and then fix automatically. There are lots of these tools and once you download. You need open the software and scan your Pc to search for errors that are stopping windows from performing some actions. All the errors found will be fixed automatically.
These programs come with system files and have the right configurations that make it easier to make all the necessary changes needed to get rid of the problem. You can find these apps for less than $30 bucks. The good thing is that after you purchase and it doesn’t remove the error message you can request for refund and some of them even come with free trial.
Following the steps above will surely help anyone fix error 0xc000013a on their windows operating system. Let us know how things work for you in the comment section.
|
1 / 1 / 1 Регистрация: 23.09.2012 Сообщений: 14 |
|
|
1 |
|
|
18.10.2016, 11:10. Показов 6058. Ответов 14
До обновления система работала без нареканий, иногда 7 дней в неделю круглосуточно, затем (не знаю как, обновления были отключены) меня во время работы принудительно обновило, стали появляться BSOD Компьютер был перезагружен после критической ошибки. Код ошибки: 0x0000000a (0x0000000000000000, 0x0000000000000002, 0x0000000000000000, 0xfffff8005b2b0118).
0 |

|
10571 / 5535 / 864 Регистрация: 07.04.2013 Сообщений: 15,660 |
|
|
18.10.2016, 19:48 |
2 |
|
Грузитесь в MSDART и удаляйте последнее обновление(я)
1 |
|
1 / 1 / 1 Регистрация: 23.09.2012 Сообщений: 14 |
|
|
18.10.2016, 20:04 [ТС] |
3 |
|
В общем на данный момент аптайм 2 часа, до этого это был максимум, дамп наконец то удалось расшифровать, по ходу это была проблема с драйвером чипсета, не мог найти драйвер под десятку, ибо интел не сделал драйвер на мой чипсет под 10, нашел на сайт производителя материнки, встал с 3 раза, не хотел запускаться. В чем оказался прикол, при обновлении он затянул с собой дрова, которые у меня были ещё на 7ке. Выяснить какой именно драйвер вызывает ошибку получилось с помощью утилиты verifier, как только обновил драйвер — сразу расшифровался дамп, чудеса какие-то. До этого никак, думаю пока тему закрывать не надо, помониторю до завтрашнего вечера. Если у кого проблемы после обновления будут — обращайтесь, около 10 багов исправил пока искал в чём проблема )
0 |
|
10571 / 5535 / 864 Регистрация: 07.04.2013 Сообщений: 15,660 |
|
|
18.10.2016, 20:17 |
4 |
|
по ходу это была проблема с драйвером чипсета Неа … 360AntiHacker64.sys (2x) нигде там не фигурирует драйвер чипсета
1 |

|
1 / 1 / 1 Регистрация: 23.09.2012 Сообщений: 14 |
|
|
20.10.2016, 08:59 [ТС] |
5 |
|
это из дампов (три дампа, которые были в 9 часов), который делался при работе verifier, сборщик bsod их сюда запухнул, там куча ошибок, но по другой причине Добавлено через 19 часов 33 минуты Добавлено через 17 часов 2 минуты
0 |
|
10571 / 5535 / 864 Регистрация: 07.04.2013 Сообщений: 15,660 |
|
|
20.10.2016, 09:09 |
6 |
|
загружайте новые дампы
0 |
|
1 / 1 / 1 Регистрация: 23.09.2012 Сообщений: 14 |
|
|
20.10.2016, 13:47 [ТС] |
7 |
|
Вот новый дамп и отчет.
0 |
|
1 / 1 / 1 Регистрация: 23.09.2012 Сообщений: 14 |
|
|
20.10.2016, 17:24 [ТС] |
8 |
|
память проверял по 4 прогона (вместе и по отдельности) в мемтетсе, винт проверял. Есть ли возможность, что это память в видеокарте? Вот что показал BSOD viewer: ntoskrnl.exe+14a2c0. За два дня количество запросов с таким адресом и этим драйвером выросло на порядок и у всех появилось после anniversary update. Добавлено через 34 минуты
0 |
|
10571 / 5535 / 864 Регистрация: 07.04.2013 Сообщений: 15,660 |
|
|
20.10.2016, 23:30 |
9 |
|
Поверил блин в лицензию от МС, лучше бы вырубил эти обновления и жил себе спокойно Тогда может воспользоваться самым первым советом ?
Грузитесь в MSDART и удаляйте последнее обновление(я) Хотя бы в качестве проверки.
0 |
|
1 / 1 / 1 Регистрация: 23.09.2012 Сообщений: 14 |
|
|
21.10.2016, 09:47 [ТС] |
10 |
|
не вышло откатить, после anniversary update ничего нет, то есть более ранние обновления удалить уже нельзя =( видит обновления за июль, май, а обновление октябрьское до этого большого не видит.
0 |
|
10571 / 5535 / 864 Регистрация: 07.04.2013 Сообщений: 15,660 |
|
|
22.10.2016, 10:41 |
11 |
|
Попробуйте убрать разгон и удалить 360 total security.
0 |
|
1 / 1 / 1 Регистрация: 23.09.2012 Сообщений: 14 |
|
|
22.10.2016, 12:10 [ТС] |
12 |
|
это уже сделал, в понедельник посмотрю на поведение, компьютер на работе просто.
0 |
|
10571 / 5535 / 864 Регистрация: 07.04.2013 Сообщений: 15,660 |
|
|
22.10.2016, 12:28 |
13 |
|
это уже сделал, в понедельник Что именно ? Потому, что в последнем отчете и разгон и 360 присутствуют Частота ЦП 3700.3 MHz (исходное: 3500 MHz, pазгон: 6%) 1394ohci 1394 OHCI-совместимый хост-контроллер 1394ohci.sys 10.0.14393.0 Драйвер ядра Остановлено
1 |
|
1 / 1 / 1 Регистрация: 23.09.2012 Сообщений: 14 |
|
|
22.10.2016, 15:22 [ТС] |
14 |
|
там последний отчет за 20.10, разгон и антивир удалил в пятницу, 21ого. Сегодня на работу заехал, запустил его и разные приложения на нём.
0 |
|
1 / 1 / 1 Регистрация: 23.09.2012 Сообщений: 14 |
|
|
25.10.2016, 17:17 [ТС] |
15 |
|
Решениеобновил драйвер видеокарты до нового релиза (в пятницу), с субботы до сегодняшнего вечера проблем не было. Кроме этого сделал полную очистку от всех хвостов видеодрайверов. Добавлено через 21 час 29 минут
1 |
 Сообщение было отмечено vavun как решение