Из-за различных неполадок или неожиданного отключения компьютера файловая система может быть повреждена. При обычном выключении все файловые системы монтируются только для чтения, а все не сохраненные данные записываются на диск.
Но если питание выключается неожиданно, часть данных теряется, и могут быть потерянны важные данные, что приведет к повреждению самой файловой системы. В этой статье мы рассмотрим как восстановить файловую систему fsck, для нескольких популярных файловых систем, а также поговорим о том, как происходит восстановление ext4.
Немного теории
Как вы знаете файловая система содержит всю информацию обо всех хранимых на компьютере файлах. Это сами данные файлов и метаданные, которые управляют расположением и атрибутами файлов в файловой системе. Как я уже говорил, данные не сразу записываются на жесткий диск, а некоторое время находятся в оперативной памяти и при неожиданном выключении, за определенного стечения обстоятельств файловая система может быть повреждена.
Современные файловые системы делятся на два типа — журналируемые и нежурналируемые. Журналиуемые файловые системы записывают в лог все действия, которые собираются выполнить, а после выполнения стирают эти записи. Это позволяет очень быстро понять была ли файловая система повреждена. Но не сильно помогает при восстановлении. Чтобы восстановить файловую систему linux необходимо проверить каждый блок файловой системы и найти поврежденные сектора.
Для этих целей используется утилита fsck. По сути, это оболочка для других утилит, ориентированных на работу только с той или иной файловой системой, например, для fat одна утилита, а для ext4 совсем другая.
В большинстве систем для корневого раздела проверка fsck запускается автоматически, но это не касается других разделов, а также не сработает если вы отключили проверку.
В этой статье мы рассмотрим ручную работу с fsck. Возможно, вам понадобиться LiveCD носитель, чтобы запустить из него утилиту, если корневой раздел поврежден. Если же нет, то система сможет загрузиться в режим восстановления и вы будете использовать утилиту оттуда. Также вы можете запустить fsck в уже загруженной системе. Только для работы нужны права суперпользователя, поэтому выполняйте ее через sudo.
А теперь давайте рассмотрим сам синтаксис утилиты:
$ fsck [опции] [опции_файловой_системы] [раздел_диска]
Основные опции указывают способ поведения утилиты, оболочки fsck. Раздел диска — это файл устройства раздела в каталоге /dev, например, /dev/sda1 или /dev/sda2. Опции файловой системы специфичны для каждой отдельной утилиты проверки.
А теперь давайте рассмотрим самые полезные опции fsck:
- -l — не выполнять другой экземпляр fsck для этого жесткого диска, пока текущий не завершит работу. Для SSD параметр игнорируется;
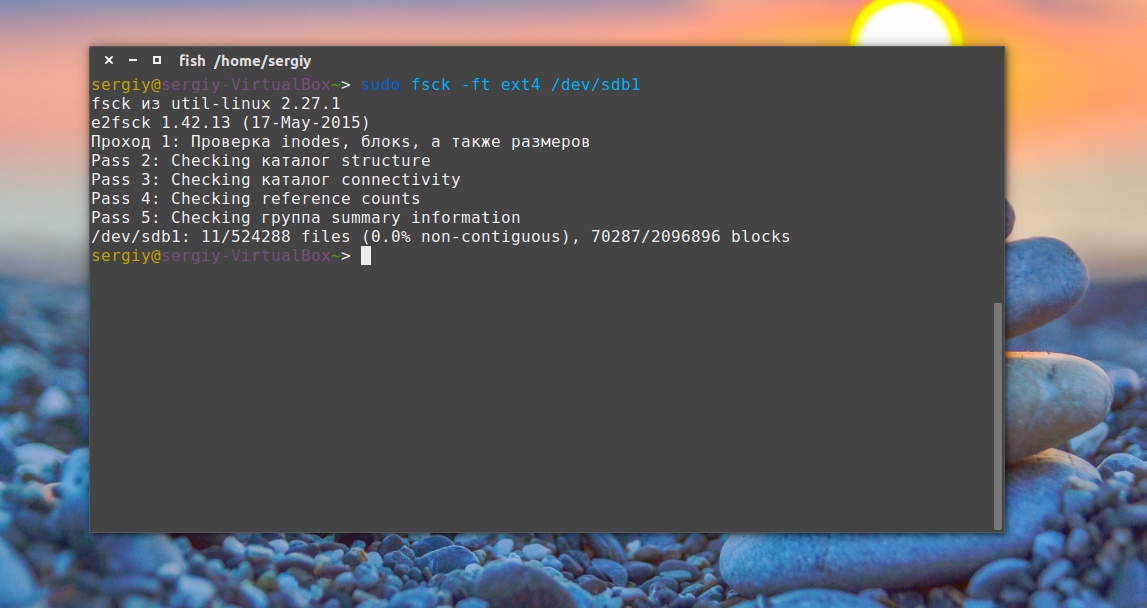
- -t — задать типы файловых систем, которые нужно проверить. Необязательно указывать устройство, можно проверить несколько разделов одной командой, просто указав нужный тип файловой системы. Это может быть сама файловая система, например, ext4 или ее опции в формате opts=ro. Утилита просматривает все файловые системы, подключенные в fstab. Если задать еще и раздел то к нему будет применена проверка именно указанного типа, без автоопределения;
- -A — проверить все файловые системы из /etc/fstab. Вот тут применяются параметры проверки файловых систем, указанные в /etc/fstab, в том числе и приоритетность. В первую очередь проверяется корень. Обычно используется при старте системы;
- -C — показать прогресс проверки файловой системы;
- -M — не проверять, если файловая система смонтирована;
- -N — ничего не выполнять, показать, что проверка завершена успешно;
- -R — не проверять корневую файловую систему;
- -T — не показывать информацию об утилите;
- -V — максимально подробный вывод.
Это были глобальные опции утилиты. А теперь рассмотрим опции для работы с файловой системой, их меньше, но они будут более интересны:
- -a — во время проверки исправить все обнаруженные ошибки, без каких-либо вопросов. Опция устаревшая и ее использовать не рекомендуется;
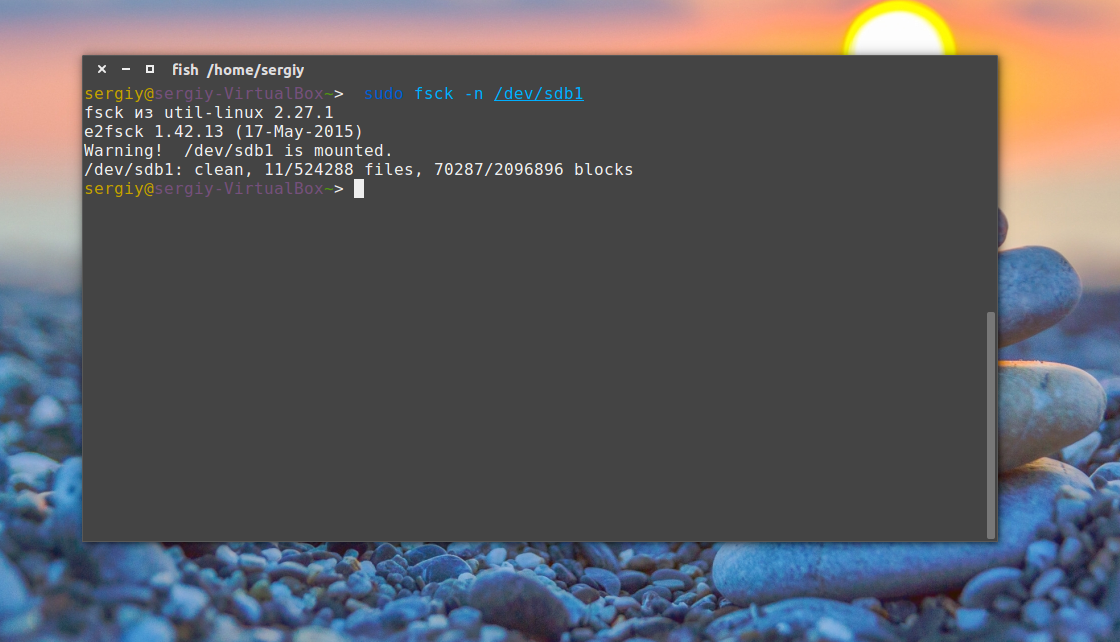
- -n — выполнить только проверку файловой системы, ничего не исправлять;
- -r — спрашивать перед исправлением каждой ошибки, используется по умолчанию для файловых систем ext;
- -y — отвечает на все вопросы об исправлении ошибок утвердительно, можно сказать, что это эквивалент a.
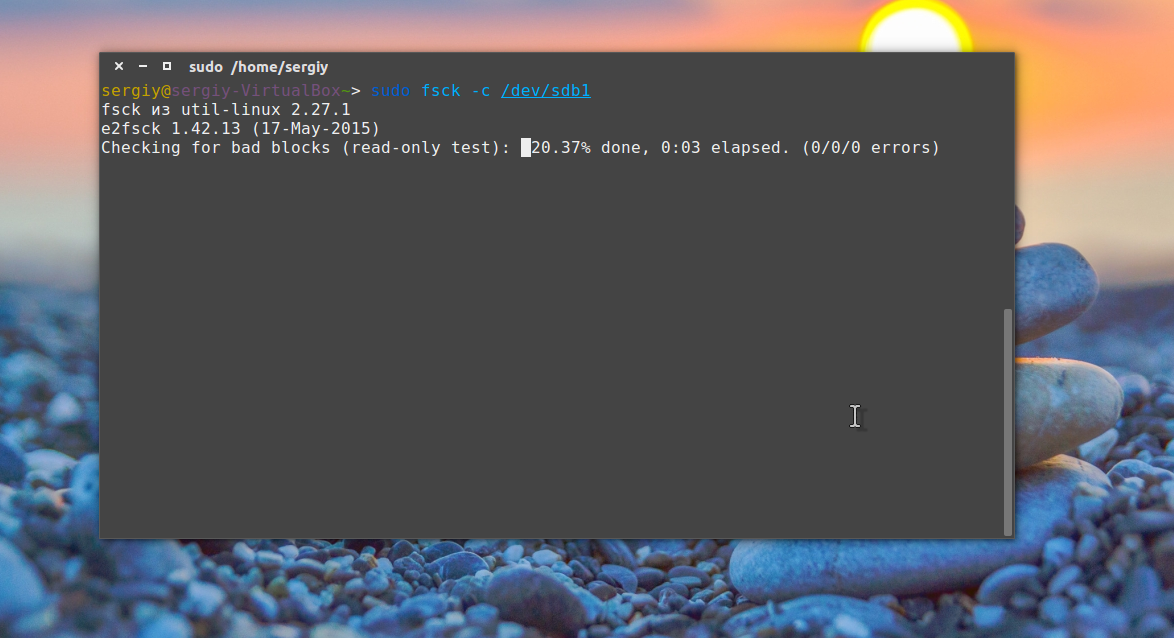
- -c — найти и занести в черный список все битые блоки на жестком диске. Доступно только для ext3 и ext4;
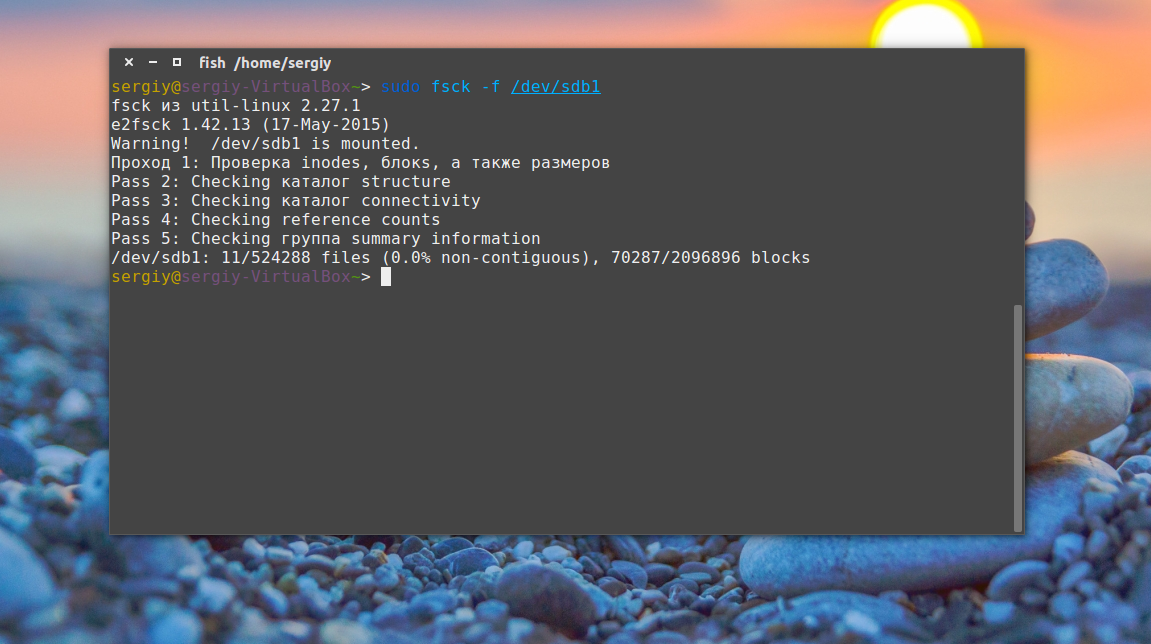
- -f — принудительная проверка файловой системы, даже если по журналу она чистая;
- -b — задать адрес суперблока, если основной был поврежден;
- -p — еще один современный аналог опции -a, выполняет проверку и исправление автоматически. По сути, для этой цели можно использовать одну из трех опций: p, a, y.
Теперь мы все разобрали и вы готовы выполнять восстановление файловой системы linux. Перейдем к делу.
Как восстановить файловую систему в fsck
Допустим, вы уже загрузились в LiveCD систему или режим восстановления. Ну, одним словом, готовы к восстановлению ext4 или любой другой поврежденной ФС. Утилита уже установлена по умолчанию во всех дистрибутивах, так что устанавливать ничего не нужно.
Восстановление файловой системы
Если ваша файловая система находится на разделе с адресом /dev/sda1 выполните:
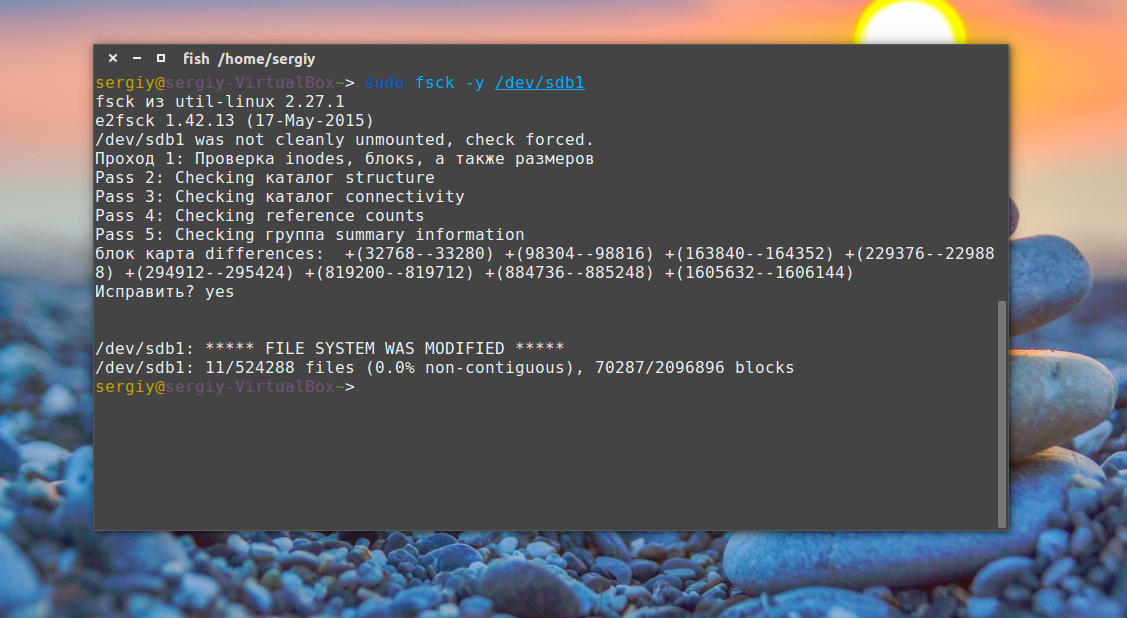
sudo fsck -y /dev/sda1
Опцию y указывать необязательно, но если этого не сделать утилита просто завалит вас вопросами, на которые нужно отвечать да.
Восстановление поврежденного суперблока
Обычно эта команда справляется со всеми повреждениями на ура. Но если вы сделали что-то серьезное и повредили суперблок, то тут fsck может не помочь. Суперблок — это начало файловой системы. Без него ничего работать не будет.
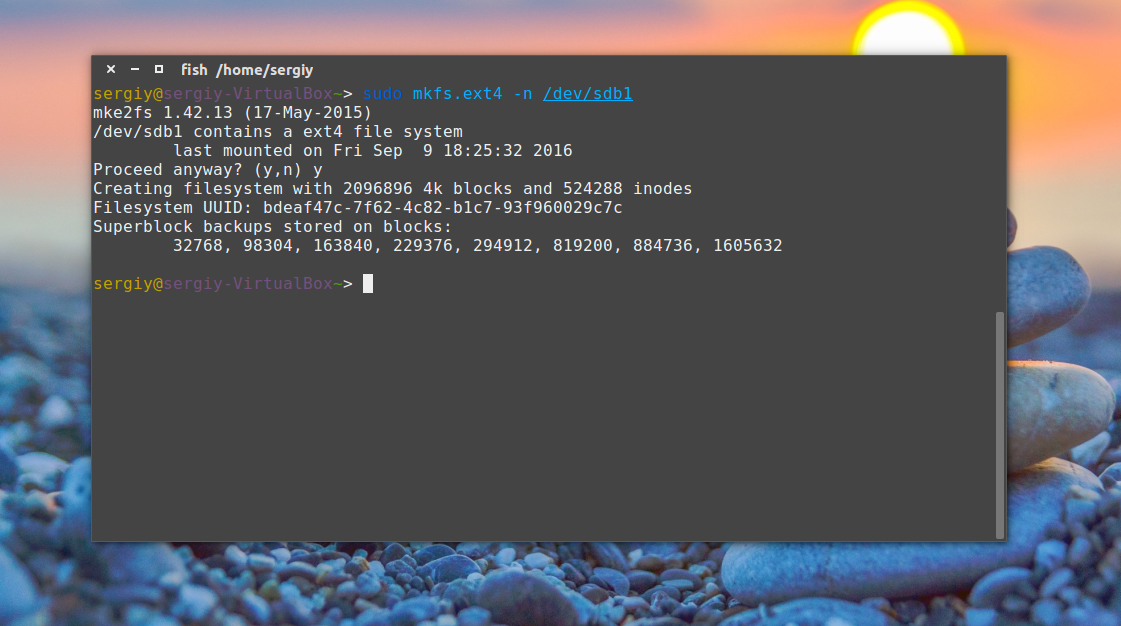
Но не спешите прощаться с вашими данными, все еще можно восстановить. С помощью такой команды смотрим куда были записаны резервные суперблоки:
sudo mkfs -t ext4 -n /dev/sda1
На самом деле эта команда создает новую файловую систему. Вместо ext4 подставьте ту файловую систему, в которую был отформатирован раздел, размер блока тоже должен совпадать иначе ничего не сработает. С опцией -n никаких изменений на диск не вноситься, а только выводится информация, в том числе о суперблоках.
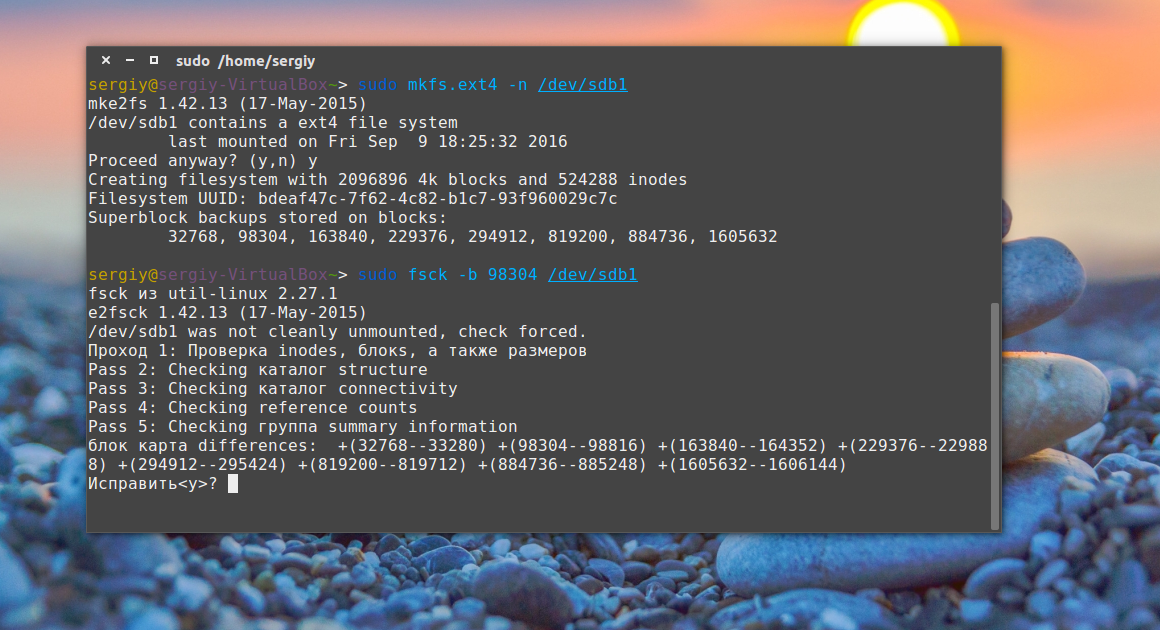
Теперь у нас есть шесть резервных адресов суперблоков и мы можем попытаться восстановить файловую систему с помощью каждого из них, например:
sudo fsck -b 98304 /dev/sda1
После этого, скорее всего, вам удастся восстановить вашу файловую систему. Но рассмотрим еще пару примеров.
Проверка чистой файловой системы
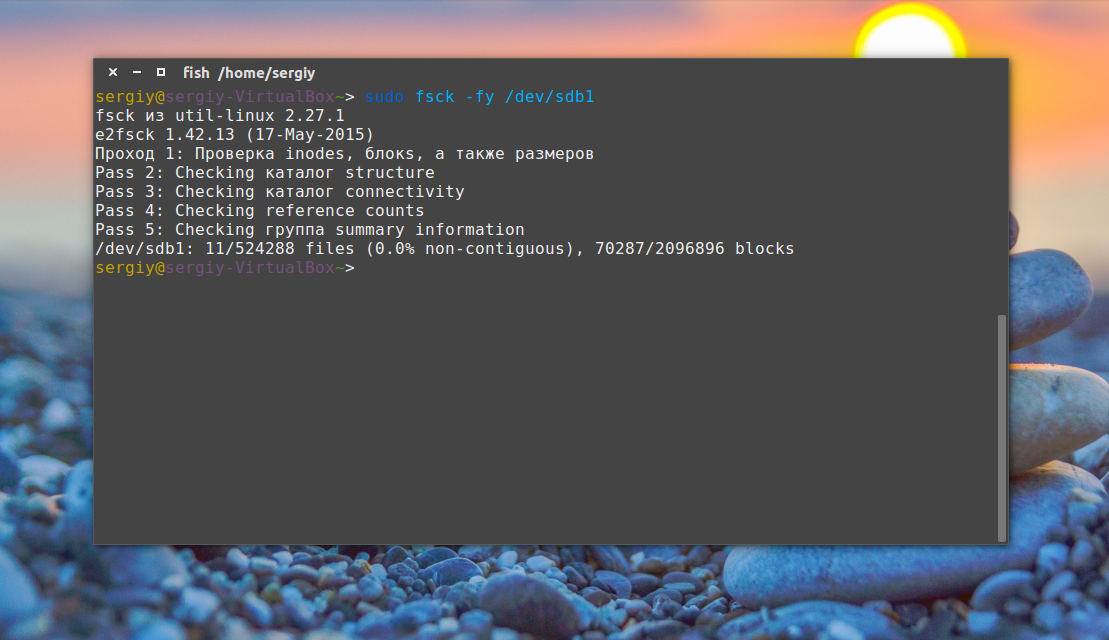
Проверим файловую систему, даже если она чистая:
sudo fsck -fy /dev/sda1
Битые сектора
Или еще мы можем найти битые сектора и больше в них ничего не писать:
sudo fsck -c /dev/sda1
Установка файловой системы
Вы можете указать какую файловую систему нужно проверять на разделе, например:
sudo fsck -t ext4 /dev/sdb1
Проверка всех файловых систем
С помощью флага -A вы можете проверить все файловые системы, подключенные к компьютеру:
sudo fsck -A -y
Но такая команда сработает только в режиме восстановления, если корневой раздел и другие разделы уже примонтированы она выдаст ошибку. Но вы можете исключить корневой раздел из проверки добавив R:
sudo fsck -AR -y
Или исключить все примонтированные файловые системы:
sudo fsck -M -y
Также вы можете проверить не все файловые системы, а только ext4, для этого используйте такую комбинацию опций:
sudo fsck -A -t ext4 -y
Или можно также фильтровать по опциям монтирования в /etc/fstab, например, проверим файловые системы, которые монтируются только для чтения:
sudo fsck -A -t opts=ro
Проверка примонтированных файловых систем
Раньше я говорил что нельзя. Но если другого выхода нет, то можно, правда не рекомендуется. Для этого нужно сначала перемонтировать файловую систему в режим только для чтения. Например:
sudo mount -o remount,ro /dev/sdb1
А теперь проверка файловой системы fsck в принудительном режиме:
sudo fsck -fy /dev/sdb1
Просмотр информации
Если вы не хотите ничего исправлять, а только посмотреть информацию, используйте опцию -n:
sudo fsck -n /dev/sdb1
Выводы
Вот и все, теперь вы знаете как выполняется восстановление файловой системы ext4 или любой другой, поддерживаемой в linux fsck. Если у вас остались вопросы, спрашивайте в комментариях!
На десерт сегодня видео на английском про различия файловых систем ext4 и xfs, как обычно, есть титры:
https://www.youtube.com/watch?v=pECp066gGcY
Обнаружили ошибку в тексте? Сообщите мне об этом. Выделите текст с ошибкой и нажмите Ctrl+Enter.
Статья распространяется под лицензией Creative Commons ShareAlike 4.0 при копировании материала ссылка на источник обязательна .
FSCK – очень важная утилита для Linux / Unix, она используется для проверки и исправления ошибок в файловой системе.
Она похоже на утилиту «chkdsk» в операционных системах Windows.
Она также доступна для операционных систем Linux, MacOS, FreeBSD.
FSCK означает «File System Consistency Check», и в большинстве случаев он запускается во время загрузки, но может также запускаться суперпользователем вручную, если возникнет такая необходимость.
Может использоваться с 3 режимами работы,
1- Проверка наличия ошибок и позволить пользователю решить, что делать с каждой ошибкой,
2- Проверка на наличие ошибок и возможность сделать фикс автоматически, или,
3- Проверка наличия ошибок и возможность отобразить ошибку, но не выполнять фикс.
Содержание
- Синтаксис использования команды FSCK
- Команда Fsck с примерами
- Выполним проверку на ошибки в одном разделе
- Проверьте файловую систему на ошибки и исправьте их автоматически
- Проверьте файловую систему на наличие ошибок, но не исправляйте их
- Выполним проверку на ошибки на всех разделах
- Проверим раздел с указанной файловой системой
- Выполнять проверку только на несмонтированных дисках
Синтаксис использования команды FSCK
$ fsck options drives
Опции, которые можно использовать с командой fsck:
- -p Автоматический фикс (без вопросов)
- -n не вносить изменений в файловую систему
- -у принять «yes» на все вопросы
- -c Проверить наличие плохих блоков и добавить их в список.
- -f Принудительная проверка, даже если файловая система помечена как чистая
- -v подробный режим
- -b использование альтернативного суперблока
- -B blocksize Принудительный размер блоков при поиске суперблока
- -j external_journal Установить местоположение внешнего журнала
- -l bad_blocks_file Добавить в список плохих блоков
- -L bad_blocks_file Установить список плохих блоков
Мы можем использовать любую из этих опций, в зависимости от операции, которую нам нужно выполнить.
Давайте обсудим некоторые варианты команды fsck с примерами.
Команда Fsck с примерами
Примечание: – Прежде чем обсуждать какие-либо примеры, прочтите это. Мы не должны использовать FSCK на смонтированных дисках, так как высока вероятность того, что fsck на смонтированном диске повредит диск навсегда.
Поэтому перед выполнением fsck мы должны отмонтировать диск с помощью следующей команды:
$ umount drivename
Например:
$ umount /dev/sdb1
Вы можете проверить номер раздела с помощью следующей команды:
$ fdisk -l
Также при запуске fsck мы можем получить некоторые коды ошибок.
Ниже приведен список кодов ошибок, которые мы могли бы получить при выполнении команды вместе с их значениями:
- 0 – нет ошибок
- 1 – исправлены ошибки файловой системы
- 2 – система должна быть перезагружена
- 4 – Ошибки файловой системы оставлены без исправлений
- 8 – Операционная ошибка
- 16 – ошибка использования или синтаксиса
- 32 – Fsck отменен по запросу пользователя
- 128 – Ошибка общей библиотеки
Теперь давайте обсудим использование команды fsck с примерами в системах Linux.
Выполним проверку на ошибки в одном разделе
Чтобы выполнить проверку на одном разделе, выполните следующую команду из терминала:
$ umount /dev/sdb1

$ fsck /dev/sdb1
Проверьте файловую систему на ошибки и исправьте их автоматически
Запустите команду fsck с параметром «a» для проверки целостности и автоматического восстановления, выполните следующую команду.
Мы также можем использовать опцию «у» вместо опции «а».
$ fsck -a /dev/sdb1
Проверьте файловую систему на наличие ошибок, но не исправляйте их
В случае, если нам нужно только увидеть ошибки, которые происходят в нашей файловой системе, и не нужно их исправлять, тогда мы должны запустить fsck с опцией “n”,
$ fsck -n /dev/sdb1
Выполним проверку на ошибки на всех разделах
Чтобы выполнить проверку файловой системы для всех разделов за один раз, используйте fsck с опцией «A»
$ fsck -A
Чтобы отключить проверку корневой файловой системы, мы будем использовать опцию «R»
$ fsck -AR
Проверим раздел с указанной файловой системой
Чтобы запустить fsck на всех разделах с указанным типом файловой системы, например, «ext4», используйте fsck с опцией «t», а затем тип файловой системы,
$ fsck -t ext4 /dev/sdb1
или
$ fsck -t -A ext4
Выполнять проверку только на несмонтированных дисках
Чтобы убедиться, что fsck выполняется только на несмонтированных дисках, мы будем использовать опцию «M» при запуске fsck,
$ fsck -AM
Вот наше короткое руководство по команде fsck с примерами.
Пожалуйста, не стесняйтесь присылать нам свои вопросы, используя поле для комментариев ниже.
|
|
Duplicate Article |
See: SystemAdministration/Fsck and TestingStorageMedia
Introduction
Contents
- Introduction
-
Basic filesystem checks and repairs
- e2fsprogs — ext2, ext3, ext4 filesystems
- dosfstools — FAT12, FAT16 and FAT32 (vfat) filesystem
- ntfs-3g (previously also ntfsprogs) — NTFS filesystem
- reiserfstools — reiserfs
- xfsprogs — xfs
- Missing superblock
- Bad blocks
- Sources and further reading
This guide will help diagnose filesystem problems one may come across on a GNU/Linux system. New sections are still being added to this howto.
Basic filesystem checks and repairs
The most common method of checking filesystem’s health is by running what’s commonly known as the fsck utility. This tool should only be run against an unmounted filesystem to check for possible issues. Nearly all well established filesystem types have their fsck tool. e.g.: ext2/3/4 filesystems have the e2fsck tool. Most notable exception until very recently was btrfs. There are also filesystems that do not need a filesystem check tool i.e.: read-only filesystems like iso9660 and udf.
e2fsprogs — ext2, ext3, ext4 filesystems
Ext2/3/4 have the previously mentioned e2fsck tool for checking and repairing filesystem. This is a part of e2fsprogs package — the package needs to be installed to have the fsck tool available. Unless one removes it in aptitude during installation, it should already be installed.
There are 4 ways the fsck tool usually gets run (listed in order of frequency of occurrence):
- it runs automatically during computer bootup every X days or Y mounts (whichever comes first). This is determined during the creation of the filesystem and can later be adjusted using tune2fs.
- it runs automatically if a filesystem has not been cleanly unmounted (e.g.: powercut)
- user runs it against an unmounted filesystem
-
user makes it run at next bootup
case 1
When filesystem check is run automatically X days after the last check or after Y mounts, Ubuntu gives user the option to interrupt the check and continue bootup normally. It is recommended that user lets it finish the check.
case 2
If a filesystem has not been cleanly unmounted, the system detects a dirty bit on the filesystem during the next bootup and starts a check. It is strongly recommended that one lets it finish. It is almost certain there are errors on the filesystem that fsck will detect and attempt to fix. Nevertheless, one can still interrupt the check and let the system boot up on a possibly corrupted filesystem.
2 things can go wrong
-
fsck dies — If fsck dies for whatever reason, you have the option to press ^D (Ctrl + D) to continue with an unchecked filesystem or run fsck manually. See e2fsck cheatsheet for details how.
-
fsck fails to fix all errors with default settings — If fsck fails to fix all errors with default settings, it will ask to be run manually by the user. See e2fsck cheatsheet for details how.
case 3
User may run fsck against any filesystem that can be unmounted on a running system. e.g. if you can issue umount /dev/sda3 without an error, you can run fsck against /dev/sda3.
case 4
You can make your system run fsck by creating an empty ‘forcefsck’ file in the root of your root filesystem. i.e.: touch /forcefsck Filesystems that have 0 or nothing specified in the sixth column of your /etc/fstab, will not be checked
Till Ubuntu 6.06 you can also issue shutdown -rF now to reboot your filesystem and check all partitions with non-zero value in sixth column of your /etc/fstab. Later versions of Ubuntu use Upstart version of shutdown which does not support the -F option any more.
Refer to man fstab for what values are allowed.
e2fsck cheatsheet
e2fsck has softlinks in /sbin that one can use to keep the names of fsck tools more uniform. i.e. fsck.ext2, fsck.ext3 and fsck.ext4 (similarly, other filesystem types have e.g.: fsck.ntfs) This cheatsheet will make use of these softlinks and will use ext4 and /dev/sda1 as an example.
-
fsck.ext4 -p /dev/sda1 — will check filesystem on /dev/sda1 partition. It will also automatically fix all problems that can be fixed without human intervention. It will do nothing, if the partition is deemed clean (no dirty bit set).
-
fsck.ext4 -p -f /dev/sda1 — same as before, but fsck will ignore the fact that the filesystem is clean and check+fix it nevertheless.
-
fsck.ext4 -p -f -C0 /dev/sda1 — same as before, but with a progress bar.
-
fsck.ext4 -f -y /dev/sda1 — whereas previously fsck would ask for user input before fixing any nontrivial problems, -y means that it will simply assume you want to answer «YES» to all its suggestions, thus making the check completely non-interactive. This is potentially dangerous but sometimes unavoidable; especially when one has to go through thousands of errors. It is recommended that (if you can) you back up your partition before you have to run this kind of check. (see dd command for backing up filesystems/partitions/volumes)
-
fsck.ext4 -f -c -C0 /dev/sda1 — will attempt to find bad blocks on the device and make those blocks unusable by new files and directories.
-
fsck.ext4 -f -cc -C0 /dev/sda1 — a more thorough version of the bad blocks check.
-
fsck.ext4 -n -f -C0 /dev/sda1 — the -n option allows you to run fsck against a mounted filesystem in a read-only mode. This is almost completely pointless and will often result in false alarms. Do not use.
In order to create and check/repair these Microsoft(TM)’s filesystems, dosfstools package needs to be installed. Similarly to ext filesystems’ tools, dosfsck has softlinks too — fsck.msdos and fsck.vfat. Options, however, vary slightly.
dosfsck cheatsheet
These examples will use FAT32 and /dev/sdc1
-
fsck.vfat -n /dev/sdc1 — a simple non-interactive read-only check
-
fsck.vfat -a /dev/sdc1 — checks the file system and fixes non-interactively. Least destructive approach is always used.
-
fsck.vfat -r /dev/sdc1 — interactive repair. User is always prompted when there is more than a single approach to fixing a problem.
-
fsck.vfat -l -v -a -t /dev/sdc1 — a very verbose way of checking and repairing the filesystem non-interactively. The -t parameter will mark unreadable clusters as bad, thus making them unavailable to newly created files and directories.
Recovered data will be dumped in the root of the filesystem as fsck0000.rec, fsck0001.rec, etc. This is similar to CHK files created by scandisk and chkdisk on MS Windows.
ntfs-3g (previously also ntfsprogs) — NTFS filesystem
Due to the closed sourced nature of this filesystem and its complexity, there is no fsck.ntfs available on GNU/Linux (ntfsck isn’t being developed anymore). There is a simple tool called ntfsfix included in ntfs-3g package. Its focus isn’t on fixing NTFS volumes that have been seriously corrupted; its sole purpose seems to be making an NTFS volume mountable under GNU/Linux.
Normally, NTFS volumes are non-mountable if their dirty bit is set. ntfsfix can help with that by clearing trying to fix the most basic NTFS problems:
-
ntfsfix /dev/sda1 — will attempt to fix basic NTFS problems. e.g.: detects and fixes a Windows XP bug, leading to a corrupt MFT; clears bad cluster marks; fixes boot sector problems
-
ntfsfix -d /dev/sda1 — will clear the dirty bit on an NTFS volume.
-
ntfsfix -b /dev/sda1 — clears the list of bad sectors. This is useful after cloning an old disk with bad sectors to a new disk.
Windows 8 and GNU/Linux cohabitation problems This segment is taken from http://www.tuxera.com/community/ntfs-3g-advanced/ When Windows 8 is restarted using its fast restarting feature, part of the metadata of all mounted partitions are restored to the state they were at the previous closing down. As a consequence, changes made on Linux may be lost. This can happen on any partition of an internal disk when leaving Windows 8 by selecting “Shut down” or “Hibernate”. Leaving Windows 8 by selecting “Restart” is apparently safe.
To avoid any loss of data, be sure the fast restarting of Windows 8 is disabled. This can be achieved by issuing as an administrator the command : powercfg /h off
Install reiserfstools package to have reiserfsck and a softlink fsck.reiserfs available. Reiserfsck is a very talkative tool that will let you know what to do should it find errors.
-
fsck.reiserfs /dev/sda1 — a readonly check of the filesystem, no changes made (same as running with —check). This is what you should run before you include any other options.
-
fsck.reiserfs —fix-fixable /dev/sda1 — does basic fixes but will not rebuild filesystem tree
-
fsck.reiserfs —scan-whole-partition —rebuild-tree /dev/sda1 — if basic check recommends running with —rebuild-tree, run it with —scan-whole-partition and do NOT interrupt it! This will take a long time. On a non-empty 1TB partition, expect something in the range of 10-24 hours.
xfsprogs — xfs
If a check is necessary, it is performed automatically at mount time. Because of this, fsck.xfs is just a dummy shell script that does absolutely nothing. If you want to check the filesystem consistency and/or repair it, you can do so using the xfs_repair tool.
-
xfs_repair -n /dev/sda — will only scan the volume and report what fixes are needed. This is the no modify mode and you should run this first.
-
xfs_repair will exit with exit status 0 if it found no errors and with exit status 1 if it found some. (You can check exit status with echo $?)
-
-
xfs_repair /dev/sda — will scan the volume and perform all fixes necessary. Large volumes take long to process.
XFS filesystem has a feature called allocation groups (AG) that enable it to use more parallelism when allocating blocks and inodes. AGs are more or less self contained parts of the filesystem (separate free space and inode management). mkfs.xfs creates only a single AG by default.
xfs_repair checks and fixes your filesystems by going through 7 phases. Phase 3 (inode discovery and checks) and Phase 4 (extent discovery and checking) work sequentially through filesystem’s allocation groups (AG). With multiple AGs, this can be heavily parallelised. xfs_repair is clever enough to not process multiple AGs on same disks.
Do NOT bother with this if any of these is true for your system:
- you created your XFS filesystem with only a single AG.
-
your xfs_repair is older than version 2.9.4 or you will make the checks even slower on GNU/Linux. You can check your version with xfs_repair -V
- your filesystem does not span across multiple disks
otherwise:
-
xfs_repair -o ag_stride=8 -t 5 -v /dev/sda — same as previous example but reduces the check/fix time by utilising multiple threads, reports back on its progress every 5 minutes (default is 15) and its output is more verbose.
-
if your filesystem had 32 AGs, the -o ag_stride=8 would start 4 threads, one to process AGs 0-7, another for 8-15, etc… If ag_stride is not specified, it defaults to the number of AGs in the filesystem.
-
-
xfs_repair -o ag_stride=8 -t 5 -v -m 2048 /dev/sda — same as above but limits xfs_repair’s memory usage to a maximum of 2048 megabytes. By default, it would use up to 75% of available ram. Please note, -o bhash=xxx has been superseded by the -m option
== jfsutils — jfs == == btrfs ==
Missing superblock
Bad blocks
Sources and further reading
- man pages
-
<XFS user guide> — more details about XFS filesystem
In this article, you will learn how to repair Linux disk errors by using fsck and xfs_repair commands.
Table of Contents:
- What is FSCK?
- List Linux Disk Partitions and Types
- Get Last Scanned Time of a Linux Disk
- Scan & Repair a Ext4 Type Disk Partition
- Enable Scanning of Ext4 Disk Partitions at Linux Startup
- What is XFS_REPAIR?
- Scan & Repair a XFS Type Disk Partition
- Enable Scanning of XFS Disk Partitions at Linux Startup
- Conclusion
What is FSCK?:
The system utility fsck (file system consistency check) is a tool for checking the consistency of a file system in Unix and Unix-like operating systems, such as Linux, macOS, and FreeBSD.
Generally, fsck is run either automatically at boot time, or manually by the system administrator. The command works directly on data structures stored on disk, which are internal and specific to the particular file system in use — so an fsck command tailored to the file system is generally required. The exact behaviors of various fsck implementations vary, but they typically follow a common order of internal operations and provide a common command-line interface to the user. (Source: Wikipedia)
List Linux Disk Partitions and Types:
First of all you need to identify the disk partitions in your Linux server, their respective file systems and the path where they are being mounted.
If you are not used to Linux commandline then we recommend that you should attend online training Linux Command Line: From novice to wizard
By using a console or a ssh client, connect with your Linux server as root user.
You can execute the lsblk command with following switches at the Linux bash prompt to list the required information.
# lsblk -o NAME,FSTYPE,MOUNTPOINT
NAME        FSTYPE      MOUNTPOINT
sda
├─sda1      ext4        /boot
└─sda2      LVM2_member
  ├─cl-root xfs         /
  ├─cl-swap swap        [SWAP]
  └─cl-home xfs         /home
sr0
Get Last Scanned Time of a Linux Disk:
You can find the last scan time for Linux Ext4 type partitions with the help of following command.
# tune2fs -l /dev/sda1 | grep checked
Last checked:             Sun Sep 29 20:03:14 2019
Scan & Repair a Ext4 Type Disk Partition:
To scan a Linux disk partition, you can use fsck (File System Consistency Check) command. But you are required to unmount that partition before checking and repairing it.
# umount /dev/sda1
After successful unmount, execute fsck command at Linux bash prompt.
# fsck.ext4 /dev/sda1
e2fsck 1.45.6 (20-Mar-2020)
/dev/sda1: clean, 320/65536 files, 61787/262144 blocks
After checking and repairing your Linux disk, mount the partition again at its respective mountpoint.
For this purpose, execute following Linux command to mount all the disk partitions listed in /etc/fstab file.
# mount -a
Enable Scanning of Ext4 Disk Partitions at Linux Startup:
To enable disk checking at the time of Linux startup. You have to modify the Mount Count parameter for that disk partition.
# tune2fs -c 1 /dev/sda1
tune2fs 1.45.6 (20-Mar-2020)
Setting maximal mount count to 1
Reboot your Linux server now.
# reboot
Linux command fsck is now check your Ext4 disk partition on startup.
After reboot, get the Last Checked value for your disk partition, now it will show you the time of last Linux startup.
# tune2fs -l /dev/sda1 | grep checked
Last checked:             Sun Aug  1 22:50:46 2021
Set back the Mount Count parameter, or it will keep performing disk scans on each Linux boot.
# tune2fs -c -1 /dev/sda1
tune2fs 1.45.6 (20-Mar-2020)
Setting maximal mount count to -1
What is XFS_REPAIR?:
XFS is a high-performance 64-bit journaling file system created by Silicon Graphics, Inc (SGI) in 1993. It was the default file system in SGI’s IRIX operating system starting with its version 5.3. XFS was ported to the Linux kernel in 2001; as of June 2014, XFS is supported by most Linux distributions, some of which use it as the default file system.
The xfs_repair utility is highly scalable and is designed to repair even very large file systems with many inodes efficiently. Unlike other Linux file systems, xfs_repair does not run at boot time, even when an XFS file system was not cleanly unmounted. In the event of an unclean unmount, xfs_repair simply replays the log at mount time, ensuring a consistent file system.
Scan & Repair a XFS Type Disk Partition:
XFS type disk partitions have their own set of commands, that are a little bit different from Ext4.
You must unmount a XFS disk partition before checking it for consistency.
# umount /dev/mapper/cl-home
We have xfs_repair command for checking and repairing the disk errors.
In some Linux distros, you may also find xfs_check command. This command only perform scanning of XFS type disk partitions and do not perform any repair.
But xfs_check command is not available in all Linux distros.
Alternatively, you can use xfs_repair command with -n switch to get the same functionality as of xfs_check.
# xfs_repair -n /dev/mapper/cl-home
Phase 1 - find and verify superblock...
Phase 2 - using internal log
        - zero log...
        - scan filesystem freespace and inode maps...
        - found root inode chunk
Phase 3 - for each AG...
        - scan (but don't clear) agi unlinked lists...
        - process known inodes and perform inode discovery...
        - agno = 0
        - agno = 1
        - agno = 2
        - agno = 3
        - process newly discovered inodes...
Phase 4 - check for duplicate blocks...
        - setting up duplicate extent list...
        - check for inodes claiming duplicate blocks...
        - agno = 0
        - agno = 1
        - agno = 2
        - agno = 3
No modify flag set, skipping phase 5
Phase 6 - check inode connectivity...
        - traversing filesystem ...
        - traversal finished ...
        - moving disconnected inodes to lost+found ...
Phase 7 - verify link counts...
No modify flag set, skipping filesystem flush and exiting.
The above command only perform disk checking and do not try to repair any error.
Now, execute the xfs_repair command without -n switch and it will perform scanning and repairing of Linux disk partitions.
# xfs_repair /dev/mapper/cl-home
Phase 1 - find and verify superblock...
Phase 2 - using internal log
        - zero log...
        - scan filesystem freespace and inode maps...
        - found root inode chunk
Phase 3 - for each AG...
        - scan and clear agi unlinked lists...
        - process known inodes and perform inode discovery...
        - agno = 0
        - agno = 1
        - agno = 2
        - agno = 3
        - process newly discovered inodes...
Phase 4 - check for duplicate blocks...
        - setting up duplicate extent list...
        - check for inodes claiming duplicate blocks...
        - agno = 0
        - agno = 1
        - agno = 2
        - agno = 3
Phase 5 - rebuild AG headers and trees...
        - reset superblock...
Phase 6 - check inode connectivity...
        - resetting contents of realtime bitmap and summary inodes
        - traversing filesystem ...
        - traversal finished ...
        - moving disconnected inodes to lost+found ...
Phase 7 - verify and correct link counts...
done
Remount the XFS partition at its original mountpoint as listed in /etc/fstab file.
# mount -a
Enable Scanning of XFS Disk Partitions at Linux Startup:
In some scenarios you cannot unmount a disk partition, if the disk is in use by the Linux operating system. For this reason you may have to defer the disk checking until next system boot.
To enable xfs_repair command to run on Linux startup, add «fsck.mode=force fsck.repair=yes» at the end of GRUB menu kernel command.
You can refer to our previous post about Editing GRUB menu.
After Linux startup, check the system log to verify the execution of disk repair command.
# journalctl | grep systemd-fsck
To permanently enable disk checking at startup, you have to add «fsck.mode=force fsck.repair=yes» in GRUB configuration files.
Edit grub configuration file in vim text editor.
# vi /etc/default/grub
Locate GRUB_CMDLINE_LINUX parameter and append «fsck.mode=force fsck.repair=yes» at the end of line.
GRUB_CMDLINE_LINUX="resume=/dev/mapper/cl-swap rd.lvm.lv=cl/root rd.lvm.lv=cl/swap rhgb quiet fsck.mode=force fsck.repair=yes"
Regenerate GRUB menu configurations based on new parameters.
# grub2-mkconfig
Reboot your Linux operating system to verify the new settings.
# reboot
Conclusion:
You have successfully performed scanning and repairing of Linux Disk partitions of Ext4 and XFS types. If you feel any difficulty understanding this Linux tutorial, we suggest that you should read The Linux Command Line, 2nd Edition by William Shotts.
Linux Filesystems are responsible for organizing how data is stored and recovered. One way or another, with time, the filesystem may become corrupted and certain parts of it may not be accessible. If your filesystem develops such inconsistency it is recommended to verify its integrity.
This can be completed via a system utility called fsck (file system consistency check), which checks the root file system automatically during boot time or ran manually.
In this article, we are going to review the fsck command and its usage to help you repair Linux disk errors.
Table of Contents
1
When to Use fsck Command in Linux
There are different scenarios when you will want to run fsck. Here are a few examples:
- The system fails to boot.
- Files on the system become corrupt (often you may see input/output error).
- The attached drive (including flash drives/SD cards) is not working as expected.
fsck Command Options
The fsck command needs to be run with superuser privileges or root. You can use it with different arguments. Their usage depends on your specific case. Below you will see some of the more important options:
-A– Used for checking all filesystems. The list is taken from/etc/fstab.-C– Show progress bar.-l– Locks the device to guarantee no other program will try to use the partition during the check.-M– Do not check mounted filesystems.-N– Only show what would be done – no actual changes are made.-P– If you want to check filesystems in parallel, including root.-R– Do not check the root filesystem. This is useful only with ‘-A‘.-r– Provide statistics for each device that is being checked.-T– Does not show the title.-t– Exclusively specify the Linux filesystem types to be checked. Types can be comma-separated lists.-V– Provide a description of what is being done.
Run fsck Command to Repair Linux File System Errors
In order to run fsck, you will need to ensure that the partition you are going to check is not mounted. For the purpose of this article, I will use my second drive /dev/sdb mounted in /mnt.
Here is what happens if I try to run fsck when the partition is mounted.
# fsck /dev/sdb
To avoid this unmount the partition using.
# umount /dev/sdb
Then fsck can be safely run with.
# fsck /dev/sdb
Understanding fsck Exit Codes
After running fsck, it will return an exit code. These codes can be seen in fsck’s manual by running:
# man fsck

0      No errors
1      Filesystem errors corrected
2      System should be rebooted
4      Filesystem errors were left uncorrected
8      Operational error
16     Usage or syntax error
32     Checking canceled by user request
128    Shared-library error
Fsck Repair Linux Filesystem
Sometimes more than one error can be found on a filesystem. In such cases, you may want fsck to automatically attempt to correct the errors. This can be done with:
# fsck -y /dev/sdb
The -y flag, automatically “yes” to any prompts from fsck to correct an error.
Similarly, you can run the same on all filesystems (without root):
$ fsck -AR -y
How to Run fsck on Linux Root Partition
In some cases, you may need to run fsck on the root partition of your system. Since you cannot run fsck while the partition is mounted, you can try one of these options:
- Force fsck upon system boot
- Run fsck in rescue mode
We will review both situations.
Force fsck Upon System Boot
This is relatively easy to complete, the only thing you need to do is create a file called forcefsck in the root partition of your system. Use the following command:
# touch /forcefsck
Then you can simply force or schedule a reboot of your system. During the next bootup, the fsck will be performed. If downtime is critical, it is recommended to plan this carefully, since if there are many used inodes on your system, fsck may take some extra time.
After your system boots, check if the file still exists:
# ls /forcefsck
If it does, you may want to remove it in order to avoid fsck on every system boot.
Run fsck in Rescue Mode
Running fsck in rescue mode requires a few more steps. First, prepare your system for reboot. Stop any critical services like MySQL/MariaDB etc and then type.
# reboot
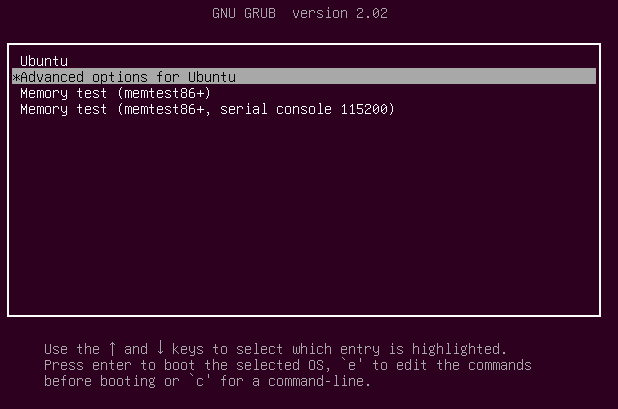
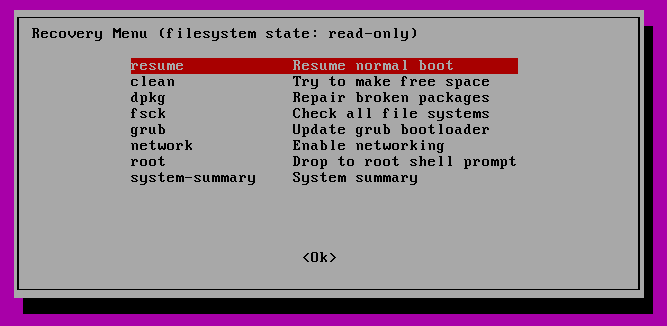
During the boot, hold down the shift key so that the grub menu is shown. Select “Advanced options”.
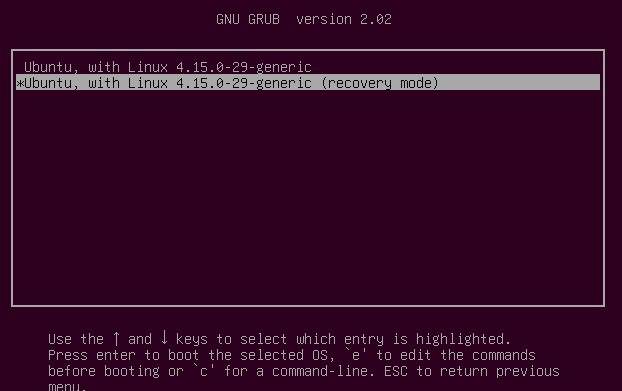
Then choose “Recovery mode”.
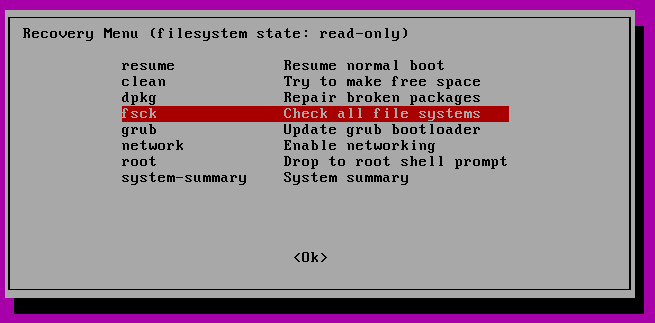
In the next menu select “fsck”.
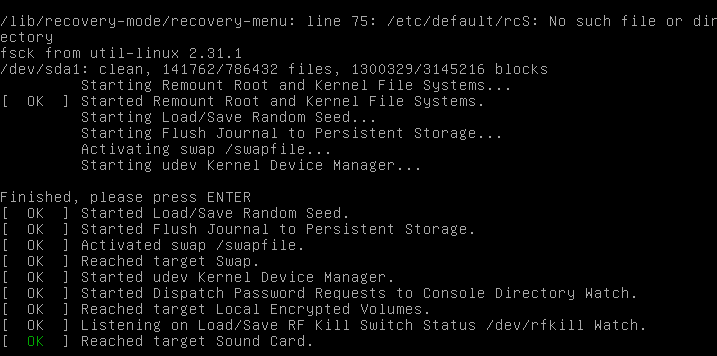
You will be asked if you wish to have your / filesystem remounted. Select “yes”.
You should see something similar to this.
You can then resume normal boot, by selecting “Resume”.
Conclusion
In this tutorial, you learned how to use fsck and run consistency checks on different Linux filesystems. If you have any questions about fsck, please do not hesitate to submit them in the comment section below.

