
Ошибка HTTP 413 Request Entity Too Large появляется, когда пользователь пытается загрузить на сервер слишком большой файл. Размер определяется относительно лимита, который установлен в конфигурации. Изменить его может только администратор сервера.
Что делать, если вы пользователь
Если вы видите ошибку 413, когда пытаетесь загрузить файл на чужом сайте, то вам нужно уменьшить размер передаваемых данных. Вот несколько ситуаций.
- Если вы пытались загрузить одновременно несколько файлов (форма позволяет так делать), попробуйте загружать их по одному.
- Если не загружается изображение, уменьшите его размер перед загрузкой на сервер. Можно сделать это с помощью онлайн-сервисов — например, Tiny PNG.
- Если не загружается видео, попробуйте сохранить его в другом формате и уменьшить размер. Можно сделать это с помощью онлайн-сервисов — я использую Video Converter.
- Если не загружается PDF-документ, уменьшите его размер. Можно сделать это с помощью онлайн-сервисов — я обычно использую PDF.io.
Универсальный вариант — архивация файла со сжатием. Ошибка сервера 413 появляется только в том случае, если вы пытаетесь одновременно загрузить слишком большой объем данных. Поэтому и выход во всех ситуациях один — уменьшить размер файлов.
Комьюнити теперь в Телеграм
Подпишитесь и будьте в курсе последних IT-новостей
Подписаться
Исправление ошибки сервера 413 владельцем сайта
Если вы владелец сайта, который при загрузке файлов выдает ошибку 413, то необходимо изменить конфигурацию сервера. Порядок действий зависит от используемых технологий.
Чтобы понять, что стало причиной ошибки, нужно посмотреть логи. Это поможет сэкономить время. Вот подробная инструкция, которая рассказывает, как посмотреть логи в панели управления Timeweb. В зависимости от того, какая информация будет в логах, вы поймете, как исправлять ошибку 413.
Увеличение разрешенного размера для загрузки файлов на Nginx и Apache
На Nginx максимально допустимый размер файла задан в параметре client_max_body_size. По умолчанию он равен 1 МБ. Если запрос превышает установленное значение, пользователь видит ошибку 413 Request Entity Too Large.
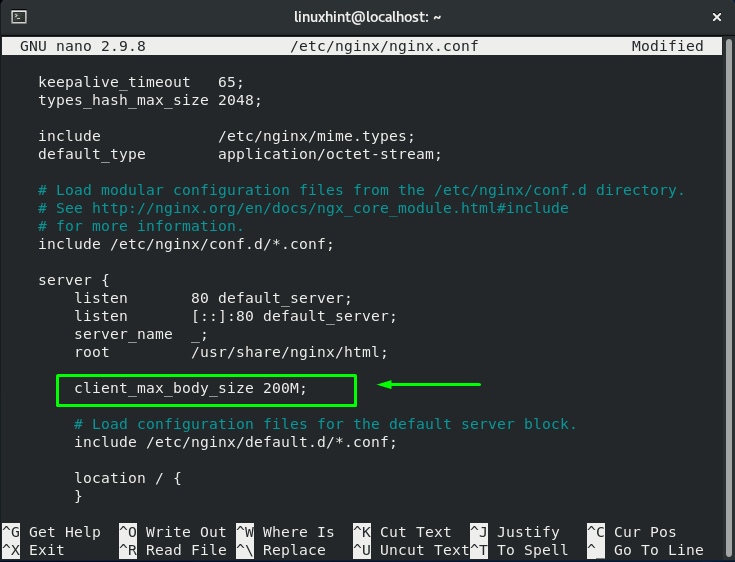
Параметр client_max_body_size находится в файле nginx.conf. Для его изменения нужен текстовый редактор — например, vi.
Подключитесь к серверу через SSH и выполните в консоли следующую команду:
Во встроенном редакторе vi откроется файл nginx.conf. В разделе http добавьте или измените следующую строку:
client_max_body_size 20M;
Сохраните и закройте файл. Затем проверьте конфигурацию файла:
Перезагрузите сервер следующей командой:
После перезагрузки будет действовать новая конфигурация с увеличенным лимитом на размер загружаемого файла.
На Apache опция, устанавливающая максимально допустимый размер загружаемого файла, называется LimitRequestBody. По умолчанию лимит не установлен (равен 0).
На CentOS главный конфиг располагается по адресу /etc/httpd/conf/httpd.conf. На Debian/Ubuntu — по адресу /etc/apache2/apache2.conf.
Значение задается в байтах:
LimitRequestBody 33554432
Эта запись выставляет максимально допустимый размер 32 МБ.
Изменить конфиги можно также через панель управления. Я пользуюсь ISPmanager, поэтому покажу на ее примере.
- Раскройте раздел «Домены» и перейдите на вкладку «WWW-домены».
- Выберите домен, на котором появляется ошибка, и нажмите на кнопку «Конфиг».

Появится вкладка с конфигами Apache и Nginx. Вы можете редактировать их вручную, устанавливая лимит на размер загружаемого файла.
Исправление ошибки на WordPress
На WordPress ошибку можно исправить двумя способами.
Способ первый — изменение разрешенного размера в файле functions.php. Этот файл отвечает за добавление функций и возможностей — например, меню навигации.
- Откройте файловый менеджер.
- Перейдите в папку public.html.
- Откройте директорию wp-content/themes.
- Выберите тему, которая используется на сайте с WordPress.
- Скачайте файл functions.php и откройте его через любой текстовый редактор.
В панели управления на Timeweb можно также воспользоваться встроенным редактором или IDE — путь будет такой же, как указан выше: public.html/wp-content/themes/ваша тема/functions.php.
В конце файла functions.php добавьте следующий код:
@ini_set( 'upload_max_size' , '256M' );

@ini_set( 'post_max_size', '256M');

@ini_set( 'max_execution_time', '300' );
Сохраните изменения и загрузите модифицированный файл обратно на сервер. Проверьте, появляется ли ошибка 413.

Второй способ — изменение файла .htaccess. Это элемент конфигурации, который способен переопределять конфигурацию сервера в плане авторизации, кэширования и даже оптимизации. Найти его можно через файловый менеджер в папке public.html.
Скачайте файл на компьютер, на всякий случай сделайте резервную копию. Затем откройте .htaccess в текстовом редакторе и после строчки #END WORDPRESS вставьте следующий код:
php_value upload_max_filesize 999M

php_value post_max_size 999M

php_value max_execution_time 1600

php_value max_input_time 1600
Сохраните файл и загрузите его обратно на сервер с заменой исходного файла. То же самое можно сделать через встроенный редактор или IDE в панели управления Timeweb.
Исправление ошибки при использовании PHP-скрипта
Если файлы загружаются с помощью PHP-скрипта, то для исправления ошибки 413 нужно отредактировать файл php.ini. В нем нас интересуют три директивы.:
- upload_max_filesize — в ней указан максимально допустимый размер загружаемого файла (значение в мегабайтах);
- post_max_size — максимально допустимый размер данных, отправляемых методом POST (значение в мегабайтах);
- max_execution_time — максимально допустимое время выполнения скрипта (значение в секундах).
Например, если я хочу, чтобы пользователи могли загружать файлы размером до 20 МБ, то я делаю так:
max_execution_time = 90

post_max_size = 20M

upload_max_filesize = 20M
Если все значения указаны верно, то файлы с допустимым размером будут загружаться на сервер без ошибок.
То же самое можно сделать через панель управления. Например, в ISPmanager порядок будет такой:
- Авторизуйтесь с root-правами.
- В левом меню раскройте раздел «Настройки web-сервера» и перейдите на вкладку «PHP».
- Выберите используемую версию и нажмите на кнопку «Изменить».

На экране появится список параметров. Они отсортированы по алфавиту. Установите необходимые значения для параметров max_execution_time, post_max_size и upload_max_filesize. Изменения применяются автоматически.

When building and maintaining a website, you’re bound to encounter some unexpected HTTP errors here and there. Problems like these are tough to avoid, and some are trickier to resolve than others.

If you’re experiencing a «413 Request Entity Too Large» error, the good news is that this issue is quick and simple to address — you just need to do a bit of server reconfiguration. And no, you don’t need to be a technical expert. Let’s learn how.

A 413 HTTP error code occurs when the size of a client’s request exceeds the server’s file size limit. This typically happens when a client attempts to upload a large file to a web server, and the server responds with a 413 error to alert the client.
Web servers place size limits on uploads to prevent users from overwhelming the server and exceeding storage permissions. This limit usually isn’t an issue, and common website files should stay well under it. However, especially large file uploads may occasionally exceed the limit, resulting in a message like this:

While you can reduce the size of your upload to get around the error, it’s also possible to change your file size limit with some server-side modification.
How to Fix a “413 Request Entity Too Large” Error
Your default upload size limit will depend on how your server is set up. In this guide, we’ll show you how to fix a 413 error by increasing your size limit with a WordPress setup, as well as with an Apache or Nginx server configuration.
All methods require some edits to your server files, so we recommend creating a backup before attempting the steps below.
WordPress
Themes and plugins are common causes of the 413 error with the WordPress content management system. Fortunately, there are several ways to increase your WordPress upload size limit enough to let these larger files through. As long as you do not exceed the limits of your hosting plan, you can try any of the following:
Modify PHP.ini
The easiest method to increase your upload limit is by modifying your server’s PHP.ini file. Here, you can change your limit through the cPanel interface without any coding. To do this:
1. In your cPanel menu, select MultiPHP INI Editor under Software.

2. In the window that appears, choose your domain from the dropdown menu.
3. Change the values of the following parameters to your preference:
- max_execution_time (maximum time to upload, in seconds)
- upload_max_filesize (maximum upload size, in megabytes)
- post_max_size (maximum post size, in megabytes)
4. When finished, click Apply.
Modify .htaccess
If your WordPress site is hosted on an Apache server, it’s also possible to increase your server’s limit via .htaccess, a file that contains many directives for the server. See the solution below.
Modify functions.php
You can also try increasing your size limit via the functions.php file of your current WordPress theme.
If you want to make this change permanent, we recommend trying the above approaches first. With this approach, you’ll need to update functions.php whenever you update or change your current theme.
1. In your cPanel menu, select File Manager under Files.

2. Navigate to the folder of your current theme inside your root WordPress directory (public_html by default). Open this theme file.
3. Select functions.php and click the Edit icon.
4. Copy the code below and paste it at the end of the file
@ini_set( ‘upload_max_size’ , ’64M’ );
@ini_set( ‘post_max_size’, ’64M’);
@ini_set( ‘max_execution_time’, ‘300’ );
5. Click Save.
This code sets the maximum allowed size of your WordPress uploads and posts to 64 megabytes. You can change this number to something larger or smaller if you need, as long as you do not exceed your hosting plan’s storage limit.
It also sets the maximum period your uploads can take to 300 seconds. Feel free to change this as well.
Nginx Server
Nginx server settings can be modified inside the file nginx.conf. Open this file and check for the directive client_max_body_size. Then, change the value (in megabytes) to your maximum file size preference.
If you do not see this directive in nginx.conf, you can add it to the end of a server, location, or http block like so:
server {
          ...
          client_max_body_size 64M;
}
This allows for a 64-megabyte upload. Set this number to your preference, save the file, then reload Nginx for the change to take effect.
Apache Server
Change the size limit on an Apache server by updating your .htaccess file like so:
1. In your cPanel menu, select File Manager under Files.
2. In your root WordPress directory (public_html by default), locate .htaccess. Depending on your settings, the .htaccess file may be hidden.
3. Select .htaccess and click the Edit icon.
4. Copy and paste the code below at the bottom of your .htaccess file:
php_value upload_max_filesize 64M
php_value post_max_size 64M
php_value max_execution_time 300
php_value max_input_time 300
5. Click Save and reload Apache.
Doing this sets the maximum allowed size of your WordPress uploads and posts to 64 megabytes and sets the maximum file upload time to 300 seconds. You can change both of these values to your preference.
Still getting a 413?
After trying one or more of the solutions above, you still may encounter a 413 error when uploading large files, even if these files are below your new size limit.
In this case, the issue may stem from your CDN’s servers or some other restriction set by your hosting provider. First, reach out to your hosting support, detailing the problem and the steps you’ve taken so far to resolve it. It may be that you’ve exceeded your plan’s file size limit without realizing. Or, your configurations may have inadvertently caused another error.
If you use a CDN to improve your site’s performance, this may also be the cause of your issue — the CDN servers you’re using may impose file size limits that are too small. Since you probably can’t modify these servers’ files directly, you consult the documentation for your CDN provider or contact product support to resolve the error.
If all else fails, consider uploading alternative files, reducing the size of your current file, or upgrading your storage plan. If you find yourself needing to upload a massive amount of data, more likely than not there’s a workaround.
Fixing a 413 Error
While HTTP errors can be frustrating, many are quickly solvable including a 413. By finding and tackling this issue now, you’ll have one less thing to worry about while building out your website. If your site allows users to upload their own content, changing your upload size limit solves this problem too — just make sure you’re not exceeding the limits set by your hosting plan.
As for the best option, we recommend WordPress users modify their server’s PHP.ini file first if possible, since this can easily be done through your hosting panel. Otherwise, choose the option that matches your server software.
This post was originally published in January 2021 and has been updated for comprehensiveness.

A 413 HTTP error code occurs when the size of a client’s request exceeds the server’s file size limit. This typically happens when a client attempts to upload a large file to a web server, and the server responds with a 413 error to alert the client.
Web servers place size limits on uploads to prevent users from overwhelming the server and exceeding storage permissions. This limit usually isn’t an issue, and common website files should stay well under it. However, especially large file uploads may occasionally exceed the limit, resulting in a message like this:
While you can reduce the size of your upload to get around the error, it’s also possible to change your file size limit with some server-side modification.
How to Fix a “413 Request Entity Too Large” Error
Your default upload size limit will depend on how your server is set up. In this guide, we’ll show you how to fix a 413 error by increasing your size limit with a WordPress setup, as well as with an Apache or Nginx server configuration.
All methods require some edits to your server files, so we recommend creating a backup before attempting the steps below.
WordPress
Themes and plugins are common causes of the 413 error with the WordPress content management system. Fortunately, there are several ways to increase your WordPress upload size limit enough to let these larger files through. As long as you do not exceed the limits of your hosting plan, you can try any of the following:
Modify PHP.ini
The easiest method to increase your upload limit is by modifying your server’s PHP.ini file. Here, you can change your limit through the cPanel interface without any coding. To do this:
1. In your cPanel menu, select MultiPHP INI Editor under Software.
2. In the window that appears, choose your domain from the dropdown menu.
3. Change the values of the following parameters to your preference:
- max_execution_time (maximum time to upload, in seconds)
- upload_max_filesize (maximum upload size, in megabytes)
- post_max_size (maximum post size, in megabytes)
4. When finished, click Apply.
Modify .htaccess
If your WordPress site is hosted on an Apache server, it’s also possible to increase your server’s limit via .htaccess, a file that contains many directives for the server. See the solution below.
Modify functions.php
You can also try increasing your size limit via the functions.php file of your current WordPress theme.
If you want to make this change permanent, we recommend trying the above approaches first. With this approach, you’ll need to update functions.php whenever you update or change your current theme.
1. In your cPanel menu, select File Manager under Files.
2. Navigate to the folder of your current theme inside your root WordPress directory (public_html by default). Open this theme file.
3. Select functions.php and click the Edit icon.
4. Copy the code below and paste it at the end of the file
@ini_set( ‘upload_max_size’ , ’64M’ );
@ini_set( ‘post_max_size’, ’64M’);
@ini_set( ‘max_execution_time’, ‘300’ );
5. Click Save.
This code sets the maximum allowed size of your WordPress uploads and posts to 64 megabytes. You can change this number to something larger or smaller if you need, as long as you do not exceed your hosting plan’s storage limit.
It also sets the maximum period your uploads can take to 300 seconds. Feel free to change this as well.
Nginx Server
Nginx server settings can be modified inside the file nginx.conf. Open this file and check for the directive client_max_body_size. Then, change the value (in megabytes) to your maximum file size preference.
If you do not see this directive in nginx.conf, you can add it to the end of a server, location, or http block like so:
server {
          ...
          client_max_body_size 64M;
}
This allows for a 64-megabyte upload. Set this number to your preference, save the file, then reload Nginx for the change to take effect.
Apache Server
Change the size limit on an Apache server by updating your .htaccess file like so:
1. In your cPanel menu, select File Manager under Files.
2. In your root WordPress directory (public_html by default), locate .htaccess. Depending on your settings, the .htaccess file may be hidden.
3. Select .htaccess and click the Edit icon.
4. Copy and paste the code below at the bottom of your .htaccess file:
php_value upload_max_filesize 64M
php_value post_max_size 64M
php_value max_execution_time 300
php_value max_input_time 300
5. Click Save and reload Apache.
Doing this sets the maximum allowed size of your WordPress uploads and posts to 64 megabytes and sets the maximum file upload time to 300 seconds. You can change both of these values to your preference.
Still getting a 413?
After trying one or more of the solutions above, you still may encounter a 413 error when uploading large files, even if these files are below your new size limit.
In this case, the issue may stem from your CDN’s servers or some other restriction set by your hosting provider. First, reach out to your hosting support, detailing the problem and the steps you’ve taken so far to resolve it. It may be that you’ve exceeded your plan’s file size limit without realizing. Or, your configurations may have inadvertently caused another error.
If you use a CDN to improve your site’s performance, this may also be the cause of your issue — the CDN servers you’re using may impose file size limits that are too small. Since you probably can’t modify these servers’ files directly, you consult the documentation for your CDN provider or contact product support to resolve the error.
If all else fails, consider uploading alternative files, reducing the size of your current file, or upgrading your storage plan. If you find yourself needing to upload a massive amount of data, more likely than not there’s a workaround.
Fixing a 413 Error
While HTTP errors can be frustrating, many are quickly solvable including a 413. By finding and tackling this issue now, you’ll have one less thing to worry about while building out your website. If your site allows users to upload their own content, changing your upload size limit solves this problem too — just make sure you’re not exceeding the limits set by your hosting plan.
As for the best option, we recommend WordPress users modify their server’s PHP.ini file first if possible, since this can easily be done through your hosting panel. Otherwise, choose the option that matches your server software.
This post was originally published in January 2021 and has been updated for comprehensiveness.
HTTP response status code 413 Payload Too Large is a client error that is returned by the server in cases where the client has initiated a request that contains a message body that is larger than the server is willing to accept for processing.
Usage
When the 413 Payload Too Large error message is received, it is because the client is sending a request that is too large. A common example is when a client tries to send a file to the server that is of an acceptable type and format but is too long. Pictures, for instance, may be of an unnecessarily high resolution and can be significantly smaller without impacting the intended use. Rather than take on the responsibility of modifying the image files, the server refuses the transfer and relies on the client to do the necessary processing.
In these situations, a client can check for file size allowance in advance of initiating the PUT by using the [[expect|Expect: 100-continue header]. The server will acknowledge and in response, the message body can be sent or not.
The server can optionally send a Retry-After header in the response. If this is the case, the client may attempt the request again after a specified period or specified time and date. For example, if the client has exceeded their upload quota for the week, or large uploads are not allowed during peak hours, the server will suggest that they try again at a more appropriate time.
If the situation occurs because the server is out of storage space then the server shall send the error message 507 Insufficient Storage instead.
The server can include the Connection: close header to terminate the connection, preventing the client from sending the message body.
Note
Search engines like Google will not index a URL with 413 Payload Too Large response status, and consequently, URLs that have been indexed in the past but are now returning this HTTP status code will be removed from the search results.
Example
In the example, the client attempts to send a file and the server responds with 413 Payload Too Large because there is a lot of traffic at the moment. In response, the server denies the request, closes the connection, and suggests that the client try again after 30 minutes.
Request
PUT /docs HTTP/1.1
Host: www.example.ai
Content-Type: applications/pdf
Content-Length: 10000
Response
HTTP/1.1 413 Payload Too Large
Retry-After: 1800
Connection: close
Content-Type: text/html
Content-Length: 202

<html>
  <head>
    <title>File Too Large</title>
  </head>
  <body>
   <p>There is too much server traffic to accept your transfer at this time. Please try again after 30 minutes.</p>
  </body>
</html>
Code references
.NET
HttpStatusCode.RequestEntityTooLarge
Rust
http::StatusCode::PAYLOAD_TOO_LARGE
Rails
:request_entity_too_large
Go
http.StatusRequestEntityTooLarge
Symfony
Response::HTTP_REQUEST_ENTITY_TOO_LARGE
Python3.5+
http.HTTPStatus.REQUEST_ENTITY_TOO_LARGE
Java
java.net.HttpURLConnection.HTTP_ENTITY_TOO_LARGE
Apache HttpComponents Core
org.apache.hc.core5.http.HttpStatus.SC_REQUEST_TOO_LONG
Angular
@angular/common/http/HttpStatusCode.PayloadTooLarge
Takeaway
The 413 Payload Too Large status code is a client error that is returned when a message-body is too large for the server to process. The connection may be closed, and the client may receive a Retry-After header if the problem is temporary.
See also
- Connection
- Retry-After
- RFC 7231
Last updated: June 2, 2022
В редких случаях, но бывает, что во время загрузки больших файлов на веб-сайт возникает ошибка, которую возвращает веб-сервер Nginx — 413 Request Entity Too Large. Ошибка появляется, при попытке загрузить на сервер слишком большой файл чем это разрешено на сервере. Дальше рассмотрим описание ошибки 413 Request Entity Too Large а также методы её исправления на стороне веб-сервера Nginx.
Что означает ошибка 413
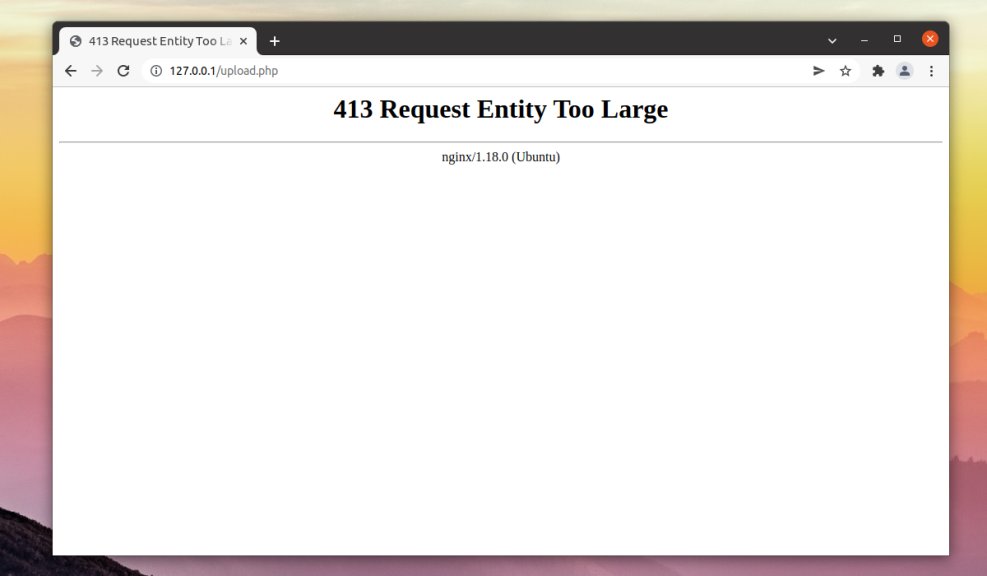
Ошибка 413 или Request Entity Too Large расшифровывается как «объект запроса слишком велик» или простыми словами объем передаваемых данных слишком большой. Ошибка возвращается в случае, если сервер не может обработать запрос по причине слишком большого размера тела запроса (или большого файла). Снимок экрана с ошибкой изображен ниже:
По умолчанию в Nginx установлен лимит на размер тела запроса который равен 1 МБ. Если запрос превышает установленное значение, вы увидите ошибку 413 Request Entity Too Large.
Как исправить
Для исправления ошибки 413 следует увеличить допустимый лимит. Увеличить размер тела запроса и соответственно, загружаемых файлов, можно путем использования client_max_body_size. Опциюя доступна для использования в директивах http, server или location в конфигурационном файле /etc/nginx/nginx.conf или в конфигурационном файле веб-сайта.
Откройте конфигурационный файл nginx.conf при помощи любого текстового редактора:
$ sudo nano /etc/nginx/nginx.conf
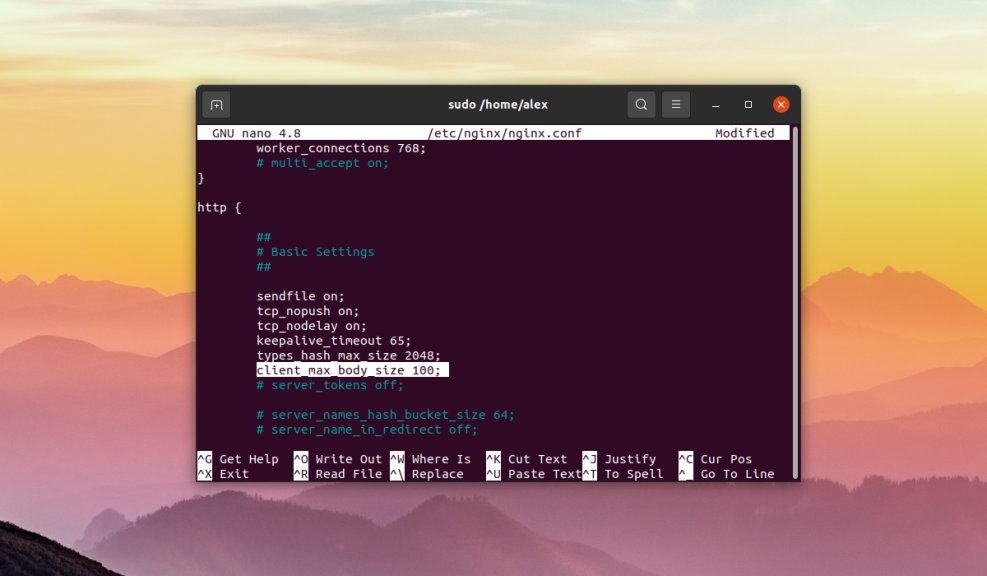
Вписываем строчку в секцию http:
$ client_max_body_size 100M
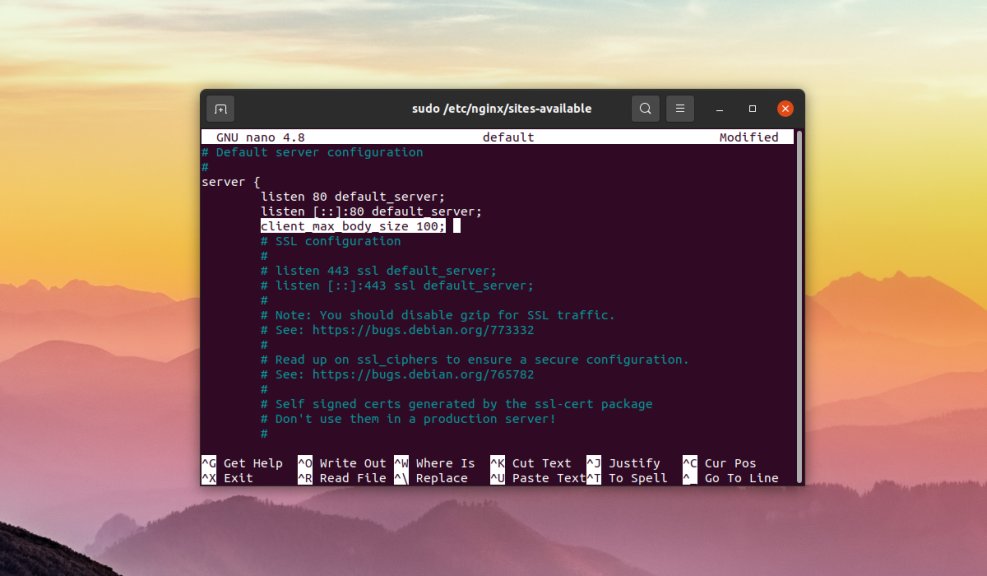
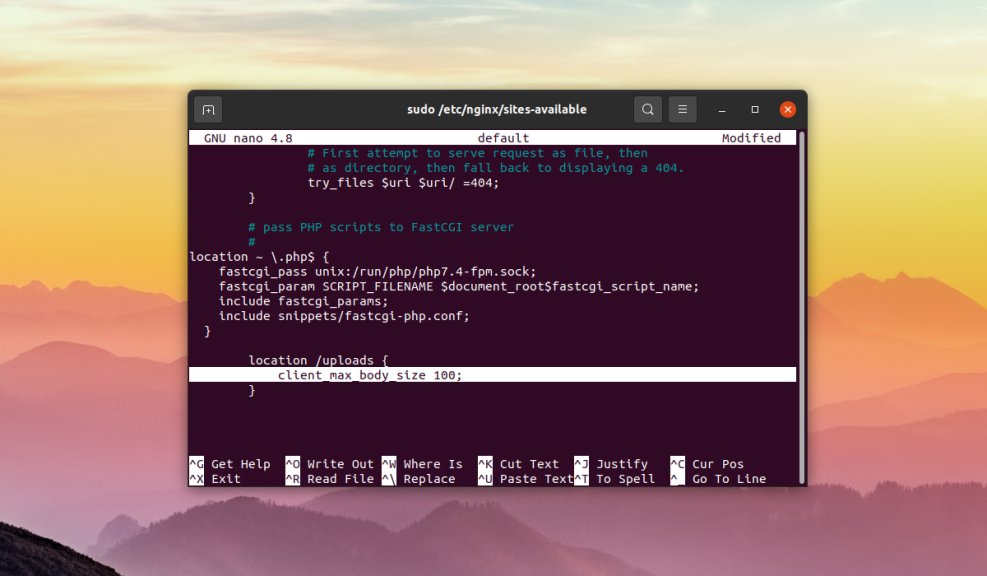
100 — максимальный размер файла в мегабайтах который можно загрузить на веб-сайт, в данном случае — 100 мегабайт. Если в распоряжении имеется несколько веб-сайтов и необходимо ограничить загрузку на все сайты сразу, то строку client_max_body_size необходимо вписываем в раздел блока http. Если ограничение на загрузку необходимо выставить только для конкретного сайта, то строку client_max_body_size необходимо добавить в блок server конфигурационного файла сайта, который по умолчанию находиться в /etc/nginx/sites-available/имя_файла_с_конфигурацией:
Когда ограничение на загрузку необходимо выставить только для конкретного раздела на сайте, строку client_max_body_size необходимо вписать в директиву location конфигурационного файла сайта, который по умолчанию находиться в /etc/nginx/sites-available/имя_файла_с_конфигурацией:
Как только были внесены изменения в конфигурационные файлы, сохраните их, закройте текстовый редактор и проверьте синтаксис конфигурационных файлов на наличие ошибок при помощи команды:
$ sudo nginx -t
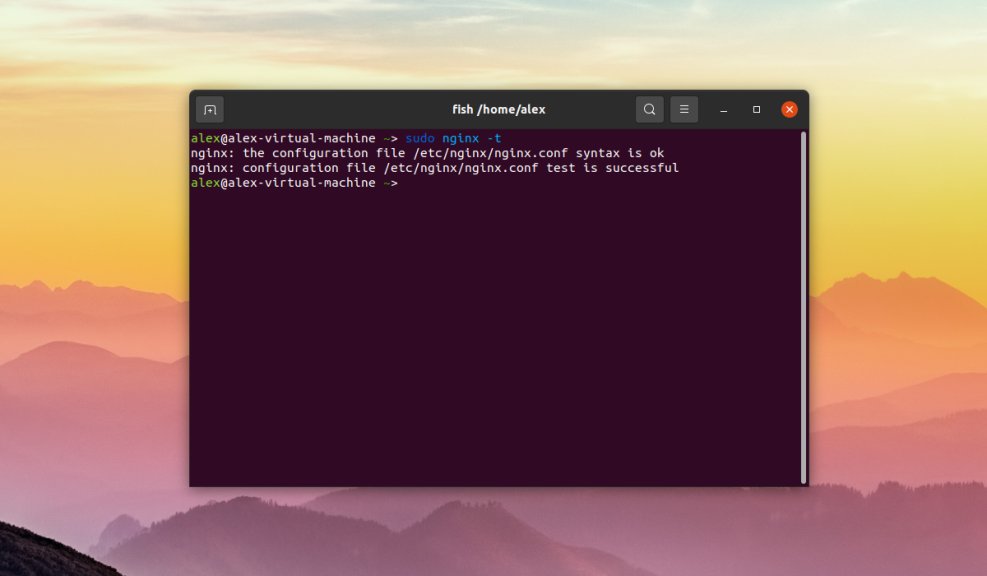
Вы можете увидеть следующие строки:
nginx: the configuration file /etc/nginx/nginx.conf syntax is ok
nginx: configuration file /etc/nginx/nginx.conf test is successful
Это означает что ошибок нет. В противном случае будет выведено описание ошибки, имя файла в котором найдена ошибка и номер строки. После внесения любых изменений в конфигурационные файлы Nginx их необходимо перезапустить при помощи команды:
$ sudo systemctl reload nginx
В этой статье рассмотрена ошибка в Nginx, известная 413 Request Entity Too Large, возникающая при загрузке больших файлов на веб-сайт. Помимо описания самой ошибки также было описаны шаги по устранению ошибки путем редактирования конфигурационных файлов Nginx.
by Tashreef Shareef
Tashreef Shareef is a software developer turned tech writer. He discovered his interest in technology after reading a tech magazine accidentally. Now he writes about everything tech from… read more
Updated on July 21, 2022
- The HTTP error 413 in Google Chrome occurs due to incorrect server configuration or browser issue.
- Clearing your browsing data is a great way to fix to fix this issue.
- In some instances, you can solve this problem by resetting your network configuration.
- Easy migration: use the Opera assistant to transfer exiting data, such as bookmarks, passwords, etc.
- Optimize resource usage: your RAM memory is used more efficiently than Chrome does
- Enhanced privacy: free and unlimited VPN integrated
- No ads: built-in Ad Blocker speeds up loading of pages and protects against data-mining
- Download Opera
The HTTP error 413 in Google Chrome usually occurs when loading webforms or accessing background server-side services.
Interestingly, the error seems to happen only on the Google Chrome browser and does not affect other browsers like Edge and IE. This isn’t the only error that you can get, and many reported This site is not secure message as well.
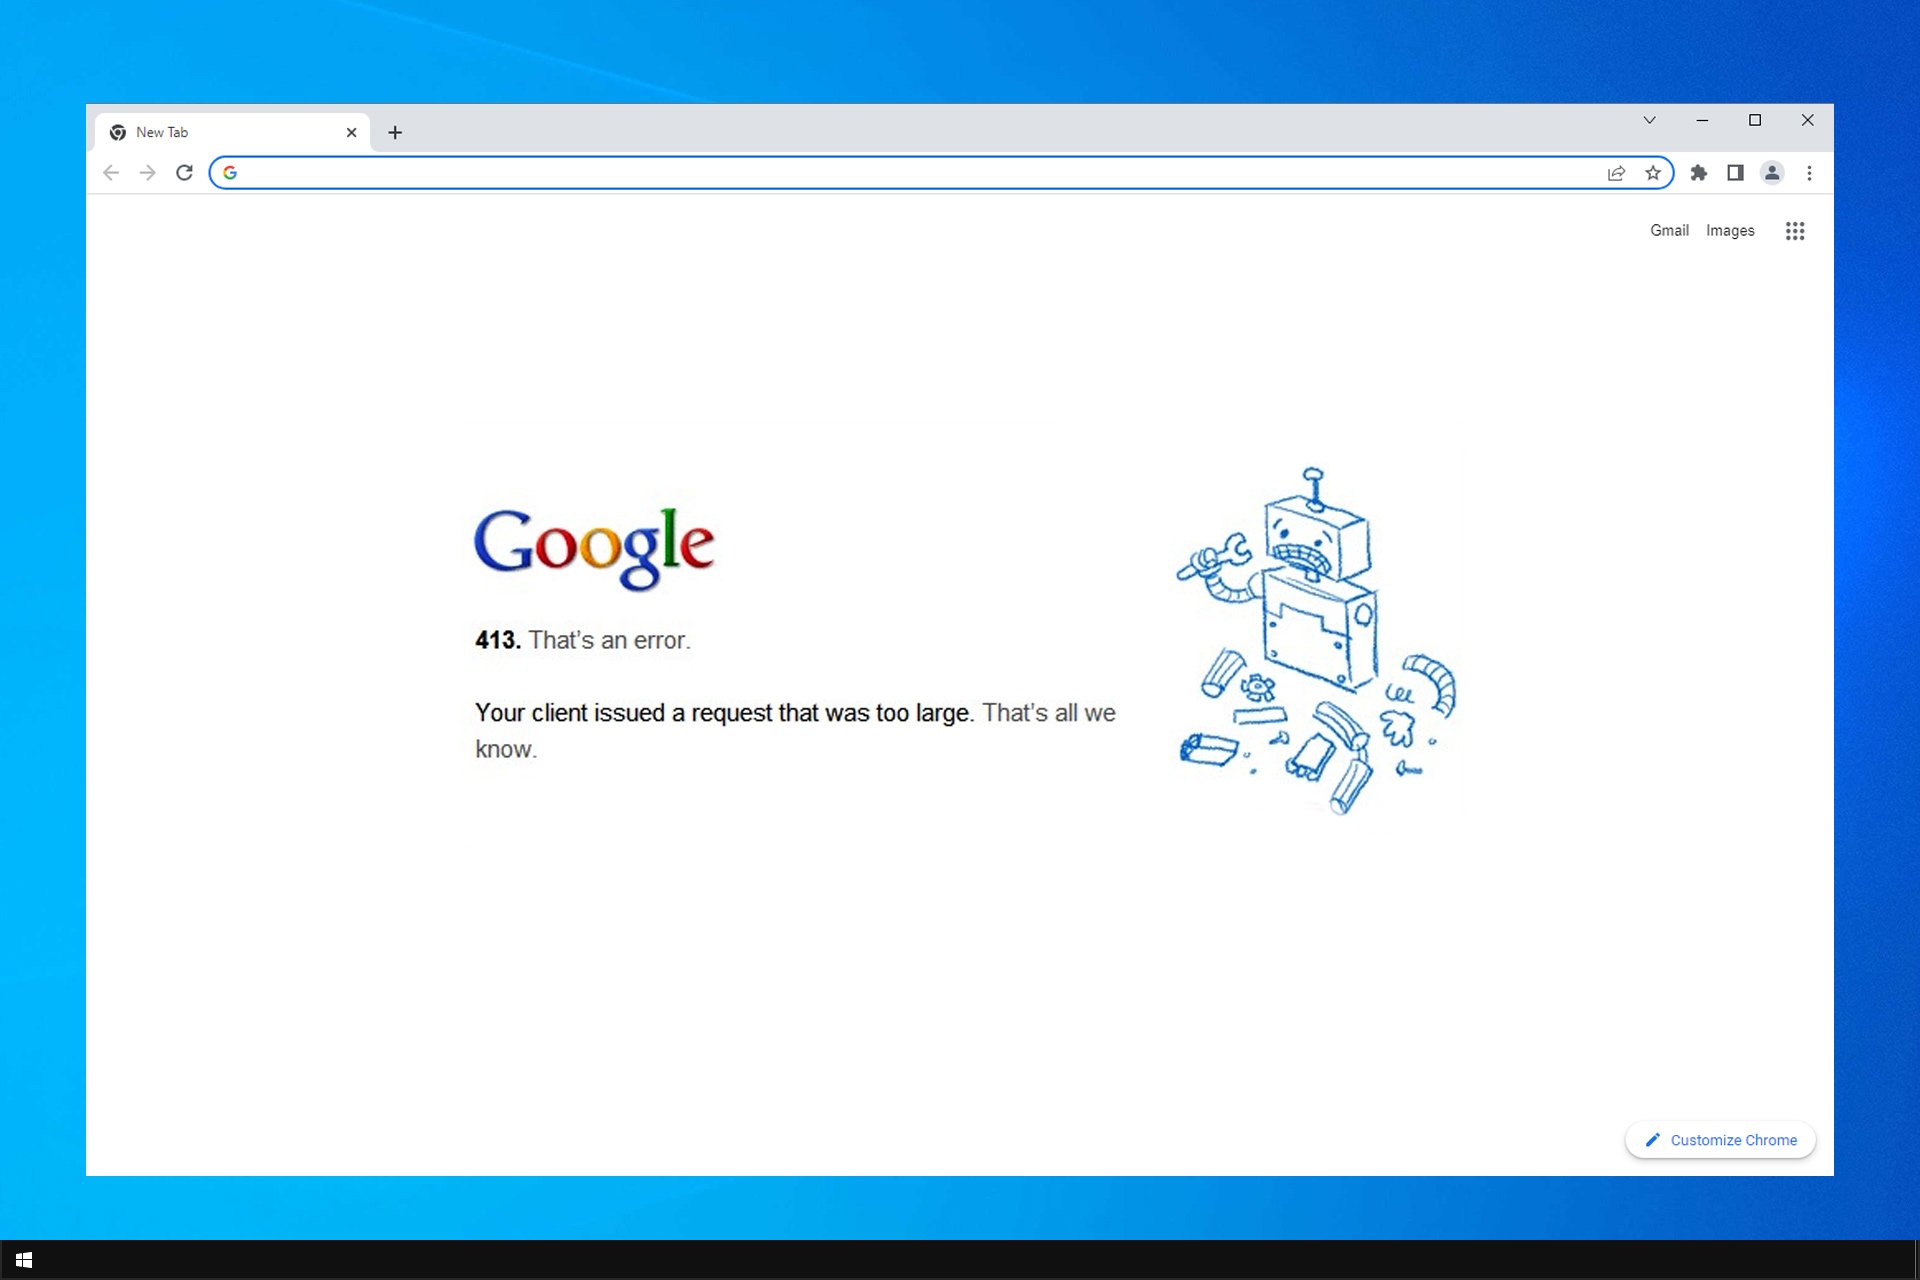
The full error reads:
HTTP Error 413. That’s an error. Your client issued a request that was too large. That’s all we know.
This article explores a few troubleshooting steps to help you resolve the HTTP error 413 on the Chrome browser.
What is a HTTP 413 error?
The HTTP error 413 usually occurs if the request was larger than the server can handle due to incorrect configuration. However, the error can also occur due to browser issues.
Corrupted cache can sometimes cause this error, but sometimes you need to fix the issue with web sockets in order to resolve this error.
Quick Tip:
Try opening the web with another browser. Built on Chromium as well, Opera is a great alternative to Chrome, being lighter and having a lower error rate.
You may not have an HTTP error in this browser and be able to get back to your tasks quickly. It includes performance-oriented features like hardware acceleration, a battery saver, and an adblocker.

Opera
Display webpages with no errors with this lightweight browser built to perform well!
How do I fix Error 413 on Chrome?
1. Check the Chrome browser for issues
Clear browsing data
- Launch Google Chrome and click the three-dots button. Select More tools. Next, select Clear browsing data.

- Select a time range and select the browsing data you want to clear.

- Click the Clear data button.
- Once done, relaunch Chrome and check for any improvements.
Clearing the browser data reportedly has fixed the error from many users. If the issue persists, proceed with other steps below.
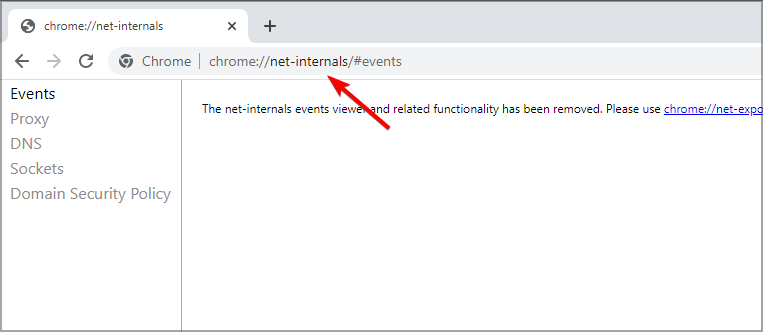
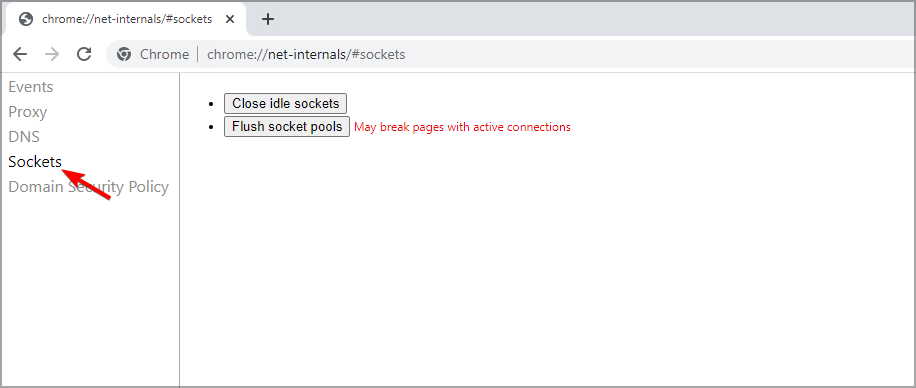
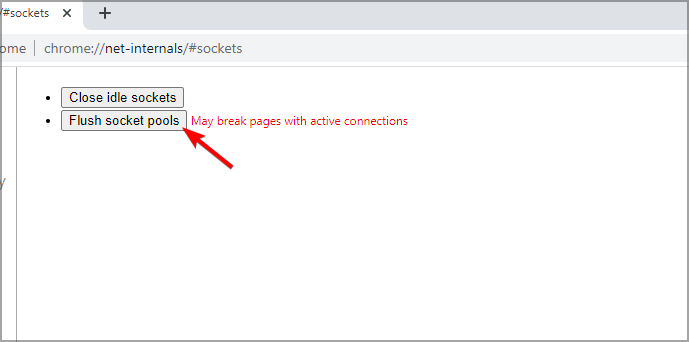
Flush the Socket Pools from your browser
- In Chrome, navigate to
chrome://net-internals
- From the left pane, click on Sockets.

- Click the Flush socket pools button. It may break pages with active connection; make sure you don’t have an active connection.

- Once done, close the tab and relaunch Chrome.
Some PC issues are hard to tackle, especially when it comes to corrupted repositories or missing Windows files. If you are having troubles fixing an error, your system may be partially broken.
We recommend installing Restoro, a tool that will scan your machine and identify what the fault is.
Click here to download and start repairing.
Flushing the socket pool can quickly fix the error 413 is triggered due to a browser issue. If the problem persists, try resetting the browser to factory default.
2. Reset Chrome to factory default
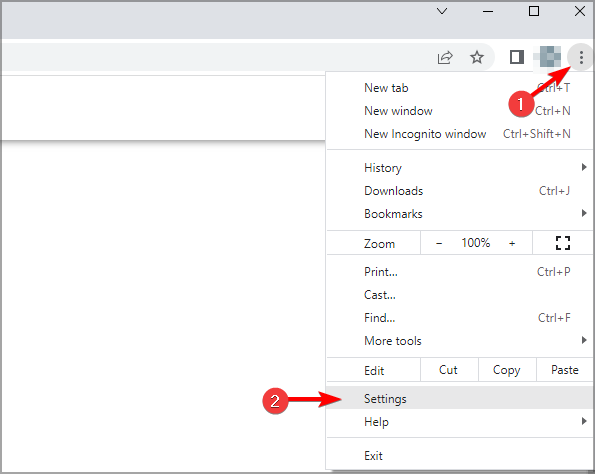
- Launch Google Chrome.
- Click Menu (three dots) and select Settings.

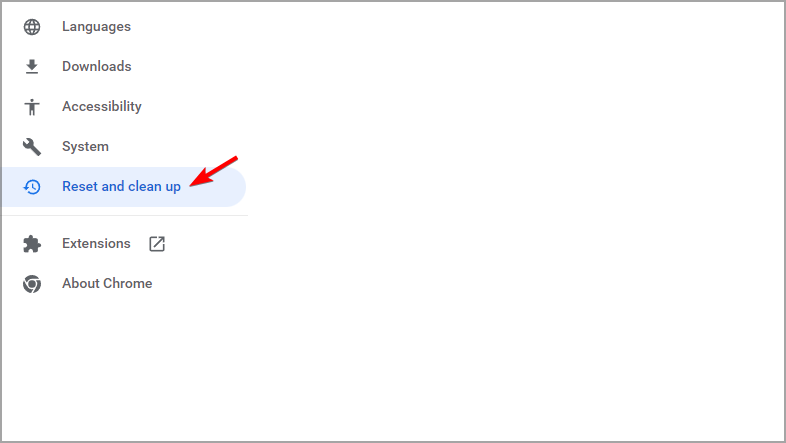
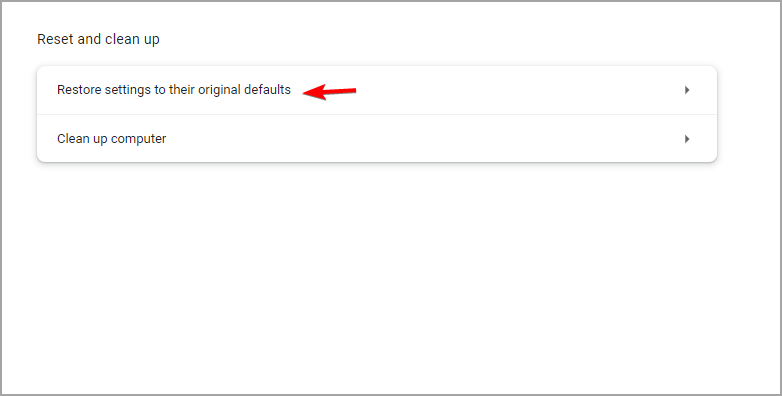
- Select Reset and clean up.

- Click Restore settings to their original defaults.

- Read the description carefully and click on Reset settings.
- The process may take some time; wait till it is completed and then relaunch the browser.
Resetting the browser to factory default will reset your startup page, new tab page, search engine, and pinned tabs. It will also disable all extensions and clear temporary data like cookies. Other data, like bookmarks, history, and saved passwords, will not be cleared.
If you don’t want to reset your Chrome browser yet, skip this step and proceed with the next steps.
This is a quick and easy solution, so try it if you’re getting Request entity too large on Chrome.
3. Reset the network adapter
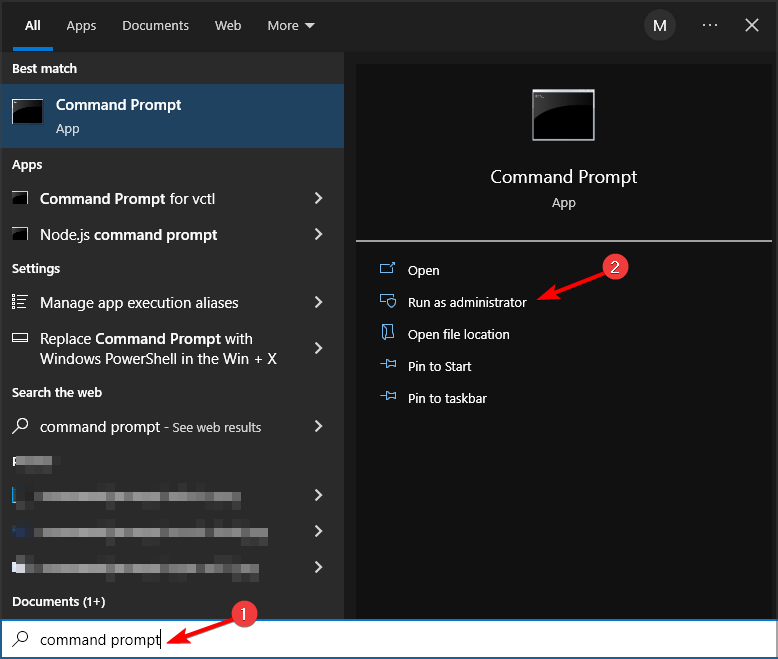
- Press the Windows key, type cmd, then click on Run as Administrator for Command Prompt.

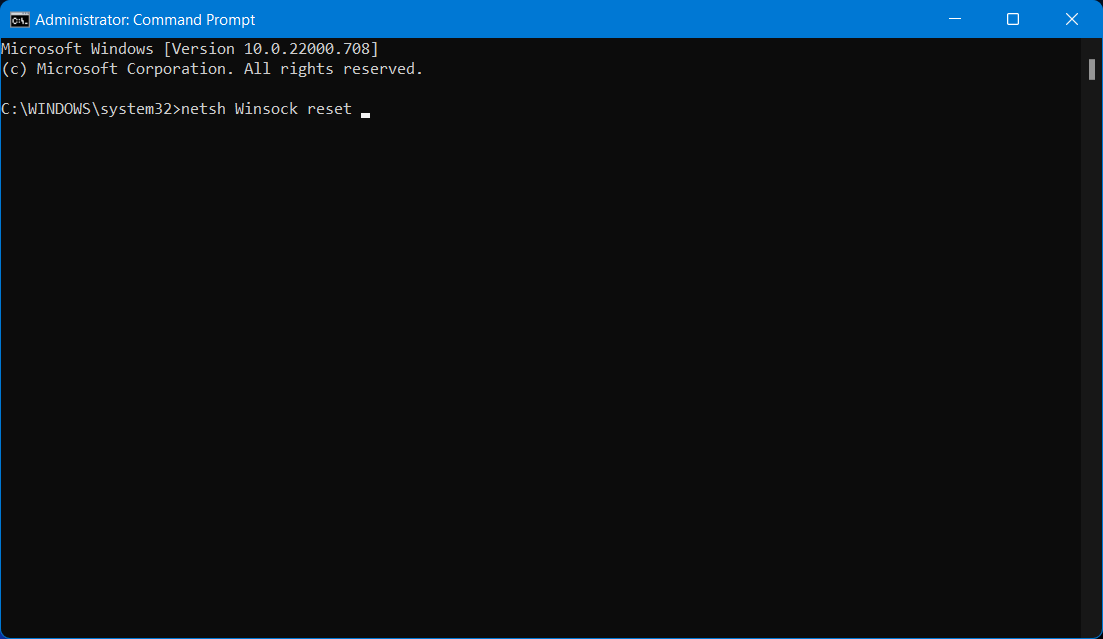
- In the Command Prompt window, type the following command and hit enter to execute:
netsh Winsock reset
- Once done, close the Command Prompt and then restart the computer.
- Launch the browser and check for any improvements.
This is a simple solution, but it might help you with 413 that’s an error, your client issued a request that was too large that’s all we know error message.
- How To Ignore Certificate Errors in Chrome & Disable Warnings
- Fix: Webpage Might be Temporarily Down or it may Have Moved
- Chrome Reader Mode: How to Enable & Use
4. Modify the PHP.ini and Nginx.Conf file
Modify PHP.ini
- Login to your PHP server.
- Enter the following command to access the php.ini file:
nano /etc/php.ini - If you are using PHP_FPM, use the following command:
nano /etc/php5/fpm/php.ini - Find the path for these files:
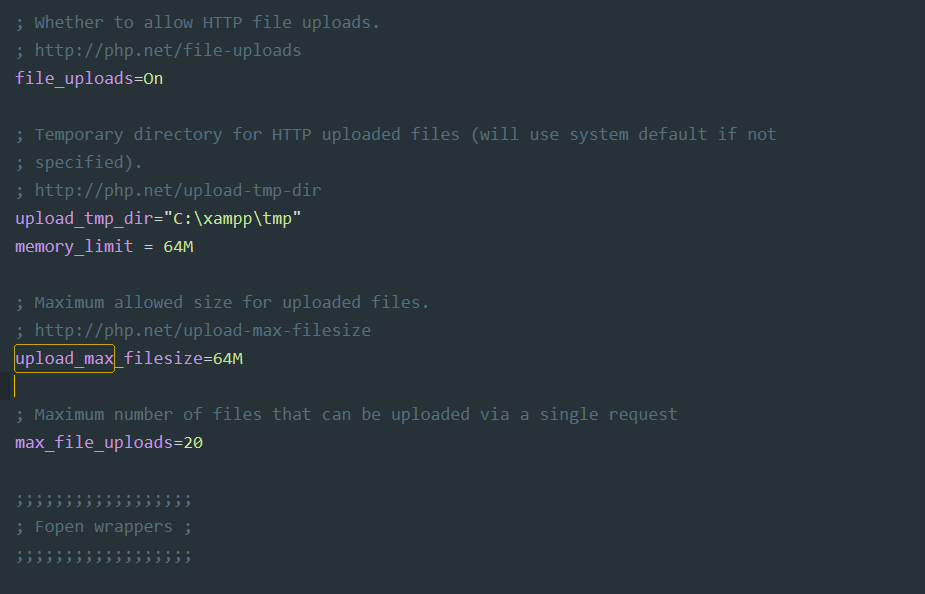
upload_max_filesize
post_max_size - Once we have the file, increase its limit to 100M. It will look something like this:
upload_max_filesize = 100M
post_max_size = 100M - Save the file and exit.
Make sure to restart PHP to apply the changes.
Modify Nginx.conf
- Login to your cloud server.
- Enter the following command to access the Nginx.conf file:
nano /etc/Nginx/nginx.conf - Find the following variable:
client_max_body_size - Increase the size limit to 100M. It will look something like this:
client_max_body_size 100M;
- Once done, restart Nginx to apply the changes:
sudo service Nginx restart
This is a quick and easy solution and it should help you with 413 error code on Nginx, so be sure to give it a try.
If the HTTP error 413 occurs only on your Chrome browser, you can mostly fix the issue by clearing the browser cache, flushing the socket pool, or resetting the browser default.
However, if the issue persists, try increasing the file size limit by following the article’s steps. This isn’t the only error, and many reported that HTTPS is not working in Chrome, but we covered that in a separate guide.
Did you find a different solution for this problem? Let us know in the comments below.
Still having issues? Fix them with this tool:
SPONSORED
If the advices above haven’t solved your issue, your PC may experience deeper Windows problems. We recommend downloading this PC Repair tool (rated Great on TrustPilot.com) to easily address them. After installation, simply click the Start Scan button and then press on Repair All.
![]()