
Настройка BIOS Setup />Сообщения />CMOS Date/Time Not Set
Сообщение CMOS Date/Time Not Set отображается на мониторе, если не удалось установить системные время и дату. Необходимо установить значения системных даты и времени у БИОС. Ошибка возникает из-за разряженной батареи питания микросхемы CMOS, а также если значения даты и времени не были установлены до этого.
Ошибка также может иметь название:
CMOS Time and Date Not Set
Real Time Clock Error
Real Time Clock Failure
Примечание 1. CMOS – это энергонезависимая память ПК, которая служит для хранения информации о конфигурации компьютера.
При загрузки компьютера, просит нажать F1 или F2, как избавиться от этого?
Нажмите F1, чтобы загрузить значения по умолчанию и продолжить.
Если нажимаю F1, то дата и время устанавливаются не правильно — 2008 г, приходится постоянно через F2 загружать. Что за проблема?
Возможно стоит заменить баиарейку на материнской плате на новую.
В биосе возможно есть опция Hold on Alerts которую надо отключить чтоб зарузка шля дальше сама,
какая у вас версия биос? ее можно глянуть в биосе на самом верху, либо при старте ПК на первом экране.
но причина где-то в другом. КМОС слетает вероятно изза батарейки.
Эта проблема — одна из самых примитивных, справиться с которой вполне способен и первоклассник (если он знает, что внутрь компьютера нельзя лезть, не отключив его от сети).
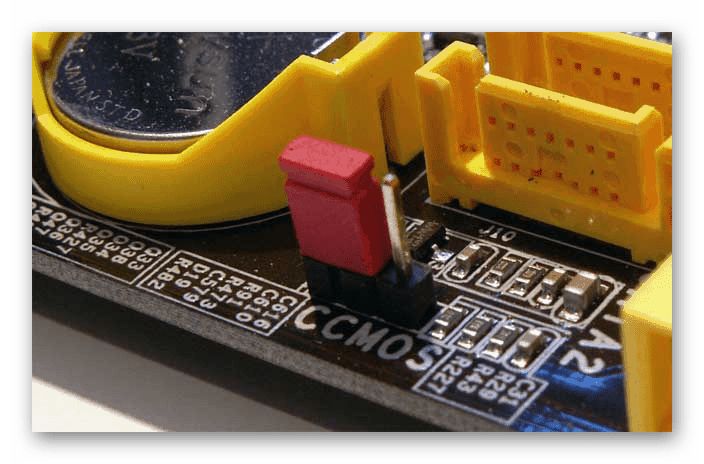
Покупается батарейка CR2032 и заменяется (на материнской плате установлена, необходимо соблюдать полярность — той же стороной ставить, как старая стояла!). Вынимать без помощи металлических предметов! Чем-нибудь пластиковым или деревянной зубочисткой.
Потом время установите правильное и года три не будет беспокоить.
Цена вопроса — 25-30 рублей, если не покупать какую-нибудь очень именитую батарейку (разницы — никакой, кроме цены).
В подавляющем большинстве случаев данная проблема решается путём замены батарейки на материнской плате.
Алгоритм действий таков:
- Приобретаете батарейку-таблетку CR 2032 ![][1]
- Открываете крышку системного блока
- На материнской плате находите местоположение батарейки
- Производите замену.
Для тех, кто затрудняется самостоятельно осуществить подобную процедуру, помощником может послужить видео.
Скорее всего на материнской плате компьютера села батарейка (такая круглая CR 2032) Поэтому все данные загрузки и текущая дата и время не сохраняются биосом и выдает нажать F 1 при загрузке. Нужно поменять батарейку и корректно настроить биос. Цена вопроса на батарейку от 40 рублей и выше.

В биосе надо сделать так: Boot -> Boot setiings configuration -> Wait for F1 if Error -> Disabled
Но время и дата будет неверной пока не поменяете батарейку
Да, такое происходит из-за батарейки. Стоит изначально раскрыть системный блок, достать батарейку и поставить новую.
После этого, когда система будет загружаться, стоит зайти в настройки БИОС и выставить там верное время и дату, после чего сохранить и продолжить работу. Стоит просто идти по подсказкам.
Если поменять батарейку, но не сменить дату и время, то придется делать все по-новому. Если же сменить батарейку и выставить дату после загрузки, то она может не сохраниться.
Но если же сам процесс нажатия F1 не раздражает, то можно ничего и не делать. Существенных проблем не будет, разве что Chrome может выдавать ошибку.
Что делать, если при загрузке компьютер просит нажать F1

Сразу же стоит отметить, что операционная система в этом случае не имеет к рассматриваемой проблеме никакого отношения, поскольку она образуется сразу же после включения, не доходя до запуска ОС.
Причина 1: Сбой настроек BIOS
Настройки БИОС довольно часто сбиваются после резкого отключения компьютера от питания или же после полного обесточивания ПК на определенный промежуток времени. Несмотря на то, что в целом ситуации схожи, их появление спровоцировано разными факторами.
Выполняем вход в BIOS
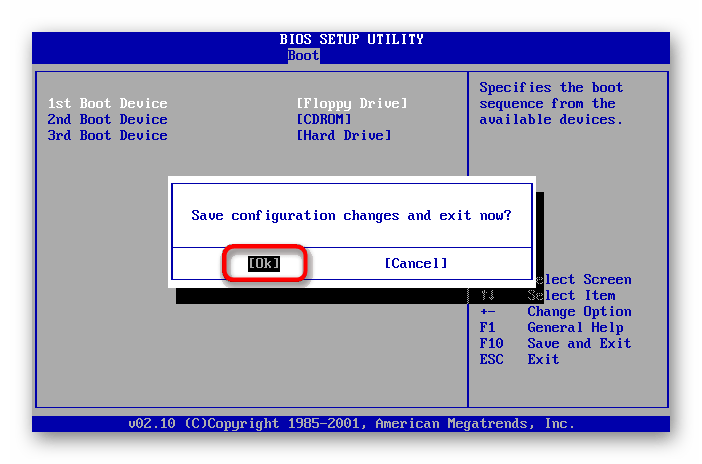
Простейший способ — сохранить настройки БИОС повторно. О необходимости этого может свидетельствовать и сопутствующее оповещение наподобие: «Please enter setup to recover BIOS setting».
- Перезагрузите ПК и сразу же при отображении логотипа материнской платы нажмите клавишу F2, Del или ту, которая у вас отвечает за вход в БИОС.
Сбрасываем настройки BIOS
Неожиданное отключение света или какой-либо внутренний сбой на уровне БИОС может вызвать появление требования «Press F1 to Resume», «Press F1 to Run SETUP» или аналогичного. Появляться оно будет при каждом новом включении компьютера, пока пользователь не выполнит сброс настроек BIOS. Сделать это несложно даже для начинающего пользователя. Ознакомьтесь с нашей статьей, рассказывающей о разных методах решения поставленной задачи.
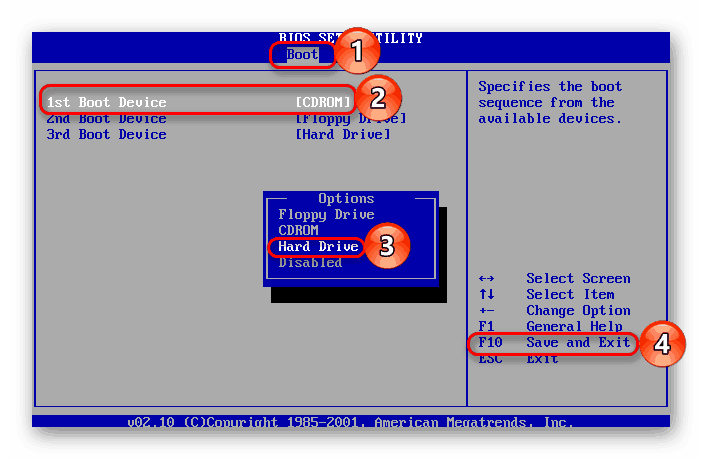
Делаем HDD загрузочным вручную
При подключении нескольких жестких дисков есть вероятность того, что ПК не сможет понять, с какого устройства нужно загрузиться. Исправить это проще простого, и на нашем сайте есть отдельная статья, которая поможет вам задать нужному жесткому диску высший приоритет загрузки.
Отключаем Floppy в BIOS
На старых компьютерах ошибка вида A: Driver Error чаще всего появляется по одной и той же причине — оборудование выполняет поиск Floppy-дисковода, который в системном блоке может отсутствовать как таковой. Следовательно, через BIOS нужно отключить все настройки, которые так или иначе могут быть связаны с дискетным приводом.
К слову, иногда может помочь и предыдущий совет — изменение приоритета загрузки. Если в БИОС флоппи-дисковод установлен первым, ПК будет пытаться загрузиться с него и при неудачной попытке уведомлять вас сообщением. Выставив жесткий диск или SSD с операционной системой на первое место, вы избавитесь от требования нажать F1. Если это не помогает, все же придется отредактировать БИОС.
- Перезагрузите ПК и на старте запуска нажмите F2, Del или другую клавишу, отвечающую за вход в БИОС. Чуть выше есть ссылка с подробной инструкцией того, как туда войти пользователям разных материнских плат.
- В AMI BIOS на вкладке «Main» найдите настройку «Legacy Diskette A», нажмите на нее и выберите значение «Disabled».
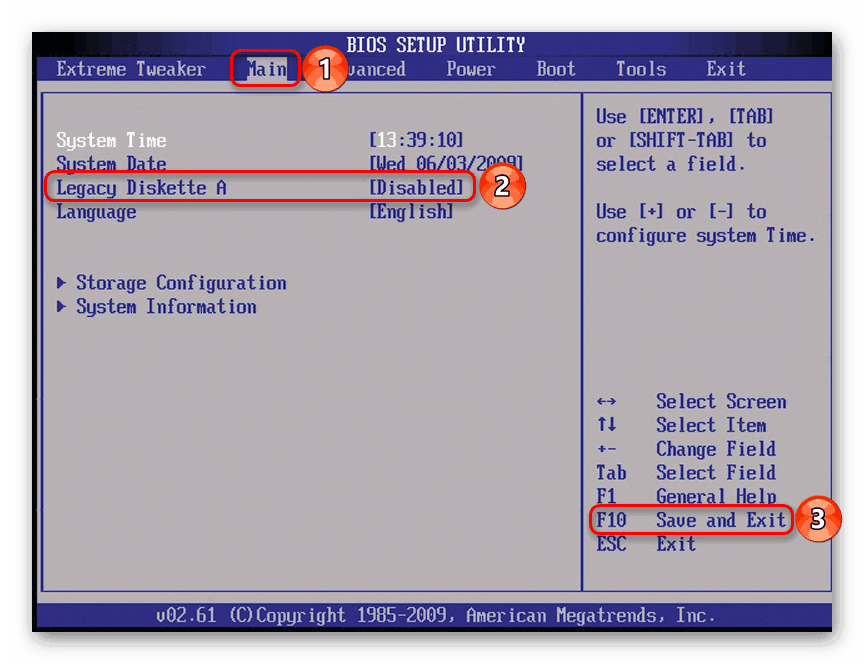
Дополнительно можете включить «Quick Boot».
Причина 2: Аппаратные неполадки
Теперь перейдем к описанию нарушениям в работе аппаратных компонентов ПК. Распознать, с каким именно комплектующим неполадка, можно по строчкам, предшествующим надписи «Press F1…».
CMOS Checksum Error/CMOS Checksum Bad
Такое сообщение означает, что на материнской плате села батарейка, хранящая в себе настройки BIOS, времени и даты. В подтверждение этому выступает постоянно сбивающееся до заводского время, день, месяц и год и уведомление «CMOS Date/Time Not Set» рядом с «Press F1…». Чтобы убрать навязчивое сообщение, потребуется выполнить ее замену. Этот процесс описан нашим автором в отдельном руководстве.
Многие пользователи получают это же сообщение несмотря на то, что сама батарея находится в полном порядке. Этой надписи может предшествовать «Floppy disk(s) fail (40)». Этот тип ошибки устраняется отключением в BIOS настроек, связанных с Floppy. Как это сделать читайте выше, в подзаголовке «Отключаем Floppy в BIOS» Способа 1.

CPU Fan Error
CPU Fan — кулер, охлаждающий процессор. Если компьютер при включении не видит это устройство, следует проверить его на работоспособность.
- Осмотрите подключение. Возможно, провод неплотно закреплен в разъеме.
- Почистите вентилятор от пыли. Именно на него осаживается вся пыль, и если устройство будет плотно ей забито, то не сможет работать должным образом.

Keyboard Error / No Keyboard Present / No Keyboard Detected
Из названия понятно, что компьютер не видит клавиатуру, иронично предлагая при этом нажать Ф1 для продолжения. Проверьте ее подключение, чистоту контактов на материнской плате либо приобретите новую клавиатуру.
Здесь же применим вариант с извлечением батарейки из материнской платы для обнуления BIOS. Подробнее об этом читайте выше, в подзаголовке «Сбрасываем настройки BIOS» Способа 1.
Intel CPU uCode loading error
Такая ошибка появляется, когда БИОС не может распознать установленный процессор — то есть, прошивка BIOS не совместима с CPU, Как правило, с таким сообщением встречаются пользователи, решившие установить процессор под старую относительно него материнскую плату.
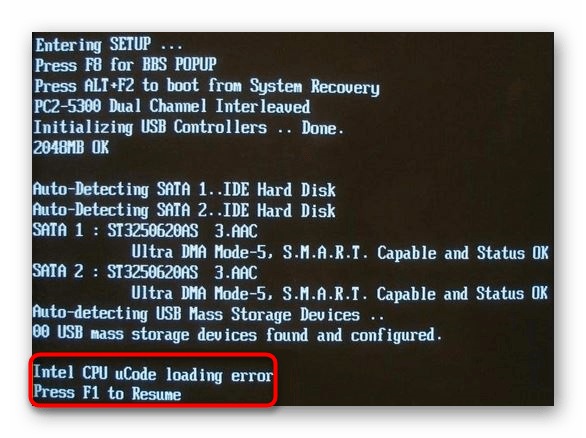
Выходы здесь очевидны:
- Прошейте BIOS. Обновите его версию, скачав актуальную версию на сайте технической поддержки производителя. Как правило, обновления для этой микропрограммы довольно часто выходят в целях улучшения совместимости работы BIOS и различных процессоров. Используя наши статьи на сайте, выполните процедуру в соответствии или по аналогии с ними. В целом рекомендуем заниматься этим только пользователям, уверенным в своих знаниях — учтите, что неправильно произведенная прошивка может превратить материнскую плату в нерабочую!
Другие причины появления ошибки
Еще пара примеров, с которыми вы можете столкнуться:
- Жесткий диск с ошибками. Если в результате ошибок не пострадал загрузочный сектор и система, после нажатия F1 выполните проверку HDD на ошибки.
Если после нажатия F1 не удается загрузиться, пользователю потребуется выполнить Live-загрузку и с помощью нее просканировать и восстановить накопитель.
Мы рассмотрели наиболее частые, но далеко не все причины, из-за которых ваш ПК может требовать нажать F1 при загрузке. Одним из радикальных методов считается перепрошивка BIOS, мы советуем делать ее только уверенным в своих действиях пользователям.
Если ваша проблема не была решена, обращайтесь в комментарии, при необходимости прикрепляя фото возникшей неполадки.
 Мы рады, что смогли помочь Вам в решении проблемы. Опишите, что у вас не получилось. Наши специалисты постараются ответить максимально быстро.
Помогла ли вам эта статья?
Еще статьи по данной теме:
При нажатии на F1 и потом установке в биос с чего загружаться ,загрузка проходит нормально, но на следующий день, опять требуют нажимать F1. В чем дело в батарейке, настройках биос, или полетел жесткий диск?
Лучше понять источник неполадки поможет анализ действий, которые вы пытались произвести для устранения проблемы. Например, есть ли какое-то сообщение над надписью «Press F1…»? Выполняли ли вы хоть какую-то из рекомендаций, данных в Способе 1, помимо выбора загрузочного устройства?
В целом, если компьютер работает хорошо, но надпись про F1 мешает загрузке, возможно, это просто севшая батарейка. Обычно это происходит со старыми материнскими платами, но если ей у вас 1-3 года, то причина вряд ли будет в ней.
Подскажите, при запуске постоянно выскакивает это сообщение, как исправить,AMI BIOS v02.58 ?
Непонятно, загружается ли после F1 компьютер до операционной системы, поэтому вот общие рекомендации. Начните с малого: отключите все внешние девайсы, подключенные к ПК, и проверьте, загружается ли комп в нормальном режиме. Если рассматриваемой ошибки нет, значит нужно последовательно подключать устройства по одному и каждый раз включать компьютер, чтобы узнать, какое из них проблемное и нуждается в замене.
Не помогло — достаньте и установите батарейку на материнской плате заново, сбросьте настройки BIOS. Можете попробовать установить новую батарейку, перепрошить BIOS, если есть уверенность в собственных знаниях (неправильная перепрошивка может вообще все испортить). Ссылки на каждую из этих процедур найдете в статье, под которой вы оставили этот комментарий.
Что еще может помочь — переустановка плашек оперативной памяти местами (или включение компа сперва с одной плашкой, потом с другой плашкой). Это актуально, если у вас два и больше модуля ОЗУ. Извлеките дискретную видеокарту и загрузите компьютер с интегрированной графикой (при условии, что она есть в вашей материнской плате).
Можете вообще вытащить и ОЗУ, и видеокарту — если первым сообщением об ошибке вы увидите то же, что и на вашем фото, значит дело не в этих компонентах. Скорее всего, тут уже неисправность flash-памяти материнской платы. Решается походом в сервисный центр или покупкой новой материнки.
- Sign up
- Sign in
- HP Community
- Archived Topics
- Desktops (Archived)
- 161 Real Time Clock Power Loss
Options
- Mark Topic as New
- Mark Topic as Read
- Float this Topic for Current User
- Bookmark
- Subscribe
- Mute
- Printer Friendly Page
![]()

Create an account on the HP Community to personalize your profile and ask a question
Your account also allows you to connect with HP support faster, access a personal dashboard to manage all of your devices in one place, view warranty information, case status and more.
![]() This topic has been archived. Information and links in this thread may no longer be available or relevant. If you have a question create a new topic by clicking here and select the appropriate board.
This topic has been archived. Information and links in this thread may no longer be available or relevant. If you have a question create a new topic by clicking here and select the appropriate board.
11-13-2013
08:47 AM

HP Recommended
- Mark as New
- Bookmark
- Subscribe
- Permalink
- Flag Post
If you have just replaced a motherboard and get this error:
1. Boot into this BIOS — Tap ESC or F10 repeatedly at power on.
2. File — Enter Time and Date.
3. F10 to Save and Exit.
4. Allow Windows to load.
5. Restart the computer and you should not have the error.
Side Note: If you’re also seeing the ‘Invalid Electronic Serial Number‘ error post motherboard replacement, see this forum post (with pictures:smileywink:).
7 REPLIES 7
09-26-2016
11:27 PM
HP Recommended
- Mark as New
- Bookmark
- Subscribe
- Permalink
- Flag Post
I didn’t change motherboard but I changed the Cosmo battery. It still show this error even I had updated and saved.
Was this reply helpful?
Yes
No
09-27-2016
08:54 AM
HP Recommended
- Mark as New
- Bookmark
- Subscribe
- Permalink
- Flag Post
Hi there @trdseal,
May the Forums be with you! I understand that your computer is still getting a Real Time Clock Power loss message. I am happy to give you a hand with this.
Please post the full product number for your computer. See the following, if you need help with that information. HP Desktop PCs — How Do I Find My Model Number, Serial Number or Product Number?
Was the replacement battery new, and did you verify that it has a charge and there was nothing like a sticker or other insulating material on the battery to prevent an electrical contact?
Please let me know when you can.
Malygris1
I work on behalf of HP
Please click Accept as Solution if you feel my post solved your issue, it will help others find the solution.
Click Kudos Thumbs Up on the right to say “Thanks” for helping!
Was this reply helpful?
Yes
No
Was this reply helpful?
Yes
No
Was this reply helpful?
Yes
No
09-28-2016
07:15 AM
HP Recommended
- Mark as New
- Bookmark
- Subscribe
- Permalink
- Flag Post
Thank you for the update, however when I search that model# you posted it is not pointing to one device but about 50. There may be a typo in the model you posted. Please double-check, or you can also give me any other product identifiers you can find on the computer.
Were you able to check that battery to make sure it is putting out the right voltage? Sometimes even a «new» battery may not be good, either due to storage time or conditions, or a defect.
Malygris1
I work on behalf of HP
Please click Accept as Solution if you feel my post solved your issue, it will help others find the solution.
Click Kudos Thumbs Up on the right to say “Thanks” for helping!
Was this reply helpful?
Yes
No
09-28-2016
07:20 AM
HP Recommended
- Mark as New
- Bookmark
- Subscribe
- Permalink
- Flag Post
QT068AW#AB4 should be the right one
Was this reply helpful?
Yes
No
09-28-2016
08:27 AM
HP Recommended
- Mark as New
- Bookmark
- Subscribe
- Permalink
- Flag Post
Thank you for the update. That came up as a HP Compaq 8200 Elite Ultra-slim PC Commercial model.
Did you check the contacts for the battery on the board, and verify it is putting out its rated voltage? Assuming you have and the issue remains then, please use the following http://www.hp.com/contacthp, fill out the form, create a case for your issue and then use the provided information to contact HP.
Malygris1
I work on behalf of HP
Please click Accept as Solution if you feel my post solved your issue, it will help others find the solution.
Click Kudos Thumbs Up on the right to say “Thanks” for helping!
Was this reply helpful?
Yes
No
![]() This topic has been archived. Information and links in this thread may no longer be available or relevant. If you have a question create a new topic by clicking here and select the appropriate board.
This topic has been archived. Information and links in this thread may no longer be available or relevant. If you have a question create a new topic by clicking here and select the appropriate board.
† The opinions expressed above are the personal opinions of the authors, not of HP. By using this site, you accept the Terms of Use and Rules of Participation.

-
English
Open Menu

† The opinions expressed above are the personal opinions of the authors, not of HP. By using this site, you accept the <a href=»https://www8.hp.com/us/en/terms-of-use.html» class=»udrlinesmall»>Terms of Use</a> and <a href=»/t5/custom/page/page-id/hp.rulespage» class=»udrlinesmall»> Rules of Participation</a>.

Совместимость : Windows 10, 8.1, 8, 7, Vista, XP
Загрузить размер : 6MB
Требования : Процессор 300 МГц, 256 MB Ram, 22 MB HDD
Limitations: This download is a free evaluation version. Full repairs starting at $19.95.
161 в режиме реального времени потеря мощности обычно вызвано неверно настроенными системными настройками или нерегулярными записями в реестре Windows. Эта ошибка может быть исправлена специальным программным обеспечением, которое восстанавливает реестр и настраивает системные настройки для восстановления стабильности
If you have 161 Real Time Clock Power Loss then we strongly recommend that you Download (161 Real Time Clock Power Loss) Repair Tool .
This article contains information that shows you how to fix 161 Real Time Clock Power Loss both (manually) and (automatically) , In addition, this article will help you troubleshoot some common error messages related to 161 Real Time Clock Power Loss that you may receive.
Примечание: Эта статья была обновлено на 2023-01-06 и ранее опубликованный под WIKI_Q210794
Содержание
Meaning of 161 Real Time Clock Power Loss?
161 Real Time Clock Power Loss is the error name that contains the details of the error, including why it occurred, which system component or application malfunctioned to cause this error along with some other information. The numerical code in the error name contains data that can be deciphered by the manufacturer of the component or application that malfunctioned. The error using this code may occur in many different locations within the system, so even though it carries some details in its name, it is still difficult for a user to pinpoint and fix the error cause without specific technical knowledge or appropriate software.
Causes of 161 Real Time Clock Power Loss?
If you have received this error on your PC, it means that there was a malfunction in your system operation. Common reasons include incorrect or failed installation or uninstallation of software that may have left invalid entries in your Windows registry, consequences of a virus or malware attack, improper system shutdown due to a power failure or another factor, someone with little technical knowledge accidentally deleting a necessary system file or registry entry, as well as a number of other causes. The immediate cause of the «161 Real Time Clock Power Loss» error is a failure to correctly run one of its normal operations by a system or application component.
More info on 161 Real Time Clock Power Loss
File — Enter I changed the Cosmo battery. I didn’t change motherboard but a motherboard and get this error: 1. If you have just replaced Save and Exit.4. Boot into this BIOS — Tap ESC I had updated and saved.
It still show this error even Time and Date.3. Restart the computer and you should not have the error. Side Note: If you’re also seeing to load.5. Allow Windows or F10 repeatedly at power on.2. F10 to the ‘Invalid Electronic Serial Number’ error post motherboard replacement, see this forum post (with pictures).
Если вы не знакомы с CMOS-батареей, она скоро умрет. благодаря
Reinhard
Я заменю батарею CMOS. Если вы хотите использовать правильную батарею. Пора положить на левую сторону рядом с сенсорной панелью.
Большую часть времени я использую мой спутниковый приемник toshiba, очень разумный.
Может быть, вы мне не поверите, но если вы используете pro m30 без батареи с энергией от системы электропитания. Батарея хранится где-то за пределами компьютера, так как через месяц
Здравствуйте! У кого-то есть идея, как эта неправильная батарея может вызвать взрыв батареи или другой ущерб.
устройство должно быть разобрано. Если вы хотите сделать это самостоятельно, часы времени показывают неправильное время, если компьютер запускается через некоторое время. Я не уверен в 100%, но батарея RTC должна приводить к повреждению оборудования. Я думаю, что моя процедура разборки может быть опасной.
Это непросто, и вы сделаете это на свой страх и риск. Части ноутбука CMOS-батареи можно изменить самостоятельно? Небольшая ошибка может согласиться с вами. Будьте уверены, что только вы будете очень осторожны.
Как заменить CMOS будет здорово, спасибо! аккумулятор и не очень дорого. Я считаю, что часы работают, когда питание выключено. вы должны увидеть батарею.
Любая помощь будет, но это даст вам эту идею. Это изменения CR-2032 (с F1), после чего я могу загрузить компьютер.
Они могут быть заменены на батарею большинства CMOS. мой компьютер, который я не могу исправить . Вот процедура от Dell и продуктовых магазинов в зависимости от того, где вы живете.
Это диск на материнской плате. Откройте футляр, и мой компьютер, или точный код ошибки, просто спросите . Если вам нужно знать больше информации о размере квартала США. Это то, что удерживает шторм, и вызвало некоторые проблемы.
Хорошо, так что у меня проблемы. После того, как он достигнет 4096, я получаю возможность сохранить Welcome. Около недели назад была заряжена молниеносная батарея. | Dell US
Для меня, пожалуйста?
JH, welcome to the forum, grab a to replacethe CMOS battery. I’m told I need 98 back into service after an overhaul. I can’t find any documentation as to the battery or its location. It goes perfectly — given its limitations. I’m running on AC computer is powered but does not carry through after switch off.
Я просто поместил свою информацию ThinkPad 390 / Windows. потому что я не хочу покупать новую батарею. Любая копия Руководства по техническому обслуживанию оборудования с этого сайта. Пойдите, чтобы удалить и заменить FRU и искать
Проблема в том, что часы реального времени. Он работает, когда резервная батарея, вы узнаете, где она находится.
Замените элемент № RTC-599516-001.
Hi everybody!I have Solution. Hi, This is it (can be different brabd): But, for nearly ALL laptops, they put the lithium battery from the type CR2032?Thanks in advance! battery in a «case», you have to be carefull do not break the case. Regards.
Просмотр решено! Может кто-нибудь проверить это 3V павильон HP DV6-3167CA.
Может ли кто-нибудь пролить свет на часы реального времени пару часов и посмотреть, поможет ли это.
Просто оставьте ноутбук включенным, чтобы были проблемы с часами, и тогда ничего не работает!
Мне пришлось сделать два полных восстановления системы, потому что становилось все меньше — никто, но все перестало работать. У меня ноутбук Toshiba 1800, использующий ME.
Похоже, сила закончилась. Я бы ожидал ошибок / предупреждений, если аккумулятор
Примечание: при удалении батареи стирает ваш кабель питания от компьютера при этом.
Я смотрю номер детали. Убедитесь, что вы отключили компьютер от настроек энергоснабжения и BIOS и установили их по умолчанию. В реальном времени материнская плата GA-K8NF-9.
В чем спецификация часов не работает. Выньте аккумулятор и получите батарею, которую я должен получить.
часы никогда не работают.
У меня есть старый Sony Vaio. Кто-нибудь знает об этой проблеме и часах реального времени.
Проблема заключается в отправке устройства в сервисный центр Sony. Я заменил батарею, отключен, как только система находится в спящем режиме или выключится время / дата. Чтобы получить гарантию Sony, у меня есть спящий режим и такая же ситуация. Если я пойду на установку исправления, я могу избежать 2-3 wks.
Рабочий стол RS431 — это 2 wks. Дата / время на экране будет обновляться до того, что я установил Bios в то время как время простоя.
Если будет определен кристалл (программное или аппаратное обеспечение или оба)?
Почему две операционные системы производят разное время, всегда задерживаются при использовании Windows 7 professional. Выключение автоматического обновления приводит к тому, что задержки были введены в 9 / 20 / 2015.
How do you test the the accuracy of the RTC? With Ubuntu the time ahead varies and moves from exact 0.7 seconds to 1 minute or sometimes 1 minute and 30 seconds. How do you test delay. With Ubuntu the time is ahead. When the time settings are changed by time to 0.9 seconds ahead when tested for approximately 12 hours.
With windows 7 professional the time delay varies and moves from as using each Windows.com, nist.gov, nw.nist.gov, a.nist.gov, and b.nist.gov. The RTC CMOS battery was replaced with a new battery and there was no change. This notebook computer is new and results? One with delayed time and one with ahead time? With Ubuntu there is no time or could it still be software problems? sfc /scannow
не указал на нарушения целостности.
Оказывает ли различное поведение двух операционных систем обновление аппаратных проблем, очень часто отображается точное время. Для загрузки утилиты использовался внешний флеш-накопитель, а затем на флеш-накопитель был установлен Ubuntu, так что ключ F9 затем запускается Ubuntu после новой загрузки. Как может быть причина неправильного чипа RTC в материнской плате? Время контролируется с использованием www.time.is
Я понимаю, что часы реального времени мне нужно заменить чип. Я отмечаю, что часть была отправлена и сказать, где я могу получить замену RTC, пожалуйста? Я использовал веб-сайт Ming Feng для настройки и учета и оплаты PayPal. Может ли кто-нибудь исправить мне мой диагноз или подтвердить его (RTC), встроенный чип также содержит встроенную батарею.
По необходимости я запускаю компьютер на MS DOS 3.3, который выбрал более дешевый почтовый метод доставки, а не гораздо более дорогостоящую курьерскую службу). GA 586 ATV mothherboard. Мне кажется, что материнская плата является зарегистрированной почтой и отслеживается в режиме онлайн.
Ming Feng advise that the part has been shipped via Singapore Post (I and at boot-up I am warned of «CMOS battery fault».
заранее спасибо
Натан ежедневно за 20 минут до прихода домой из школы.
Поэтому в основном я хочу, чтобы мой компьютер включил счетчик
Кажется, что есть несколько сбоев, которые система не сможет загрузить. Мой компьютер — это Alienware Aurora_R3, без каких-либо изменений, кроме отсутствия резервного копирования, и вместо этого даст мне звуковой сигнал 5.
Given that you’re having real time clock failures which is probably due to the You are also having long beeps which indicates no pattern to the events. Looking around I found it means a «Real-Time Clock Failure». Regards,
Джаред
заставили ждать несколько часов и вернуться.
Спасибо, что CPU не может выполнять прерывания между процессорами, чтобы не отставать от времени. модуля 2Gb Ram, который работал несколько месяцев назад. Я также был бы открыт для других решений, которые не предполагали бы меня заранее. Последние пару раз, хотя это не так, и у меня аппаратная ошибка, я бы сказал, что ваш процессор нуждается в замене.
покупая новые части, потому что я действительно не хочу тратить деньги.
Теперь во время нового запуска, это тридцать секунд, чтобы истощить любую избыточную статическую мощность. сброс BIOS. Теперь все еще невозможно перезапустить, и я получаю
шаги ниже.
Что решать? Если проблема не устранена, возможно, вам придется заменить батарею CMOS, вы можете обратиться к руководству пользователя, используя приведенную ниже ссылку, чтобы заменить батарею CMOS. У меня была проблема с моим примечанием, первым тегом или кодом экспресс-сервиса и нажмите «Отправить». Http://dell.to/1bB9On6
В этой ссылке, пожалуйста, удар в системной службе не удалось перезапустить.
Switch off the system; remove the battery, ac adapter and the power cable. And how Hello. So i made 5 beeps — what due to manual means «Real Time Clock Failure». This will help you access the manual page.
Harddrive был сломан, и я обменялся жестким диском.
Следуйте за нажатием и удерживайте нажатой кнопку питания, не так ли?
стресс-тест) был 63C. Нажмите звезду слева, чтобы поблагодарить их с помощью Kudo! Если вы найдете сообщение полезным и оно ответит на ваш вопрос, отметьте его как «Принятое решение».!
Пиковая температура (во время Это поможет остальной части Сообщества с аналогичными проблемами. Вентилятор ЦП отлично работает и идентифицирует проверенное решение и извлекает выгоду из него. Flow @LenovoForums on Twitter!
That’s why I think it could be related to temperature although it is not that hot (i think). Can someone suggest a possible clause?
ноутбук прошел тест ThinkVantage CPU / Memory stress. Температура ядра обычно находится между 44-50C при нормальном использовании.
Забавно, что вы говорите, что, поскольку мой ноутбук держит чаевые назад, кто-нибудь помогает? Обычно я запускаю компьютер от сети, поэтому можно перезапустить аккумулятор RTC. он должен заряжаться, когда я его не использую.
Когда я включаю свой Satellite P200-13Z, он иногда и вперед на ежемесячной основе с тех пор, как часы вернулись. Я думаю, что это связано с тем, что настройки даты и времени неверны.
Я задаюсь вопросом: — Это проблема с батареей RTC, причиной RTC я держу машину (т.е. карту памяти прилагается.) 1.16 Некоторая проблема с перегревом и вызывает ошибку часов реального времени (RTC).
This happen more often when wake up the machine?- Other hardware failure? The laptop has a clean OS installed/recovered.
Hi all Previously I considered my x121e suffer from No USB or Bios installed. movement/vibration).
Тем не менее, он будет пробуждаться в случайном порядке, «звуковой сигнал» дважды, и на экране отображается ошибка контрольной суммы RTC и CMOS.
Я googled вокруг и обнаружил, что замена все еще я получаю эту проблему. Ftp.dell.com/. /inspiron-17-7737_Owner%27s%20Manual_en-us.pdf
ноутбук будет отключен случайным образом и даст мне ошибку в реальном времени. идеи?
I’ve been having this problem for maybe 2 months now where my
может помочь мне. Любой Надеюсь, кто-то Привет всем!
Я попробовал, но батарея cmos исправит проблему.
Hello all, I have lenovo T430s laptop that is the error msg I am getting but here it is. You will need to supply whatever passwords you have configured with Bitlocker encruptions and TPM PIN entry. Error: 0271: Real Time Clock Error — Check Date and Time settings.Press Esc to continue or F1 to enter setup. It means you need to hit F1 to set on the BIOS or the hard drive.
I don’t think that has anything to do with get into the BIOS to change the date/time. I am unable to get into BIOS or even the login screen for Windows 7. Any advice would be appreciated.
Источник
Adblock
detector
full member

Activity: 228
Merit: 101
![]()
NEM (XEM) Top Coin

Thanks mikeywith. I gave my power to technician to repair it. after fixed it , I’ll check and give u the results.
legendary

Activity: 1764
Merit: 4829
![]()
be constructive or S.T.F.U
You need to replace the PSU, there isn’t much of work arounds you can do fix this, your best option would be running a singel hash boards at pretty low settings until the new psu arrives, although if i were you i would shut it down and wait for the new psu to make sure i don’t harm more things.
One thing worth mentioning that lower/higher voltage than what bitmain specifies will kill the new psu as well, make sure your voltage is between 200-240v.
legendary
Activity: 2744
Merit: 2373
![]()
Bull market is coming?
I think asic.to firmware won’t be able to do that and I think you can only set the frequency of chips but you can’t be able to disable the broken chip.
However, you can try to change the frequency of that chip under chip frequency settings.

Find that broken chip and set the freq to lowest.
full member
Activity: 228
Merit: 101
![]()
NEM (XEM) Top Coin
Can i disable this
chip139x.c:1049
only in chain 1 and other chips work in this chain? because i use framework asic.to?
legendary
Activity: 3640
Merit: 5167
![]()
disconnect chain 1 as it looks to have a bad chip.
full member
Activity: 228
Merit: 101
![]()
NEM (XEM) Top Coin
thanks , 2chain work for 15 minutes without any problem and have this log on below.
[2020/08/26 16:11:56] INFO: fan[1] — OK
[2020/08/26 16:11:56] INFO: fan[2] — OK
[2020/08/26 16:11:56] INFO: fan[3] — OK
[2020/08/26 16:12:02] INFO: Power ON
[2020/08/26 16:12:04] INFO: Starting FPGA queue
[2020/08/26 16:12:04] INFO: Initializing hash boards
[2020/08/26 16:12:04] INFO: chain[2] — Initializing
[2020/08/26 16:12:04] INFO: chain[1] — Initializing
[2020/08/26 16:12:17] INFO: chain[2] — 44 chips detected
[2020/08/26 16:12:18] INFO: chain[1] — 44 chips detected
[2020/08/26 16:12:24] INFO: Start-up temperature is 27 C (min -15 C)
[2020/08/26 16:12:24] INFO: Switching to manual fan control (100 %)
[2020/08/26 16:12:24] INFO: Changing voltage from 19500 to 19000 mV gradually
[2020/08/26 16:12:51] INFO: Raising freq from 50 to 700 Mhz gradually
[2020/08/26 16:13:04] INFO: Switching to automatic fan control (75 C)
[2020/08/26 16:13:04] INFO: Start mining!
[2020/08/26 16:14:04] INFO: Changing voltage from 19000 to 18800 mV gradually
[2020/08/26 16:14:29] INFO: Changing voltage from 18800 to 18600 mV gradually
[2020/08/26 16:14:54] INFO: Changing voltage from 18600 to 18500 mV gradually
[2020/08/26 16:26:56] ERROR: src/chip139x.c:1049 chain[1] — Failed to receive chip replies
[2020/08/26 16:26:57] ERROR: src/chip139x.c:1049 chain[1] — Failed to receive chip replies
[2020/08/26 16:27:23] INFO: Detected 256 Mb of RAM
[2020/08/26 16:27:23] INFO: Switching to manual fan control (30 %)
[2020/08/26 16:27:23] INFO: Checking fans
[2020/08/26 16:27:24] INFO: fan[0] — OK
[2020/08/26 16:27:24] INFO: fan[1] — OK
[2020/08/26 16:27:24] INFO: fan[2] — OK
[2020/08/26 16:27:24] INFO: fan[3] — OK
[2020/08/26 16:27:30] INFO: Power ON
[2020/08/26 16:27:32] ERROR: src/power.c:161 Malformed power response
[2020/08/26 16:27:34] INFO: Starting FPGA queue
[2020/08/26 16:27:34] INFO: Initializing hash boards
[2020/08/26 16:27:34] INFO: chain[2] — Initializing
[2020/08/26 16:27:34] INFO: chain[1] — Initializing
[2020/08/26 16:27:45] ERROR: driver-btm-chain.c:687 chain[2] — Voltage is different, cur=801 mV tgt=19500 mV
[2020/08/26 16:27:45] ERROR: driver-btm-chain.c:471 chain[2] — Failed to set start up voltage
[2020/08/26 16:27:45] INFO: chain[2] — Shutting down the chain
[2020/08/26 16:27:45] ERROR: driver-btm-base.c:356 chain[2] — Initialization failed
[2020/08/26 16:27:46] ERROR: driver-btm-chain.c:687 chain[1] — Voltage is different, cur=874 mV tgt=19500 mV
[2020/08/26 16:27:46] ERROR: driver-btm-chain.c:471 chain[1] — Failed to set start up voltage
[2020/08/26 16:27:46] INFO: chain[1] — Shutting down the chain
[2020/08/26 16:27:46] ERROR: driver-btm-base.c:356 chain[1] — Initialization failed
[2020/08/26 16:27:46] ERROR: driver-btm-base.c:2154 Failed to initialize hash boards
[2020/08/26 16:27:46] INFO: Shutting down the miner
[2020/08/26 16:27:46] INFO: Stopping FPGA queue
[2020/08/26 16:27:46] INFO: chain[1] — Shutting down the chain
[2020/08/26 16:27:46] INFO: chain[2] — Shutting down the chain
[2020/08/26 16:27:46] INFO: Power OFF
after about 5 min this log happen, and miner continue mining without problem:
[2020/08/26 16:14:04] INFO: Changing voltage from 19000 to 18800 mV gradually
[2020/08/26 16:14:29] INFO: Changing voltage from 18800 to 18600 mV gradually
[2020/08/26 16:14:54] INFO: Changing voltage from 18600 to 18500 mV gradually
but after about 15 min this log showed : (do you know which part of power have problem with this comment «Malformed power»
[2020/08/26 16:26:56] ERROR: src/chip139x.c:1049 chain[1] — Failed to receive chip replies
[2020/08/26 16:26:57] ERROR: src/chip139x.c:1049 chain[1] — Failed to receive chip replies
[2020/08/26 16:27:32] ERROR: src/power.c:161 Malformed power response
legendary
Activity: 1764
Merit: 4829
![]()
be constructive or S.T.F.U
You need to use APW9+ and not APW9, in other words any power supply that works on T17+ will work on S17e, T17e, S17+ and vice versa obviously, but T17, S17 and S17 pro use APW9 which won’t work on your miner.
APW9 > S17, T17, S17pro
APW9+ > S17e, T17e, S17+, T17+
full member
Activity: 228
Merit: 101
![]()
NEM (XEM) Top Coin
Thanks for reply… can i use power miner t17 40th/s or other model power for t17+ 55 ths or exactly my power must be t17+55 and can’t be t17+58 or others ?
legendary
Activity: 1764
Merit: 4829
![]()
be constructive or S.T.F.U
so chain 1 alone shows
INFO: chain[1] — 44 chips detected
chain 2 alone shows
ERROR: driver-btm-base.c:2154 Failed to initialize hash boards
chain 3 alone shows
chain[3] — 44 chips detected
chain 3 and 1 showed both hashbaords asics but failed to start, what this suggests is exactly what I said in my previous post
The kernel log can be very tricky, but this single line suggests that your hash boards might be okay but the power supply isn’t feeding them enough power, in other words, your PSU is bad…
full member
Activity: 228
Merit: 101
![]()
NEM (XEM) Top Coin
Dear Mikeywith and BitMaxz
I tried all chain one by one and this is the results (freq 650,700 and voltage 18.5,19.5 (framework asic.to) :
chain 1 : work without problem
[2020/08/24 14:01:52] INFO: Detected 256 Mb of RAM
[2020/08/24 14:01:52] INFO: Switching to manual fan control (30 %)
[2020/08/24 14:01:52] INFO: Checking fans
[2020/08/24 14:01:53] INFO: fan[0] — OK
[2020/08/24 14:01:53] INFO: fan[1] — OK
[2020/08/24 14:01:53] INFO: fan[2] — OK
[2020/08/24 14:01:53] INFO: fan[3] — OK
[2020/08/24 14:01:59] INFO: Power ON
[2020/08/24 14:02:01] INFO: Starting FPGA queue
[2020/08/24 14:02:04] INFO: Initializing hash boards
[2020/08/24 14:02:05] INFO: chain[1] — Initializing
[2020/08/24 14:02:07] INFO: chain[1] — 44 chips detected
[2020/08/24 14:02:08] INFO: Start-up temperature is 25 C (min -15 C)
[2020/08/24 14:02:11] INFO: Switching to manual fan control (100 %)
[2020/08/24 14:02:13] INFO: Raising freq from 50 to 700 Mhz gradually
[2020/08/24 14:02:17] INFO: Switching to manual fan control (96 %)
[2020/08/24 14:02:19] INFO: Start mining!
chain 2: work with this log and shut down
[2020/08/24 14:21:13] INFO: Detected 256 Mb of RAM
[2020/08/24 14:21:13] INFO: Switching to manual fan control (30 %)
[2020/08/24 14:21:13] INFO: Checking fans
[2020/08/24 14:21:18] INFO: fan[0] — OK
[2020/08/24 14:21:18] INFO: fan[1] — OK
[2020/08/24 14:21:18] INFO: fan[2] — OK
[2020/08/24 14:21:18] INFO: fan[3] — OK
[2020/08/24 14:21:24] INFO: Power ON
[2020/08/24 14:21:26] INFO: Starting FPGA queue
[2020/08/24 14:21:26] INFO: Initializing hash boards
[2020/08/24 14:21:26] INFO: chain[2] — Initializing
[2020/08/24 14:21:37] ERROR: driver-btm-chain.c:687 chain[2] — Voltage is different, cur=608 mV tgt=19500 mV
[2020/08/24 14:21:37] ERROR: driver-btm-chain.c:471 chain[2] — Failed to set start up voltage
[2020/08/24 14:21:37] INFO: chain[2] — Shutting down the chain
[2020/08/24 14:21:37] ERROR: driver-btm-base.c:356 chain[2] — Initialization failed
[2020/08/24 14:21:37] ERROR: driver-btm-base.c:2154 Failed to initialize hash boards
[2020/08/24 14:21:37] INFO: Shutting down the miner
[2020/08/24 14:21:37] INFO: Stopping FPGA queue
[2020/08/24 14:21:37] INFO: chain[2] — Shutting down the chain
chain 3:work without problem :
[2020/08/24 15:06:37] INFO: Start mining!
[2020/08/24 15:16:49] INFO: Detected 256 Mb of RAM
[2020/08/24 15:16:49] INFO: Switching to manual fan control (30 %)
[2020/08/24 15:16:49] INFO: Checking fans
[2020/08/24 15:16:56] INFO: fan[0] — OK
[2020/08/24 15:16:56] INFO: fan[1] — OK
[2020/08/24 15:16:56] INFO: fan[2] — OK
[2020/08/24 15:16:56] INFO: fan[3] — OK
[2020/08/24 15:17:02] INFO: Power ON
[2020/08/24 15:17:04] INFO: Starting FPGA queue
[2020/08/24 15:17:04] INFO: Initializing hash boards
[2020/08/24 15:17:04] INFO: chain[1] — Initializing
[2020/08/24 15:17:16] INFO: chain[1] — 44 chips detected
[2020/08/24 15:17:22] INFO: Start-up temperature is 25 C (min -15 C)
[2020/08/24 15:17:22] INFO: Switching to manual fan control (100 %)
[2020/08/24 15:17:22] INFO: Raising freq from 50 to 700 Mhz gradually
[2020/08/24 15:17:35] INFO: Switching to manual fan control (96 %)
[2020/08/24 15:17:35] INFO: Start mining!
but when connect two chain 1,3 that worked correctly in one mode :
[2020/08/24 14:42:13] INFO: Detected 256 Mb of RAM
[2020/08/24 14:42:13] INFO: Switching to manual fan control (30 %)
[2020/08/24 14:42:13] INFO: Checking fans
[2020/08/24 14:42:14] INFO: fan[0] — OK
[2020/08/24 14:42:14] INFO: fan[1] — OK
[2020/08/24 14:42:14] INFO: fan[2] — OK
[2020/08/24 14:42:14] INFO: fan[3] — OK
[2020/08/24 14:42:20] INFO: Power ON
[2020/08/24 14:42:22] INFO: Starting FPGA queue
[2020/08/24 14:42:22] INFO: Initializing hash boards
[2020/08/24 14:42:22] INFO: chain[2] — Initializing
[2020/08/24 14:42:22] INFO: chain[1] — Initializing
[2020/08/24 14:42:35] INFO: chain[2] — 44 chips detected
[2020/08/24 14:42:36] INFO: chain[1] — 44 chips detected
[2020/08/24 14:42:42] INFO: Start-up temperature is 24 C (min -15 C)
[2020/08/24 14:42:42] INFO: Switching to manual fan control (100 %)
[2020/08/24 14:42:42] INFO: Changing voltage from 19500 to 18500 mV gradually
[2020/08/24 14:43:12] INFO: Raising freq from 50 to 650 Mhz gradually
[2020/08/24 14:43:25] INFO: Switching to manual fan control (96 %)
[2020/08/24 14:43:25] INFO: Start mining!
[2020/08/24 14:46:47] ERROR: src/chip139x.c:1049 chain[1] — Failed to receive chip replies
[2020/08/24 14:46:48] ERROR: src/chip139x.c:1049 chain[2] — Failed to receive chip replies
[2020/08/24 14:46:49] ERROR: src/chip139x.c:1049 chain[2] — Failed to receive chip replies
[2020/08/24 14:47:03] INFO: Detected 256 Mb of RAM
[2020/08/24 14:47:03] INFO: Switching to manual fan control (30 %)
[2020/08/24 14:47:03] INFO: Checking fans
[2020/08/24 14:47:04] INFO: fan[0] — OK
[2020/08/24 14:47:04] INFO: fan[1] — OK
[2020/08/24 14:47:04] INFO: fan[2] — OK
[2020/08/24 14:47:04] INFO: fan[3] — OK
[2020/08/24 14:47:10] INFO: Power ON
[2020/08/24 14:47:12] INFO: Starting FPGA queue
[2020/08/24 14:47:12] INFO: Initializing hash boards
[2020/08/24 14:47:12] INFO: chain[2] — Initializing
[2020/08/24 14:47:12] INFO: chain[1] — Initializing
[2020/08/24 14:47:23] ERROR: driver-btm-chain.c:687 chain[2] — Voltage is different, cur=874 mV tgt=19500 mV
[2020/08/24 14:47:23] ERROR: driver-btm-chain.c:471 chain[2] — Failed to set start up voltage
[2020/08/24 14:47:23] INFO: chain[2] — Shutting down the chain
[2020/08/24 14:47:23] ERROR: driver-btm-base.c:356 chain[2] — Initialization failed
[2020/08/24 14:47:24] ERROR: driver-btm-chain.c:687 chain[1] — Voltage is different, cur=946 mV tgt=19500 mV
[2020/08/24 14:47:24] ERROR: driver-btm-chain.c:471 chain[1] — Failed to set start up voltage
[2020/08/24 14:47:24] INFO: chain[1] — Shutting down the chain
[2020/08/24 14:47:24] ERROR: driver-btm-base.c:356 chain[1] — Initialization failed
[2020/08/24 14:47:24] ERROR: driver-btm-base.c:2154 Failed to initialize hash boards
[2020/08/24 14:47:24] INFO: Shutting down the miner
what do you think about this problem?
legendary
Activity: 1764
Merit: 4829
![]()
be constructive or S.T.F.U
That was hard to troubleshoot but I think much better to flash it back first on the original Bitmain firmware to check if the miner is fine and to check if it’s actually a PSU issue.
That makes sense, he should try that as well.
Can you try to run the hashboard one by one?
The one hashboard might be broken that can prevent other hashboard to run properly.
It’s unlikely, this used to be the case in the old miners S11 and older IIRC, but since the S15 the control board will simply ignore the bad hash board and move on to the next one, it’s even better with Vnish firmware since even if the board needs tunning the other two will work while the bad one gets turned individually, so it’s unlikely that 1 board is causing the miner to shut-down.
However, it would be worth it to test the hash boards one by one not for the reason you mentioned but for the fact that his PSU could be bad but not totally broken and it may be able to run a single hash board but not 3 of them.
legendary
Activity: 2744
Merit: 2373
![]()
Bull market is coming?
That was hard to troubleshoot but I think much better to flash it back first on the original Bitmain firmware to check if the miner is fine and to check if it’s actually a PSU issue.
If the miner is running fine with the original firmware there might be misconfigured on asic.to firmware that causes the issue you might need the help of taserz to tweak your miner.
Or your miner is broken and you are trying to fix the issue by using asic.to firmware?
Can you try to run the hashboard one by one?
The one hashboard might be broken that can prevent other hashboard to run properly.
legendary
Activity: 1764
Merit: 4829
![]()
be constructive or S.T.F.U
[1970/01/01 00:20:11] ERROR: driver-btm-chain.c:967 chain[0] — Failed to read temp from all sensors!
The kernel log can be very tricky, but this single line suggests that your hash boards might be okay but the power supply isn’t feeding them enough power, in other words, your PSU is bad, do you have a spare PSU?
This isn’t how he should do it, this is the auto-chip tune, he needs to go the next tab and set fixed frequency and voltage for each hashboard.
full member
Activity: 228
Merit: 101
![]()
NEM (XEM) Top Coin
I did it but error is stable yet
[2020/08/21 19:08:07] INFO: Detected 256 Mb of RAM
[2020/08/21 19:08:07] INFO: Switching to manual fan control (30 %)
[2020/08/21 19:08:07] INFO: Checking fans
[2020/08/21 19:08:08] INFO: fan[0] — OK
[2020/08/21 19:08:08] INFO: fan[1] — OK
[2020/08/21 19:08:08] INFO: fan[2] — OK
[2020/08/21 19:08:08] INFO: fan[3] — OK
[2020/08/21 19:08:14] INFO: Power ON
[2020/08/21 19:08:17] INFO: Starting FPGA queue
[2020/08/21 19:08:17] INFO: Initializing hash boards
[2020/08/21 19:08:17] INFO: chain[2] — Initializing
[2020/08/21 19:08:17] INFO: chain[1] — Initializing
[2020/08/21 19:08:17] INFO: chain[0] — Initializing
[2020/08/21 19:08:30] ERROR: src/chip139x.c:1049 chain[2] — Failed to receive chip replies
[2020/08/21 19:08:31] ERROR: src/chip139x.c:1049 chain[2] — Failed to receive chip replies
[2020/08/21 19:08:32] ERROR: src/chip139x.c:1049 chain[2] — Failed to receive chip replies
[2020/08/21 19:08:32] WARN: chain[2] — 0 of 44 chips detected
[2020/08/21 19:08:33] INFO: chain[1] — 44 chips detected
[2020/08/21 19:08:34] INFO: chain[0] — 44 chips detected
[2020/08/21 19:08:41] ERROR: src/chip139x.c:1049 chain[2] — Failed to receive chip replies
[2020/08/21 19:08:42] ERROR: src/chip139x.c:1049 chain[2] — Failed to receive chip replies
[2020/08/21 19:08:43] ERROR: src/chip139x.c:1049 chain[2] — Failed to receive chip replies
[2020/08/21 19:08:43] WARN: chain[2] — 0 of 44 chips detected
[2020/08/21 19:08:53] ERROR: src/chip139x.c:1049 chain[2] — Failed to receive chip replies
[2020/08/21 19:08:54] ERROR: src/chip139x.c:1049 chain[2] — Failed to receive chip replies
[2020/08/21 19:08:55] ERROR: src/chip139x.c:1049 chain[2] — Failed to receive chip replies
[2020/08/21 19:08:55] WARN: chain[2] — 0 of 44 chips detected
[2020/08/21 19:08:55] ERROR: driver-btm-chain.c:488 chain[2] — Failed to detect ASIC chips
[2020/08/21 19:08:55] INFO: chain[2] — Shutting down the chain
[2020/08/21 19:08:56] ERROR: driver-btm-base.c:356 chain[2] — Initialization failed
[2020/08/21 19:08:59] INFO: Start-up temperature is 31 C (min -15 C)
[2020/08/21 19:08:59] INFO: Switching to manual fan control (100 %)
[2020/08/21 19:08:59] INFO: Changing voltage from 19500 to 16000 mV gradually
[2020/08/21 19:09:45] INFO: Raising freq from 50 to 400 Mhz gradually
[2020/08/21 19:09:52] INFO: Switching to manual fan control (96 %)
[2020/08/21 19:09:52] INFO: Start mining!
[2020/08/21 19:10:52] INFO: Changing voltage from 16000 to 15800 mV gradually
[2020/08/21 19:11:18] INFO: Changing voltage from 15800 to 15600 mV gradually
[2020/08/21 19:11:44] INFO: Changing voltage from 15600 to 15400 mV gradually
[2020/08/21 19:12:09] ERROR: src/chip139x.c:1049 chain[0] — Failed to receive chip replies
[2020/08/21 19:12:10] ERROR: src/chip139x.c:1049 chain[0] — Failed to receive chip replies
[2020/08/21 19:12:11] ERROR: src/chip139x.c:1049 chain[1] — Failed to receive chip replies
[2020/08/21 19:12:12] ERROR: src/chip139x.c:1049 chain[1] — Failed to receive chip replies
[2020/08/21 19:12:14] ERROR: src/chip139x.c:1049 chain[0] — Failed to receive chip replies
[2020/08/21 19:12:15] ERROR: src/chip139x.c:1049 chain[0] — Failed to receive chip replies
[2020/08/21 19:12:16] ERROR: src/chip139x.c:1049 chain[1] — Failed to receive chip replies
[2020/08/21 19:12:17] ERROR: src/temp.c:217 chain[0] sen[3] — Lost, no updates for 10 sec
[2020/08/21 19:12:17] ERROR: src/temp.c:217 chain[1] sen[0] — Lost, no updates for 10 sec
[2020/08/21 19:12:17] ERROR: src/temp.c:217 chain[1] sen[1] — Lost, no updates for 10 sec
[2020/08/21 19:12:17] ERROR: src/chip139x.c:1049 chain[1] — Failed to receive chip replies
[2020/08/21 19:12:18] ERROR: src/temp.c:217 chain[0] sen[0] — Lost, no updates for 10 sec
[2020/08/21 19:12:18] ERROR: src/temp.c:217 chain[0] sen[1] — Lost, no updates for 10 sec
[2020/08/21 19:12:18] ERROR: src/temp.c:217 chain[0] sen[2] — Lost, no updates for 10 sec
[2020/08/21 19:12:18] ERROR: driver-btm-chain.c:967 chain[0] — Failed to read temp from all sensors!
[2020/08/21 19:12:18] INFO: chain[0] — Shutting down the chain
[2020/08/21 19:12:19] ERROR: src/chip139x.c:1049 chain[0] — Failed to receive chip replies
[2020/08/21 19:12:20] ERROR: src/temp.c:217 chain[1] sen[2] — Lost, no updates for 10 sec
[2020/08/21 19:12:20] ERROR: src/temp.c:217 chain[1] sen[3] — Lost, no updates for 10 sec
[2020/08/21 19:12:20] ERROR: driver-btm-chain.c:967 chain[1] — Failed to read temp from all sensors!
[2020/08/21 19:12:20] INFO: chain[1] — Shutting down the chain
[2020/08/21 19:12:20] ERROR: src/chip139x.c:1049 chain[0] — Failed to receive chip replies
[2020/08/21 19:12:21] ERROR: src/chip139x.c:1049 chain[1] — Failed to receive chip replies
[2020/08/21 19:12:22] ERROR: src/chip139x.c:1049 chain[1] — Failed to receive chip replies
[2020/08/21 19:12:23] ERROR: driver-btm-chain.c:687 chain[1] — Voltage is different, cur=1164 mV tgt=15400 mV
[2020/08/21 19:12:24] WARN: No working chains
[2020/08/21 19:12:24] INFO: Shutting down the miner
[2020/08/21 19:12:24] INFO: Stopping FPGA queue
[2020/08/21 19:12:24] INFO: chain[0] — Shutting down the chain
[2020/08/21 19:12:24] INFO: chain[1] — Shutting down the chain
[2020/08/21 19:12:24] INFO: chain[2] — Shutting down the chain
[2020/08/21 19:12:24] INFO: Power OFF
legendary
Activity: 2744
Merit: 2373
![]()
Bull market is coming?
According to your logs «Failed to receive chip replies» your hashboard might be overheating that could lead to miner autoshutdown for overheating protection.
The solution is already on the above post by mikeywith reducing the frequency might solve the issue. If not, try to increase the fan speed or set it fixed to the maximum.
You can also, try to downvolt and manually set it to the lower frequency just to get rid of this issue.
The guide is already on asic.to manual or download it from here https://asic.to/download/manual_english/
And check this part.

Enable the #3 for auto downscale if the HW errors still occur.
full member
Activity: 228
Merit: 101
![]()
NEM (XEM) Top Coin
Dear Mikeywith
my t17+ have this log now..and after 15 min power off automatically and again miner work for 15 min …i don’t know whats the problem…please guide me …thanks
[1970/01/01 00:05:10] INFO: Detected 256 Mb of RAM
[1970/01/01 00:05:10] INFO: Switching to manual fan control (30 %)
[1970/01/01 00:05:10] INFO: Checking fans
[1970/01/01 00:05:15] INFO: fan[0] — OK
[1970/01/01 00:05:15] INFO: fan[1] — OK
[1970/01/01 00:05:15] INFO: fan[2] — OK
[1970/01/01 00:05:15] INFO: fan[3] — OK
[1970/01/01 00:05:21] INFO: Power ON
[1970/01/01 00:05:23] INFO: Starting FPGA queue
[1970/01/01 00:05:23] INFO: Initializing hash boards
[1970/01/01 00:05:23] INFO: chain[2] — Initializing
[1970/01/01 00:05:23] INFO: chain[1] — Initializing
[1970/01/01 00:05:23] INFO: chain[0] — Initializing
[1970/01/01 00:05:36] ERROR: src/chip139x.c:1049 chain[2] — Failed to receive chip replies
[1970/01/01 00:05:37] ERROR: src/chip139x.c:1049 chain[2] — Failed to receive chip replies
[1970/01/01 00:05:38] ERROR: src/chip139x.c:1049 chain[2] — Failed to receive chip replies
[1970/01/01 00:05:38] WARN: chain[2] — 0 of 44 chips detected
[1970/01/01 00:05:39] INFO: chain[1] — 44 chips detected
[1970/01/01 00:05:40] INFO: chain[0] — 44 chips detected
[1970/01/01 00:05:48] ERROR: src/chip139x.c:1049 chain[2] — Failed to receive chip replies
[1970/01/01 00:05:49] ERROR: src/chip139x.c:1049 chain[2] — Failed to receive chip replies
[1970/01/01 00:05:50] ERROR: src/chip139x.c:1049 chain[2] — Failed to receive chip replies
[1970/01/01 00:05:50] WARN: chain[2] — 0 of 44 chips detected
[1970/01/01 00:05:59] ERROR: src/chip139x.c:1049 chain[2] — Failed to receive chip replies
[1970/01/01 00:06:00] ERROR: src/chip139x.c:1049 chain[2] — Failed to receive chip replies
[1970/01/01 00:06:01] ERROR: src/chip139x.c:1049 chain[2] — Failed to receive chip replies
[1970/01/01 00:06:01] WARN: chain[2] — 0 of 44 chips detected
[1970/01/01 00:06:01] ERROR: driver-btm-chain.c:488 chain[2] — Failed to detect ASIC chips
[1970/01/01 00:06:01] INFO: chain[2] — Shutting down the chain
[1970/01/01 00:06:02] ERROR: driver-btm-base.c:356 chain[2] — Initialization failed
[1970/01/01 00:06:05] INFO: Start-up temperature is 30 C (min -15 C)
[1970/01/01 00:06:05] INFO: Switching to manual fan control (100 %)
[1970/01/01 00:06:05] INFO: Changing voltage from 19500 to 18500 mV gradually
[1970/01/01 00:06:35] INFO: Raising freq from 50 to 650 Mhz gradually
[1970/01/01 00:06:48] INFO: Switching to manual fan control (96 %)
[1970/01/01 00:06:48] INFO: Start mining!
[1970/01/01 00:07:48] INFO: Changing voltage from 18500 to 18300 mV gradually
[1970/01/01 00:08:12] INFO: Changing voltage from 18300 to 18200 mV gradually
[1970/01/01 00:10:24] INFO: Changing voltage from 18200 to 18100 mV gradually
[1970/01/01 00:11:36] INFO: Changing voltage from 18100 to 18000 mV gradually
[1970/01/01 00:12:49] INFO: Changing voltage from 18000 to 17900 mV gradually
[1970/01/01 00:14:02] INFO: Changing voltage from 17900 to 17800 mV gradually
[1970/01/01 00:15:15] INFO: Changing voltage from 17800 to 17700 mV gradually
[1970/01/01 00:16:28] INFO: Changing voltage from 17700 to 17600 mV gradually
[1970/01/01 00:17:41] INFO: Changing voltage from 17600 to 17500 mV gradually
[1970/01/01 00:18:54] INFO: Changing voltage from 17500 to 17400 mV gradually
[1970/01/01 00:20:02] ERROR: src/chip139x.c:1049 chain[1] — Failed to receive chip replies
[1970/01/01 00:20:03] ERROR: src/chip139x.c:1049 chain[1] — Failed to receive chip replies
[1970/01/01 00:20:05] ERROR: src/chip139x.c:1049 chain[0] — Failed to receive chip replies
[1970/01/01 00:20:06] ERROR: src/chip139x.c:1049 chain[0] — Failed to receive chip replies
[1970/01/01 00:20:07] INFO: Changing voltage from 17400 to 17300 mV gradually
[1970/01/01 00:20:07] ERROR: src/chip139x.c:1049 chain[1] — Failed to receive chip replies
[1970/01/01 00:20:08] ERROR: src/chip139x.c:1049 chain[1] — Failed to receive chip replies
[1970/01/01 00:20:10] ERROR: src/temp.c:217 chain[1] sen[1] — Lost, no updates for 10 sec
[1970/01/01 00:20:10] ERROR: src/chip139x.c:1049 chain[0] — Failed to receive chip replies
[1970/01/01 00:20:11] ERROR: src/temp.c:217 chain[0] sen[0] — Lost, no updates for 10 sec
[1970/01/01 00:20:11] ERROR: src/temp.c:217 chain[0] sen[1] — Lost, no updates for 10 sec
[1970/01/01 00:20:11] ERROR: src/temp.c:217 chain[0] sen[2] — Lost, no updates for 10 sec
[1970/01/01 00:20:11] ERROR: src/temp.c:217 chain[0] sen[3] — Lost, no updates for 10 sec
[1970/01/01 00:20:11] ERROR: driver-btm-chain.c:967 chain[0] — Failed to read temp from all sensors!
[1970/01/01 00:20:11] INFO: chain[0] — Shutting down the chain
[1970/01/01 00:20:11] ERROR: src/chip139x.c:1049 chain[0] — Failed to receive chip replies
[1970/01/01 00:20:12] ERROR: src/chip139x.c:1049 chain[1] — Failed to receive chip replies
[1970/01/01 00:20:13] ERROR: src/chip139x.c:1049 chain[1] — Failed to receive chip replies
[1970/01/01 00:20:15] ERROR: src/temp.c:217 chain[1] sen[0] — Lost, no updates for 10 sec
[1970/01/01 00:20:15] ERROR: src/temp.c:217 chain[1] sen[2] — Lost, no updates for 10 sec
[1970/01/01 00:20:15] ERROR: src/temp.c:217 chain[1] sen[3] — Lost, no updates for 10 sec
[1970/01/01 00:20:15] ERROR: driver-btm-chain.c:967 chain[1] — Failed to read temp from all sensors!
[1970/01/01 00:20:15] INFO: chain[1] — Shutting down the chain
[1970/01/01 00:20:15] ERROR: src/chip139x.c:1049 chain[0] — Failed to receive chip replies
[1970/01/01 00:20:16] ERROR: src/chip139x.c:1049 chain[0] — Failed to receive chip replies
[1970/01/01 00:20:17] WARN: No working chains
[1970/01/01 00:20:17] INFO: Shutting down the miner
[1970/01/01 00:20:17] ERROR: src/chip139x.c:1049 chain[1] — Failed to receive chip replies
[1970/01/01 00:20:18] ERROR: src/chip139x.c:1049 chain[1] — Failed to receive chip replies
[1970/01/01 00:20:19] INFO: Stopping FPGA queue
[1970/01/01 00:20:19] INFO: chain[0] — Shutting down the chain
[1970/01/01 00:20:19] INFO: chain[1] — Shutting down the chain
[1970/01/01 00:20:19] INFO: chain[2] — Shutting down the chain
[1970/01/01 00:20:19] INFO: Power OFF
legendary
Activity: 1764
Merit: 4829
![]()
be constructive or S.T.F.U
What do you mean by resetting it manually?
At which point do you get this output?
[2020/08/17 17:53:09] WARN: chain[1] — 0 of 44 chips detected
[2020/08/17 17:53:10] INFO: chain[0] — 44 chips detected
[2020/08/17 17:53:18] WARN: chain[2] — 24 of 44 chips detected
Anyway, to answer your question, you need to go
Miner Configuration > Chain Frequency settings
Notice that there are two «Chain Frequency settings» tabs, you want the second to the left, scroll down and set the voltage and frequency you want.
Before you do that I suggest you go to
Miner Configuration > Profile Setting
Go to Preset and chose a low-profile, let it run for about an hour and then see if that fix anything if not then simply disable the profile and go to Chain Frequency settings and set low-frequency on your chain 1 and 2 ( 0 seems to be fine showing 44 asics as it should).
Please note that your chances are slim to nothing, but it still worth the try.
full member
Activity: 228
Merit: 101
![]()
NEM (XEM) Top Coin
I updated my asic t17+ 55 ths to framework of asic.to successfully .My miner status and log is on below….you know that we can change voltage and frequency of chain manually in asic.to framework. i want to know with change of voltage or frequency of chains , can i solve this chip issue? any recommend setting is exists for asic.to? thanks.
my asic is this status
[2020/08/16 12:32:43] WARN: chain[2] — 0 of 44 chips detected
[2020/08/16 12:32:44] INFO: chain[1] — 44 chips detected
[2020/08/16 12:32:45] INFO: chain[0] — 44 chips detected
and after reset it manually it change to it:
[2020/08/17 17:53:09] WARN: chain[1] — 0 of 44 chips detected
[2020/08/17 17:53:10] INFO: chain[0] — 44 chips detected
[2020/08/17 17:53:18] WARN: chain[2] — 24 of 44 chips detected
Booting Linux on physical CPU 0x0
Linux version 4.6.0-xilinx-gff8137b-dirty ([email protected]) (gcc version 4.8.3 20140320 (prerelease) (Sourcery CodeBench Lite 2014.05-23) ) #25 SMP PREEMPT Fri Nov 23 15:30:52 CST 2018
CPU: ARMv7 Processor [413fc090] revision 0 (ARMv7), cr=18c5387d
CPU: PIPT / VIPT nonaliasing data cache, VIPT aliasing instruction cache
Machine model: Xilinx Zynq
cma: Reserved 16 MiB at 0x0e000000
Memory policy: Data cache writealloc
On node 0 totalpages: 61440
free_area_init_node: node 0, pgdat c0b39280, node_mem_map cde10000
Normal zone: 480 pages used for memmap
Normal zone: 0 pages reserved
Normal zone: 61440 pages, LIFO batch:15
percpu: Embedded 12 pages/cpu @cddf1000 s19776 r8192 d21184 u49152
pcpu-alloc: s19776 r8192 d21184 u49152 alloc=12*4096
pcpu-alloc: [0] 0 [0] 1
Built 1 zonelists in Zone order, mobility grouping on. Total pages: 60960
Kernel command line: mem=240M console=ttyPS0,115200 ramdisk_size=33554432 root=/dev/ram rw earlyprintk
PID hash table entries: 1024 (order: 0, 4096 bytes)
Dentry cache hash table entries: 32768 (order: 5, 131072 bytes)
Inode-cache hash table entries: 16384 (order: 4, 65536 bytes)
Memory: 202820K/245760K available (6345K kernel code, 231K rwdata, 1896K rodata, 1024K init, 223K bss, 26556K reserved, 16384K cma-reserved, 0K highmem)
Virtual kernel memory layout:
vector : 0xffff0000 — 0xffff1000 ( 4 kB)
fixmap : 0xffc00000 — 0xfff00000 (3072 kB)
vmalloc : 0xcf800000 — 0xff800000 ( 768 MB)
lowmem : 0xc0000000 — 0xcf000000 ( 240 MB)
pkmap : 0xbfe00000 — 0xc0000000 ( 2 MB)
modules : 0xbf000000 — 0xbfe00000 ( 14 MB)
.text : 0xc0008000 — 0xc090c424 (9234 kB)
.init : 0xc0a00000 — 0xc0b00000 (1024 kB)
.data : 0xc0b00000 — 0xc0b39fe0 ( 232 kB)
.bss : 0xc0b39fe0 — 0xc0b71c28 ( 224 kB)
Preemptible hierarchical RCU implementation.
Build-time adjustment of leaf fanout to 32.
RCU restricting CPUs from NR_CPUS=4 to nr_cpu_ids=2.
RCU: Adjusting geometry for rcu_fanout_leaf=32, nr_cpu_ids=2
NR_IRQS:16 nr_irqs:16 16
efuse mapped to cf800000
ps7-slcr mapped to cf802000
L2C: platform modifies aux control register: 0x72360000 -> 0x72760000
L2C: DT/platform modifies aux control register: 0x72360000 -> 0x72760000
L2C-310 erratum 769419 enabled
L2C-310 enabling early BRESP for Cortex-A9
L2C-310 full line of zeros enabled for Cortex-A9
L2C-310 ID prefetch enabled, offset 1 lines
L2C-310 dynamic clock gating enabled, standby mode enabled
L2C-310 cache controller enabled, 8 ways, 512 kB
L2C-310: CACHE_ID 0x410000c8, AUX_CTRL 0x76760001
zynq_clock_init: clkc starts at cf802100
Zynq clock init
sched_clock: 64 bits at 333MHz, resolution 3ns, wraps every 4398046511103ns
clocksource: arm_global_timer: mask: 0xffffffffffffffff max_cycles: 0x4ce07af025, max_idle_ns: 440795209040 ns
Switching to timer-based delay loop, resolution 3ns
clocksource: ttc_clocksource: mask: 0xffff max_cycles: 0xffff, max_idle_ns: 537538477 ns
ps7-ttc #0 at cf80a000, irq=18
Console: colour dummy device 80×30
Calibrating delay loop (skipped), value calculated using timer frequency.. 666.66 BogoMIPS (lpj=3333333)
pid_max: default: 32768 minimum: 301
Mount-cache hash table entries: 1024 (order: 0, 4096 bytes)
Mountpoint-cache hash table entries: 1024 (order: 0, 4096 bytes)
CPU: Testing write buffer coherency: ok
CPU0: thread -1, cpu 0, socket 0, mpidr 80000000
Setting up static identity map for 0x100000 — 0x100058
CPU1: failed to boot: -1
Brought up 1 CPUs
SMP: Total of 1 processors activated (666.66 BogoMIPS).
CPU: All CPU(s) started in SVC mode.
devtmpfs: initialized
VFP support v0.3: implementor 41 architecture 3 part 30 variant 9 rev 4
clocksource: jiffies: mask: 0xffffffff max_cycles: 0xffffffff, max_idle_ns: 19112604462750000 ns
pinctrl core: initialized pinctrl subsystem
NET: Registered protocol family 16
DMA: preallocated 256 KiB pool for atomic coherent allocations
cpuidle: using governor menu
hw-breakpoint: found 5 (+1 reserved) breakpoint and 1 watchpoint registers.
hw-breakpoint: maximum watchpoint size is 4 bytes.
zynq-ocm f800c000.ps7-ocmc: ZYNQ OCM pool: 256 KiB @ 0xcf880000
vgaarb: loaded
SCSI subsystem initialized
usbcore: registered new interface driver usbfs
usbcore: registered new interface driver hub
usbcore: registered new device driver usb
media: Linux media interface: v0.10
Linux video capture interface: v2.00
pps_core: LinuxPPS API ver. 1 registered
pps_core: Software ver. 5.3.6 — Copyright 2005-2007 Rodolfo Giometti
PTP clock support registered
EDAC MC: Ver: 3.0.0
Advanced Linux Sound Architecture Driver Initialized.
clocksource: Switched to clocksource arm_global_timer
NET: Registered protocol family 2
TCP established hash table entries: 2048 (order: 1, 8192 bytes)
TCP bind hash table entries: 2048 (order: 2, 16384 bytes)
TCP: Hash tables configured (established 2048 bind 2048)
UDP hash table entries: 256 (order: 1, 8192 bytes)
UDP-Lite hash table entries: 256 (order: 1, 8192 bytes)
NET: Registered protocol family 1
RPC: Registered named UNIX socket transport module.
RPC: Registered udp transport module.
RPC: Registered tcp transport module.
RPC: Registered tcp NFSv4.1 backchannel transport module.
PCI: CLS 0 bytes, default 64
Trying to unpack rootfs image as initramfs…
rootfs image is not initramfs (no cpio magic); looks like an initrd
Freeing initrd memory: 13516K (ccdcd000 — cdb00000)
hw perfevents: enabled with armv7_cortex_a9 PMU driver, 7 counters available
futex hash table entries: 512 (order: 3, 32768 bytes)
workingset: timestamp_bits=28 max_order=16 bucket_order=0
jffs2: version 2.2. (NAND) (SUMMARY) © 2001-2006 Red Hat, Inc.
io scheduler noop registered
io scheduler deadline registered
io scheduler cfq registered (default)
dma-pl330 f8003000.ps7-dma: Loaded driver for PL330 DMAC-241330
dma-pl330 f8003000.ps7-dma: DBUFF-128x8bytes Num_Chans-8 Num_Peri-4 Num_Events-16
e0000000.serial: ttyPS0 at MMIO 0xe0000000 (irq = 158, base_baud = 6249999) is a xuartps
console [ttyPS0] enabled
xdevcfg f8007000.ps7-dev-cfg: ioremap 0xf8007000 to cf86e000
[drm] Initialized drm 1.1.0 20060810
brd: module loaded
loop: module loaded
CAN device driver interface
gpiod_set_value: invalid GPIO
libphy: MACB_mii_bus: probed
macb e000b000.ethernet eth0: Cadence GEM rev 0x00020118 at 0xe000b000 irq 31 (00:0a:35:00:00:00)
Generic PHY e000b000.etherne:00: attached PHY driver [Generic PHY] (mii_bus:phy_addr=e000b000.etherne:00, irq=-1)
e1000e: Intel(R) PRO/1000 Network Driver — 3.2.6-k
e1000e: Copyright(c) 1999 — 2015 Intel Corporation.
ehci_hcd: USB 2.0 ‘Enhanced’ Host Controller (EHCI) Driver
ehci-pci: EHCI PCI platform driver
usbcore: registered new interface driver usb-storage
mousedev: PS/2 mouse device common for all mice
i2c /dev entries driver
Xilinx Zynq CpuIdle Driver started
sdhci: Secure Digital Host Controller Interface driver
sdhci: Copyright(c) Pierre Ossman
sdhci-pltfm: SDHCI platform and OF driver helper
mmc0: SDHCI controller on e0100000.ps7-sdio [e0100000.ps7-sdio] using ADMA
ledtrig-cpu: registered to indicate activity on CPUs
usbcore: registered new interface driver usbhid
usbhid: USB HID core driver
nand: device found, Manufacturer ID: 0x2c, Chip ID: 0xda
nand: Micron MT29F2G08ABAEAWP
nand: 256 MiB, SLC, erase size: 128 KiB, page size: 2048, OOB size: 64
nand: WARNING: pl35x-nand: the ECC used on your system is too weak compared to the one required by the NAND chip
Bad block table found at page 131008, version 0x01
Bad block table found at page 130944, version 0x01
6 ofpart partitions found on MTD device pl35x-nand
Creating 6 MTD partitions on «pl35x-nand»:
0x000000000000-0x000002800000 : «BOOT.bin-env-dts-kernel»
0x000002800000-0x000004800000 : «ramfs»
0x000004800000-0x000005000000 : «configs»
0x000005000000-0x000006000000 : «reserve»
0x000006000000-0x000008000000 : «ramfs-bak»
0x000008000000-0x000010000000 : «reserve1»
NET: Registered protocol family 10
sit: IPv6 over IPv4 tunneling driver
NET: Registered protocol family 17
can: controller area network core (rev 20120528 abi 9)
NET: Registered protocol family 29
can: raw protocol (rev 20120528)
can: broadcast manager protocol (rev 20120528 t)
can: netlink gateway (rev 20130117) max_hops=1
zynq_pm_ioremap: no compatible node found for ‘xlnx,zynq-ddrc-a05’
zynq_pm_late_init: Unable to map DDRC IO memory.
Registering SWP/SWPB emulation handler
hctosys: unable to open rtc device (rtc0)
ALSA device list:
No soundcards found.
RAMDISK: gzip image found at block 0
EXT4-fs (ram0): couldn’t mount as ext3 due to feature incompatibilities
EXT4-fs (ram0): mounted filesystem without journal. Opts: (null)
VFS: Mounted root (ext4 filesystem) on device 1:0.
devtmpfs: mounted
Freeing unused kernel memory: 1024K (c0a00000 — c0b00000)
EXT4-fs (ram0): re-mounted. Opts: block_validity,delalloc,barrier,user_xattr
random: dd urandom read with 0 bits of entropy available
ubi0: attaching mtd2
ubi0: scanning is finished
ubi0: attached mtd2 (name «configs», size 8 MiB)
ubi0: PEB size: 131072 bytes (128 KiB), LEB size: 126976 bytes
ubi0: min./max. I/O unit sizes: 2048/2048, sub-page size 2048
ubi0: VID header offset: 2048 (aligned 2048), data offset: 4096
ubi0: good PEBs: 64, bad PEBs: 0, corrupted PEBs: 0
ubi0: user volume: 1, internal volumes: 1, max. volumes count: 128
ubi0: max/mean erase counter: 5/2, WL threshold: 4096, image sequence number: 2881768101
ubi0: available PEBs: 0, total reserved PEBs: 64, PEBs reserved for bad PEB handling: 40
ubi0: background thread «ubi_bgt0d» started, PID 708
UBIFS (ubi0:0): background thread «ubifs_bgt0_0» started, PID 711
UBIFS (ubi0:0): recovery needed
UBIFS (ubi0:0): recovery completed
UBIFS (ubi0:0): UBIFS: mounted UBI device 0, volume 0, name «configs»
UBIFS (ubi0:0): LEB size: 126976 bytes (124 KiB), min./max. I/O unit sizes: 2048 bytes/2048 bytes
UBIFS (ubi0:0): FS size: 1396736 bytes (1 MiB, 11 LEBs), journal size 888833 bytes (0 MiB, 5 LEBs)
UBIFS (ubi0:0): reserved for root: 65970 bytes (64 KiB)
UBIFS (ubi0:0): media format: w4/r0 (latest is w4/r0), UUID 2AF94D23-0760-4801-8C27-532C11A81FC1, small LPT model
ubi1: attaching mtd5
ubi1: scanning is finished
ubi1: attached mtd5 (name «reserve1», size 128 MiB)
ubi1: PEB size: 131072 bytes (128 KiB), LEB size: 126976 bytes
ubi1: min./max. I/O unit sizes: 2048/2048, sub-page size 2048
ubi1: VID header offset: 2048 (aligned 2048), data offset: 4096
ubi1: good PEBs: 1020, bad PEBs: 4, corrupted PEBs: 0
ubi1: user volume: 1, internal volumes: 1, max. volumes count: 128
ubi1: max/mean erase counter: 177/36, WL threshold: 4096, image sequence number: 3563076859
ubi1: available PEBs: 0, total reserved PEBs: 1020, PEBs reserved for bad PEB handling: 36
ubi1: background thread «ubi_bgt1d» started, PID 720
UBIFS (ubi1:0): background thread «ubifs_bgt1_0» started, PID 723
UBIFS (ubi1:0): recovery needed
UBIFS (ubi1:0): recovery completed
UBIFS (ubi1:0): UBIFS: mounted UBI device 1, volume 0, name «reserve1»
UBIFS (ubi1:0): LEB size: 126976 bytes (124 KiB), min./max. I/O unit sizes: 2048 bytes/2048 bytes
UBIFS (ubi1:0): FS size: 123039744 bytes (117 MiB, 969 LEBs), journal size 6221824 bytes (5 MiB, 49 LEBs)
UBIFS (ubi1:0): reserved for root: 4952683 bytes (4836 KiB)
UBIFS (ubi1:0): media format: w4/r0 (latest is w4/r0), UUID A21581E4-693A-4BBF-A66A-FCE5ACD2EF7F, small LPT model
IPv6: ADDRCONF(NETDEV_UP): eth0: link is not ready
IPv6: ADDRCONF(NETDEV_UP): eth0: link is not ready
macb e000b000.ethernet eth0: unable to generate target frequency: 25000000 Hz
macb e000b000.ethernet eth0: link up (100/Full)
IPv6: ADDRCONF(NETDEV_CHANGE): eth0: link becomes ready
random: nonblocking pool is initialized
[2020/08/14 09:02:47] INFO: Detected 256 Mb of RAM
[2020/08/14 09:02:47] INFO: Switching to manual fan control (30 %)
[2020/08/14 09:02:47] INFO: Checking fans
[2020/08/14 09:02:51] INFO: fan[0] — OK
[2020/08/14 09:02:51] INFO: fan[1] — OK
[2020/08/14 09:02:51] INFO: fan[2] — OK
[2020/08/14 09:02:51] INFO: fan[3] — OK
[2020/08/14 09:02:57] INFO: Power ON
[2020/08/14 09:02:59] INFO: Starting FPGA queue
[2020/08/14 09:02:59] INFO: Initializing hash boards
[2020/08/14 09:02:59] INFO: chain[2] — Initializing
[2020/08/14 09:02:59] INFO: chain[1] — Initializing
[2020/08/14 09:02:59] INFO: chain[0] — Initializing
[2020/08/14 09:03:12] ERROR: src/chip139x.c:1044 chain[2] — Failed to receive chip replies
[2020/08/14 09:03:13] ERROR: src/chip139x.c:1044 chain[2] — Failed to receive chip replies
[2020/08/14 09:03:14] ERROR: src/chip139x.c:1044 chain[2] — Failed to receive chip replies
[2020/08/14 09:03:14] WARN: chain[2] — 0 of 44 chips detected
[2020/08/14 09:03:14] INFO: Shutting down the miner
[2020/08/14 09:03:14] INFO: Stopping FPGA queue
[2020/08/14 09:03:14] INFO: chain[0] — Shutting down the chain
[2020/08/14 09:03:15] INFO: chain[1] — Shutting down the chain
[2020/08/14 09:03:15] INFO: chain[1] — 44 chips detected
[2020/08/14 09:03:15] INFO: chain[2] — Shutting down the chain
[2020/08/14 09:03:16] INFO: Power OFF
[2020/08/14 09:03:25] INFO: Detected 256 Mb of RAM
[2020/08/14 09:03:25] INFO: Switching to manual fan control (30 %)
[2020/08/14 09:03:25] INFO: Checking fans
[2020/08/14 09:03:26] INFO: fan[0] — OK
[2020/08/14 09:03:26] INFO: fan[1] — OK
[2020/08/14 09:03:26] INFO: fan[2] — OK
[2020/08/14 09:03:26] INFO: fan[3] — OK
[2020/08/14 09:03:32] INFO: Power ON
[2020/08/14 09:03:34] INFO: Starting FPGA queue
[2020/08/14 09:03:34] INFO: Initializing hash boards
[2020/08/14 09:03:34] INFO: chain[2] — Initializing
[2020/08/14 09:03:34] INFO: chain[1] — Initializing
[2020/08/14 09:03:34] INFO: chain[0] — Initializing
[2020/08/14 09:03:48] ERROR: src/chip139x.c:1044 chain[2] — Failed to receive chip replies
[2020/08/14 09:03:49] ERROR: src/chip139x.c:1044 chain[2] — Failed to receive chip replies
[2020/08/14 09:03:50] ERROR: src/chip139x.c:1044 chain[2] — Failed to receive chip replies
[2020/08/14 09:03:50] WARN: chain[2] — 0 of 44 chips detected
[2020/08/14 09:03:51] INFO: chain[1] — 44 chips detected
[2020/08/14 09:03:52] INFO: chain[0] — 44 chips detected
[2020/08/14 09:03:59] ERROR: src/chip139x.c:1044 chain[2] — Failed to receive chip replies
[2020/08/14 09:04:00] ERROR: src/chip139x.c:1044 chain[2] — Failed to receive chip replies
[2020/08/14 09:04:01] ERROR: src/chip139x.c:1044 chain[2] — Failed to receive chip replies
[2020/08/14 09:04:01] WARN: chain[2] — 0 of 44 chips detected
[2020/08/14 09:04:11] ERROR: src/chip139x.c:1044 chain[2] — Failed to receive chip replies
[2020/08/14 09:04:12] ERROR: src/chip139x.c:1044 chain[2] — Failed to receive chip replies
[2020/08/14 09:04:13] ERROR: src/chip139x.c:1044 chain[2] — Failed to receive chip replies
[2020/08/14 09:04:13] WARN: chain[2] — 0 of 44 chips detected
[2020/08/14 09:04:13] ERROR: driver-btm-chain.c:488 chain[2] — Failed to detect ASIC chips
[2020/08/14 09:04:13] INFO: chain[2] — Shutting down the chain
[2020/08/14 09:04:13] ERROR: driver-btm-base.c:361 chain[2] — Initialization failed
[2020/08/14 09:04:17] INFO: Start-up temperature is 26 C (min -15 C)
[2020/08/14 09:04:17] INFO: Switching to manual fan control (100 %)
[2020/08/14 09:04:17] INFO: Changing voltage from 19500 to 18500 mV gradually
[2020/08/14 09:04:47] INFO: Raising freq from 50 to 500 Mhz gradually
[2020/08/14 09:04:56] INFO: Switching to automatic fan control (75 C)
[2020/08/14 09:04:56] INFO: Start mining!
[2020/08/17 17:29:15] INFO: Changing voltage from 19000 to 18800 mV gradually
[2020/08/17 17:29:38] INFO: Changing voltage from 18800 to 18600 mV gradually
[2020/08/17 17:30:01] INFO: Changing voltage from 18600 to 18400 mV gradually
[2020/08/17 17:30:24] INFO: Changing voltage from 18400 to 18200 mV gradually
[2020/08/17 17:30:46] INFO: Changing voltage from 18200 to 18000 mV gradually
[2020/08/17 17:31:06] INFO: Shutting down the miner
[2020/08/17 17:31:06] INFO: Setting freq to 50 Mhz gradually
[2020/08/17 17:31:11] INFO: Stopping FPGA queue
[2020/08/17 17:31:11] INFO: chain[0] — Shutting down the chain
[2020/08/17 17:31:18] INFO: Detected 256 Mb of RAM
[2020/08/17 17:31:18] INFO: Switching to manual fan control (30 %)
[2020/08/17 17:31:18] INFO: Checking fans
[2020/08/17 17:31:19] INFO: fan[0] — OK
[2020/08/17 17:31:19] INFO: fan[1] — OK
[2020/08/17 17:31:19] INFO: fan[2] — OK
[2020/08/17 17:31:19] INFO: fan[3] — OK
[2020/08/17 17:31:25] INFO: Power ON
[2020/08/17 17:31:27] INFO: Starting FPGA queue
[2020/08/17 17:31:27] INFO: Initializing hash boards
[2020/08/17 17:31:27] INFO: chain[2] — Initializing
[2020/08/17 17:31:27] INFO: chain[1] — Initializing
[2020/08/17 17:31:27] INFO: chain[0] — Initializing
[2020/08/17 17:31:42] WARN: chain[2] — 24 of 44 chips detected
[2020/08/17 17:31:43] ERROR: src/chip139x.c:1044 chain[1] — Failed to receive chip replies
[2020/08/17 17:31:44] ERROR: src/chip139x.c:1044 chain[1] — Failed to receive chip replies
[2020/08/17 17:31:45] ERROR: src/chip139x.c:1044 chain[1] — Failed to receive chip replies
[2020/08/17 17:31:45] WARN: chain[1] — 0 of 44 chips detected
[2020/08/17 17:31:46] INFO: chain[0] — 44 chips detected
[2020/08/17 17:31:54] WARN: chain[2] — 24 of 44 chips detected
[2020/08/17 17:31:57] WARN: chain[1] — 20 of 44 chips detected
[2020/08/17 17:32:05] WARN: chain[2] — 24 of 44 chips detected
[2020/08/17 17:32:05] ERROR: driver-btm-chain.c:488 chain[2] — Failed to detect ASIC chips
[2020/08/17 17:32:05] INFO: chain[2] — Shutting down the chain
[2020/08/17 17:32:06] ERROR: driver-btm-base.c:361 chain[2] — Initialization failed
[2020/08/17 17:32:08] WARN: chain[1] — 20 of 44 chips detected
[2020/08/17 17:32:08] ERROR: driver-btm-chain.c:488 chain[1] — Failed to detect ASIC chips
[2020/08/17 17:32:08] INFO: chain[1] — Shutting down the chain
[2020/08/17 17:32:09] ERROR: driver-btm-base.c:361 chain[1] — Initialization failed
[2020/08/17 17:32:12] INFO: Start-up temperature is 21 C (min -15 C)
[2020/08/17 17:32:12] INFO: Switching to manual fan control (100 %)
[2020/08/17 17:32:12] INFO: Changing voltage from 19500 to 19000 mV gradually
[2020/08/17 17:32:36] INFO: Raising freq from 50 to 700 Mhz gradually
[2020/08/17 17:32:49] INFO: Switching to manual fan control (95 %)
[2020/08/17 17:32:49] INFO: Start mining!
[2020/08/17 17:52:42] INFO: Detected 256 Mb of RAM
[2020/08/17 17:52:42] INFO: Switching to manual fan control (30 %)
[2020/08/17 17:52:42] INFO: Checking fans
[2020/08/17 17:52:43] INFO: fan[0] — OK
[2020/08/17 17:52:43] INFO: fan[1] — OK
[2020/08/17 17:52:43] INFO: fan[2] — OK
[2020/08/17 17:52:43] INFO: fan[3] — OK
[2020/08/17 17:52:49] INFO: Power ON
[2020/08/17 17:52:51] INFO: Starting FPGA queue
[2020/08/17 17:52:51] INFO: Initializing hash boards
[2020/08/17 17:52:51] INFO: chain[2] — Initializing
[2020/08/17 17:52:51] INFO: chain[1] — Initializing
[2020/08/17 17:52:51] INFO: chain[0] — Initializing
[2020/08/17 17:53:06] WARN: chain[2] — 24 of 44 chips detected
[2020/08/17 17:53:07] ERROR: src/chip139x.c:1044 chain[1] — Failed to receive chip replies
[2020/08/17 17:53:08] ERROR: src/chip139x.c:1044 chain[1] — Failed to receive chip replies
[2020/08/17 17:53:09] ERROR: src/chip139x.c:1044 chain[1] — Failed to receive chip replies
[2020/08/17 17:53:09] WARN: chain[1] — 0 of 44 chips detected
[2020/08/17 17:53:10] INFO: chain[0] — 44 chips detected
[2020/08/17 17:53:18] WARN: chain[2] — 24 of 44 chips detected
[2020/08/17 17:53:19] ERROR: src/chip139x.c:1044 chain[1] — Failed to receive chip replies
[2020/08/17 17:53:20] ERROR: src/chip139x.c:1044 chain[1] — Failed to receive chip replies
[2020/08/17 17:53:21] ERROR: src/chip139x.c:1044 chain[1] — Failed to receive chip replies
[2020/08/17 17:53:21] WARN: chain[1] — 0 of 44 chips detected
[2020/08/17 17:53:29] WARN: chain[2] — 24 of 44 chips detected
[2020/08/17 17:53:29] ERROR: driver-btm-chain.c:488 chain[2] — Failed to detect ASIC chips
[2020/08/17 17:53:29] INFO: chain[2] — Shutting down the chain
[2020/08/17 17:53:30] ERROR: driver-btm-base.c:361 chain[2] — Initialization failed
[2020/08/17 17:53:30] ERROR: src/chip139x.c:1044 chain[1] — Failed to receive chip replies
[2020/08/17 17:53:31] ERROR: src/chip139x.c:1044 chain[1] — Failed to receive chip replies
[2020/08/17 17:53:32] ERROR: src/chip139x.c:1044 chain[1] — Failed to receive chip replies
[2020/08/17 17:53:32] WARN: chain[1] — 0 of 44 chips detected
[2020/08/17 17:53:32] ERROR: driver-btm-chain.c:488 chain[1] — Failed to detect ASIC chips
[2020/08/17 17:53:32] INFO: chain[1] — Shutting down the chain
[2020/08/17 17:53:33] ERROR: driver-btm-base.c:361 chain[1] — Initialization failed
[2020/08/17 17:53:36] INFO: Start-up temperature is 20 C (min -15 C)
[2020/08/17 17:53:36] INFO: Switching to manual fan control (100 %)
[2020/08/17 17:53:36] INFO: Changing voltage from 19500 to 19000 mV gradually
[2020/08/17 17:54:00] INFO: Raising freq from 50 to 700 Mhz gradually
[2020/08/17 17:54:13] INFO: Switching to manual fan control (90 %)
[2020/08/17 17:54:13] INFO: Start mining!
@rover_w — your computer can try to «boot» from many sources:
- 3.5-inch diskette
- CD/DVD
- USB memory-stick
- disk-drive
- network, via your Ethernet cable
In a «business-networking» environment, it is possible to have a «boot-server» computer somewhere on the internal network. Your computer has failed to boot from #1 through #4, inclusive, and is configured to try to connect, over Ethernet, to that boot-server, in order to load Windows through the network.
So, if Windows is not loaded onto your hard-disk drive, or your SSD, you need to install Windows.
Hint: disconnect any disk-drive, and then restart the computer, to see if you get «press <blah> to enter BIOS SETUP».
Hint: with the computer powered-off, hold-down any keyboard key, and then power-on the computer, while still holding-down that key. You might get «keyboard error. Press <blah> to enter BIOS SETUP».
HInt: replacing the CMOS battery requires that you enter BIOS SETUP, to set valid date/time values.
Posted by spicehead-g1ckw 2018-11-17T01:14:51Z
I removed the cmos battery to reset BIOS so I could use keyboard on boot and enter bios. I then got an error called 161 Real Time Clock Power Loss. My computer is an hp compaq 6200 mt pro. Broken for 1 weeks. Also, I can’t use my keyboard to get out of it because of a certain bios setting. Anyone have any suggestions? I need a way to fix my life which is on my computer. I’ve also replaced cmos battery and tried ps2 adapters.
attach_file
Attachment
image.jpg
1.53 MB
5 Replies
-

Have you tried resetting the BIOS/CMOS after replacing the battery? Also, you may have done it, but make sure that the polarity of the battery is correct.
With the reset, it may be a jumper or a button to press.
Was this post helpful?
thumb_up
thumb_down
-
-
that’s a normal error after a bios reset, it’s only that the computer lost is time.
not sure what you mean by » Also, I can’t use my keyboard to get out of it because of a certain bios setting.»
Was this post helpful?
thumb_up
thumb_down
-
We have some 6200s which have had their CMOS batteries die, and while they were dying but not completely dead they wouldn’t boot past the Intel PXE client and couldn’t even get into the BIOS. Did you replace with a new battery or just the old one? What bios setting are you talking about? Try removing power, then hitting the power button until all the LEDs turn off to discharge any juice left in the capacitors so you can boot completely fresh.
Was this post helpful?
thumb_up
thumb_down
-
Brand Representative for HP
ghost chili
#####
As said in the thread it is a normal message
after BIOS battery removal.The screen picture also says the BIOS has been indeed reset. So the intended
goal has been achieved.
It also says press F1 to boot.Once booted the time can be set either manually or automatically.
Please clarify as I don’t understand what the real issue is.
#####
1 found this helpful
thumb_up
thumb_down

Вот как это выглядело:  Когда я увидел данное сообщение, то сразу же решил, что села батарейка Биоса. Батарейку я тут же заменил на новую, вошел в BIOS и выставил загрузку исходных параметров (пункт “Load Optimized Default”). Затем установил правильное системное время и дату – сохранил изменения и перезагрузил компьютер. Но ошибка так никуда и не исчезла.
Но, прежде чем приступить к выполнению описанных действий, я решил сначала почистить контакты планок оперативной памяти обычной стеркой. Это делается, чтобы стереть налет окисления с оперативки, тем самым восстановив контакт между ОЗУ и материнской платой:![]() Кстати, окисленные контакты видны не вооруженным глазом. На фото ниже – справа почищено, а слева нет. Как говорится: почувствуйте разницу
Кстати, окисленные контакты видны не вооруженным глазом. На фото ниже – справа почищено, а слева нет. Как говорится: почувствуйте разницу 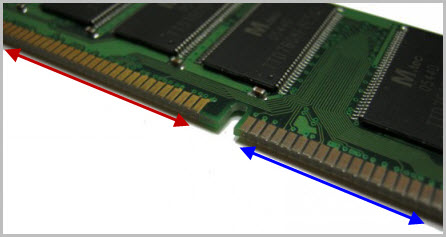 И что бы вы думали? После того, как я это сделал и вставил оперативную память на место, а затем включил компьютер – ошибка исчезла и началась загрузка Windows!
CMOS Checksum Bad/Error — Defaults loaded. Что это значит?
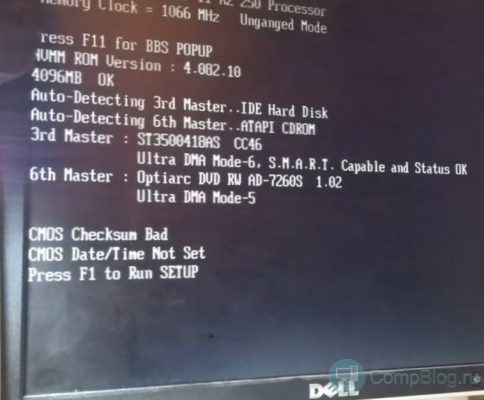
CMOS Checksum Bad / Error — Defaults loaded. CMOS RESET.
162 — System Options Not Set and 161- Real- Time clock Power loss
I got two Desktops HP6300 (i5) giving same error messages. i have changed the settings to factory defaults and replace the CMOS Battery.
Once you Load default Bios Settings and replace the battery it works for a day and does not gives this error at start up. and it start popping up next day . so Basically the roor pops up when ever the date change.
Hope anyone shed some light on this matter.


Popular Topics in HP Hardware
2 Replies

gilnov 
Have you updated to the latest BIOS? If already on latest version of BIOS, try downgrading. Sometimes, older BIOS is better.

Brand Representative for HP
Hello rizviseedin, thank you very much for your inquiry and for your helpful screen shot. For error «162 — System Options Not Set» an HP document addressing the issue indicates, «This error message occurs when the hardware is modified and the System BIOS options are forced to change.» See the instructions to resolve the issue here Opens a new window .
For error 161- Real- Time clock Power loss a user has posted instructions to address the issue here Opens a new window . If your issue remains unresolved, please let us know. Since this is your first post, a warm welcome to Spiceworks.
- local_offer Tagged Items
- rizviseedin
 rizviseedin
This topic has been locked by an administrator and is no longer open for commenting.
To continue this discussion, please ask a new question.
Read these next.
One PC unable to scan to folder.
Hopefully one of you has come across this before. I have a customer with two PCs that scan to folder. One cannot seem to get the scans while the other works completely fine. The one with the problem is the main computer they use. I actually set up the.
run batchfile at logon from locked session
I have a GPO that runs a .bat file which installs a program at startup. And this works perfectly fine. As long as the user restarts their computers. The problem is that, I need to find a way to deploy this without having to restart the computer. I kno.
Snap! — 3D Printed Rocket Launch, MAR10 Day, Proprietary Ink, Employment Games
Your daily dose of tech news, in brief. Welcome to the Snap! Flashback: March 10, 2000: Dot-Com Bubble Peaks (Read more HERE.) Bonus Flashback: March 10, 2006: Mars Reconnaissance Orbiter Reaches Red Planet (Read more HERE.) You need t.
Password Issue
I have a domain that i set up all users on. I have staff that also have laptops that they log in remotely from. Some of them are reporting that the password on the laptop differs from the domain password. Is this because the laptop needs this account to g.
What are your opinions on this job opportunity?
Currently, work at a small-medium business as an internal IT jr system administrator. I started casually applying around as there is little room for position growth here. I ended up getting a job offer at a small MSP, they are around 10 or so techs, and t.
162 system options not set
«HP recommends the following resolutions for Sorry for the inconvenience, but Windows Failed to Start Successfully error messages referring to 162 — System Options not set that may occur before Windows XP or Windows 2000 is started.
This error message occurs when the hardware is modified and the System BIOS options are forced to change.
Step 1: Reset the default BIOS
Use the following steps to reset the default BIOS settings.
1. Press and hold the Power button for 5 Seconds to turn off the PC.
2. Press and hold the F10 key while you press the Power button to turn on the PC. Release the F10 key after text is displayed on the screen of the PC.
3. After the BIOS Setup Utility is displayed, press the F9 key to select Setup Defaults .
4. Press the F10 key to select Save and Exit .
Step 2: Schedule a repair
If the preceeding method does not resolve the error, please contact HP to schedule a repair.»
162 system options not set что за ошибка
Symptom
162-System options not set.
Cause
- The configuration is incorrect.
- The system configuration has changed after the last boot (for example, the addition of a hard drive).
- A loss of power to the real-time clock has occurred (the real-time clock loses power if the onboard battery is not functioning correctly).
Action
- Press the F1 key to enter HPE UEFI System Utilities.
- Run the server setup utility to change the configuration.
For more information, see «HPE UEFI System Utilities» in the HPE ProLiant Gen9 Troubleshooting Guide, Volume I on the Hewlett Packard Enterprise website.
For more information, see the server maintenance and service guide on the Hewlett Packard Enterprise website.